Paleo Chocolate Cake (Gluten & Dairy Free)
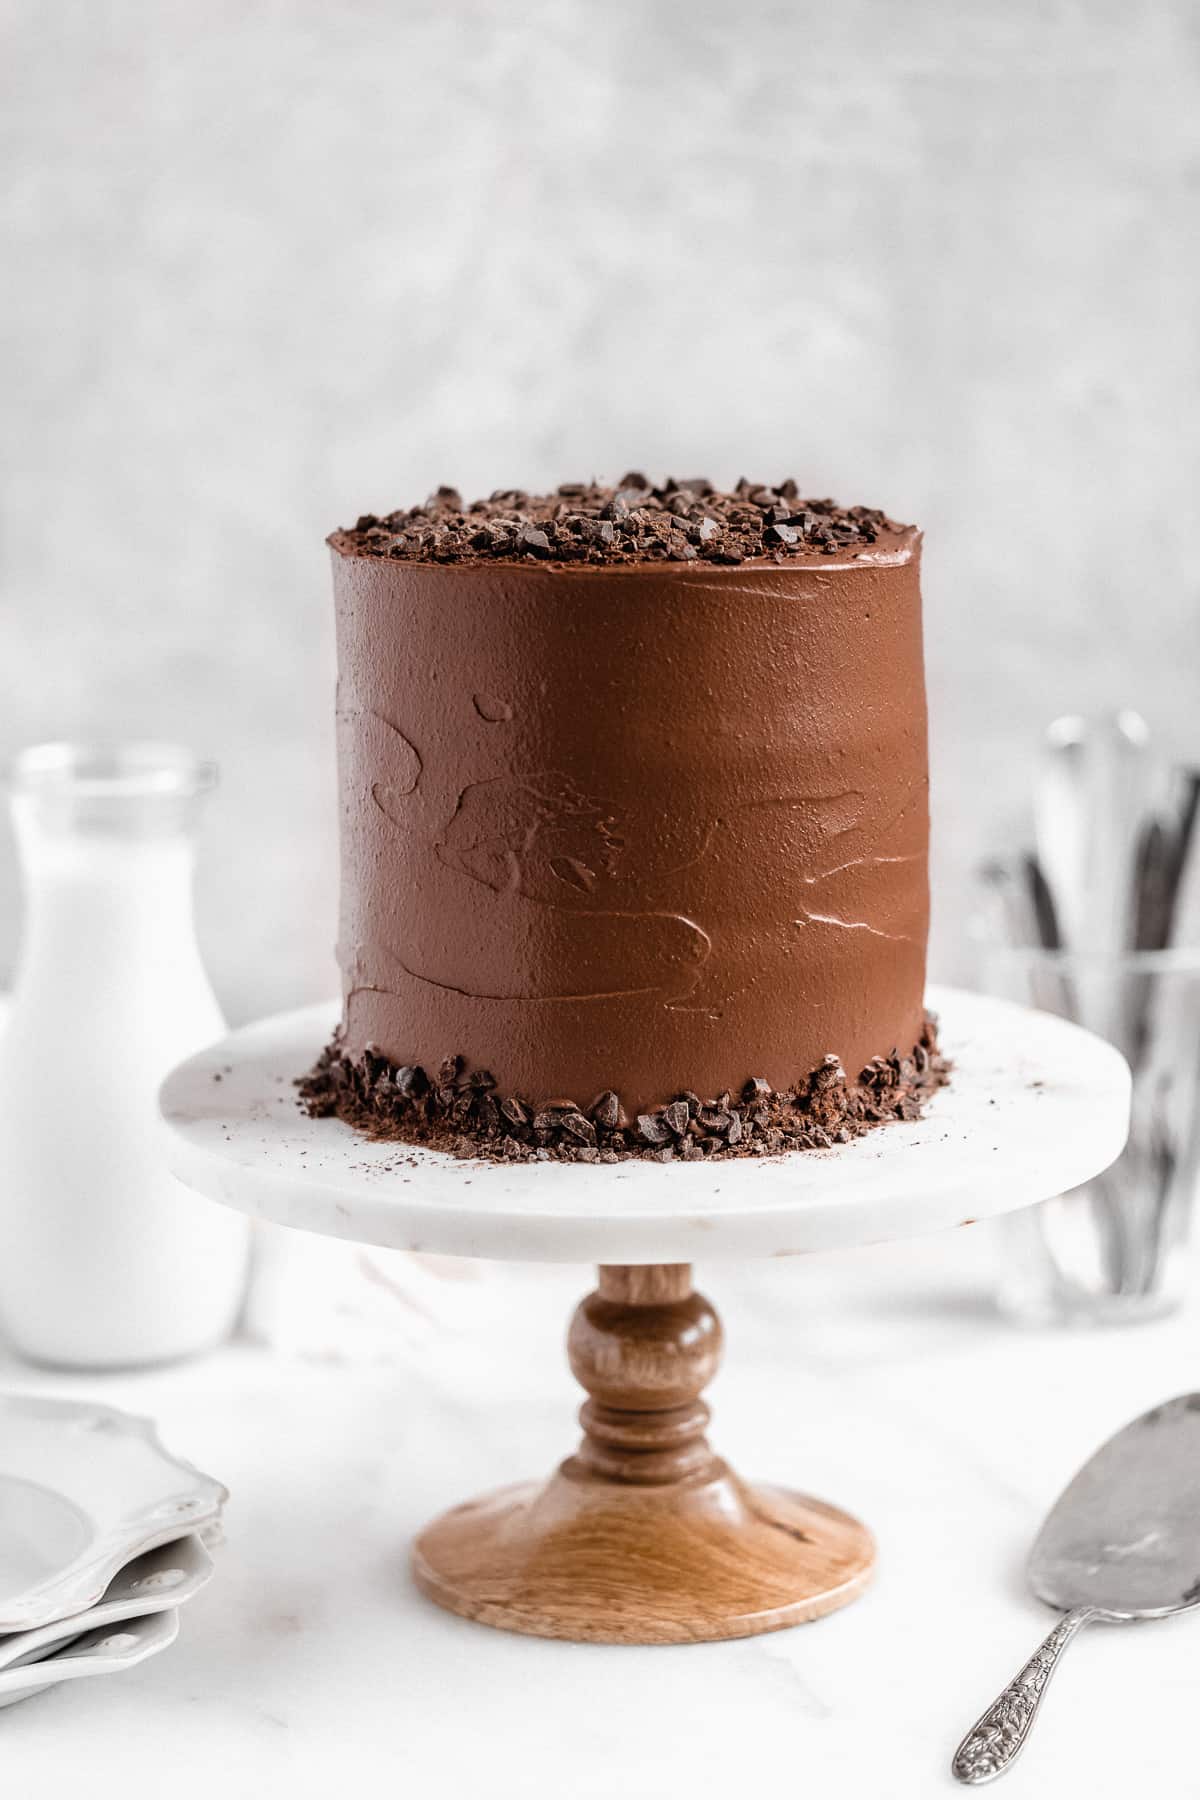
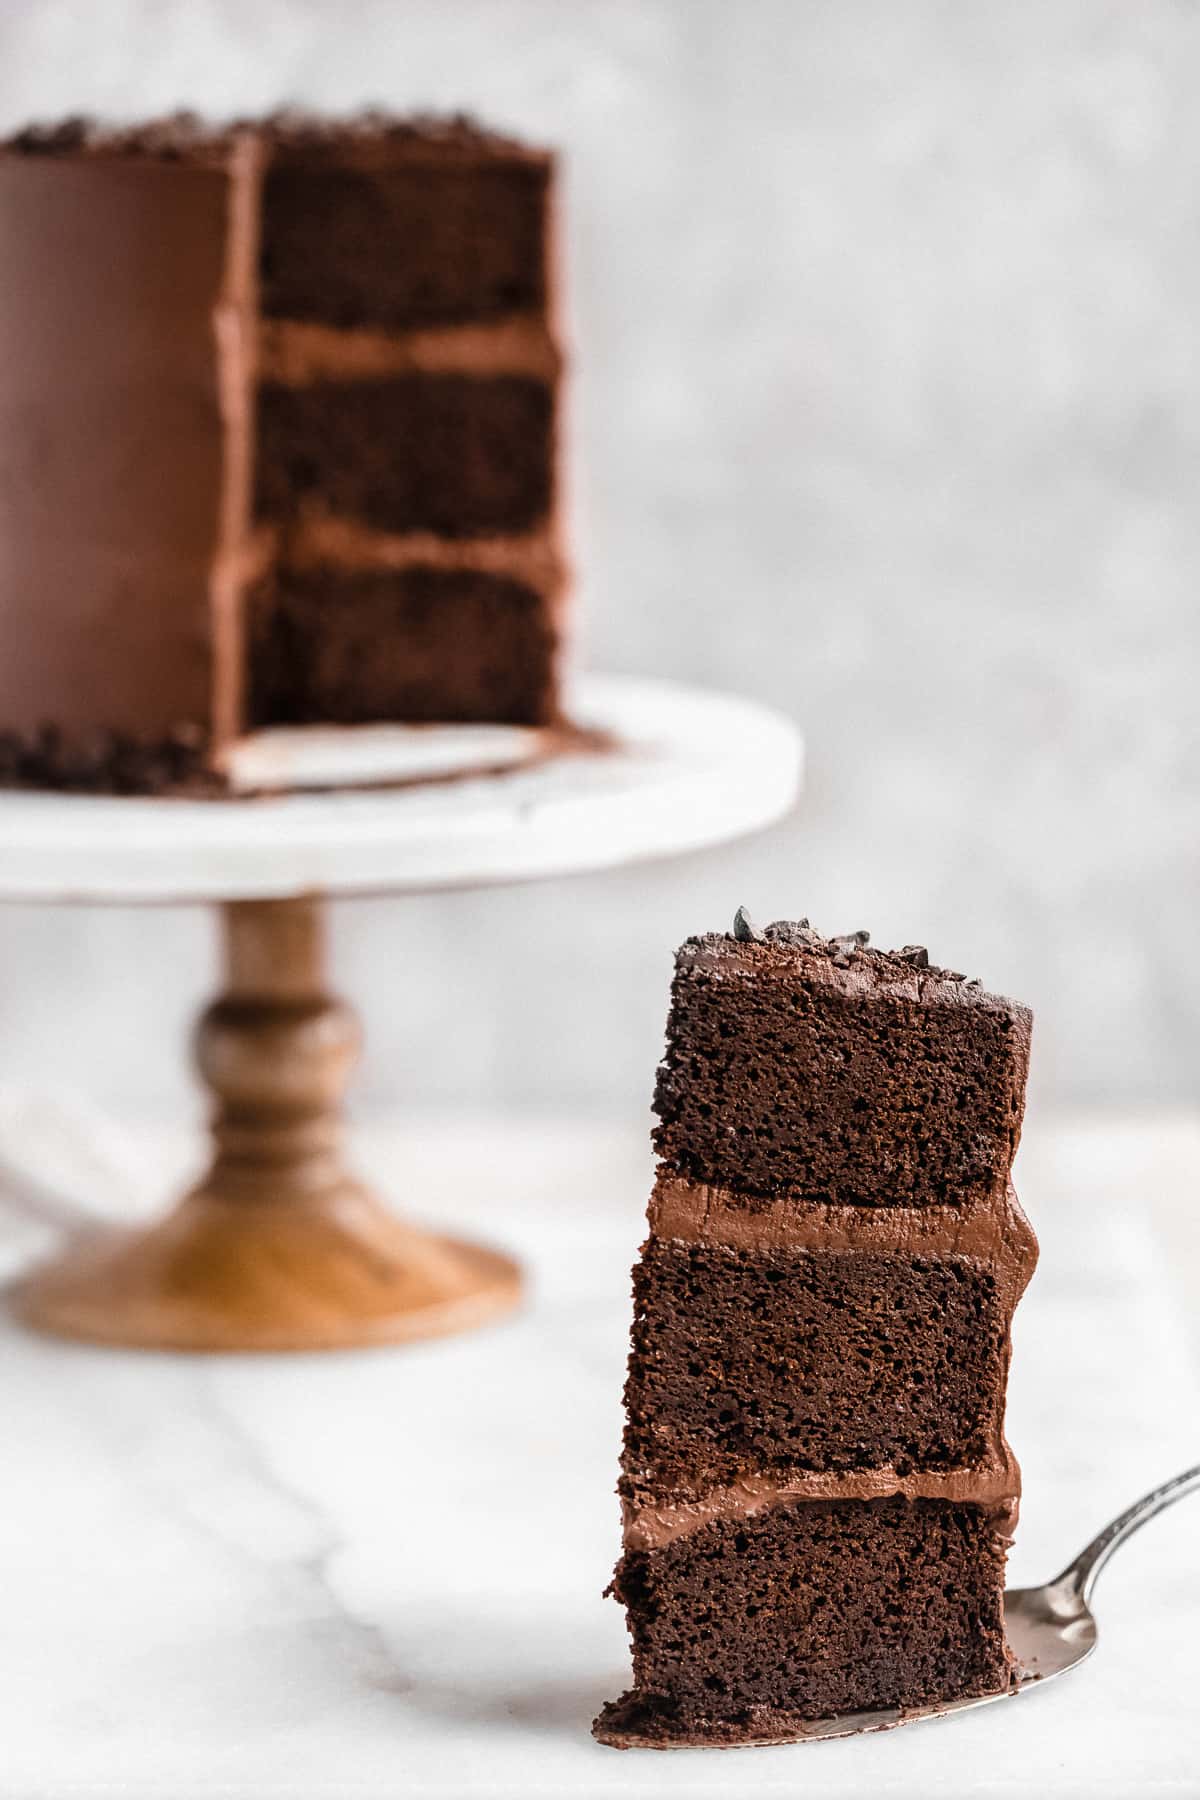
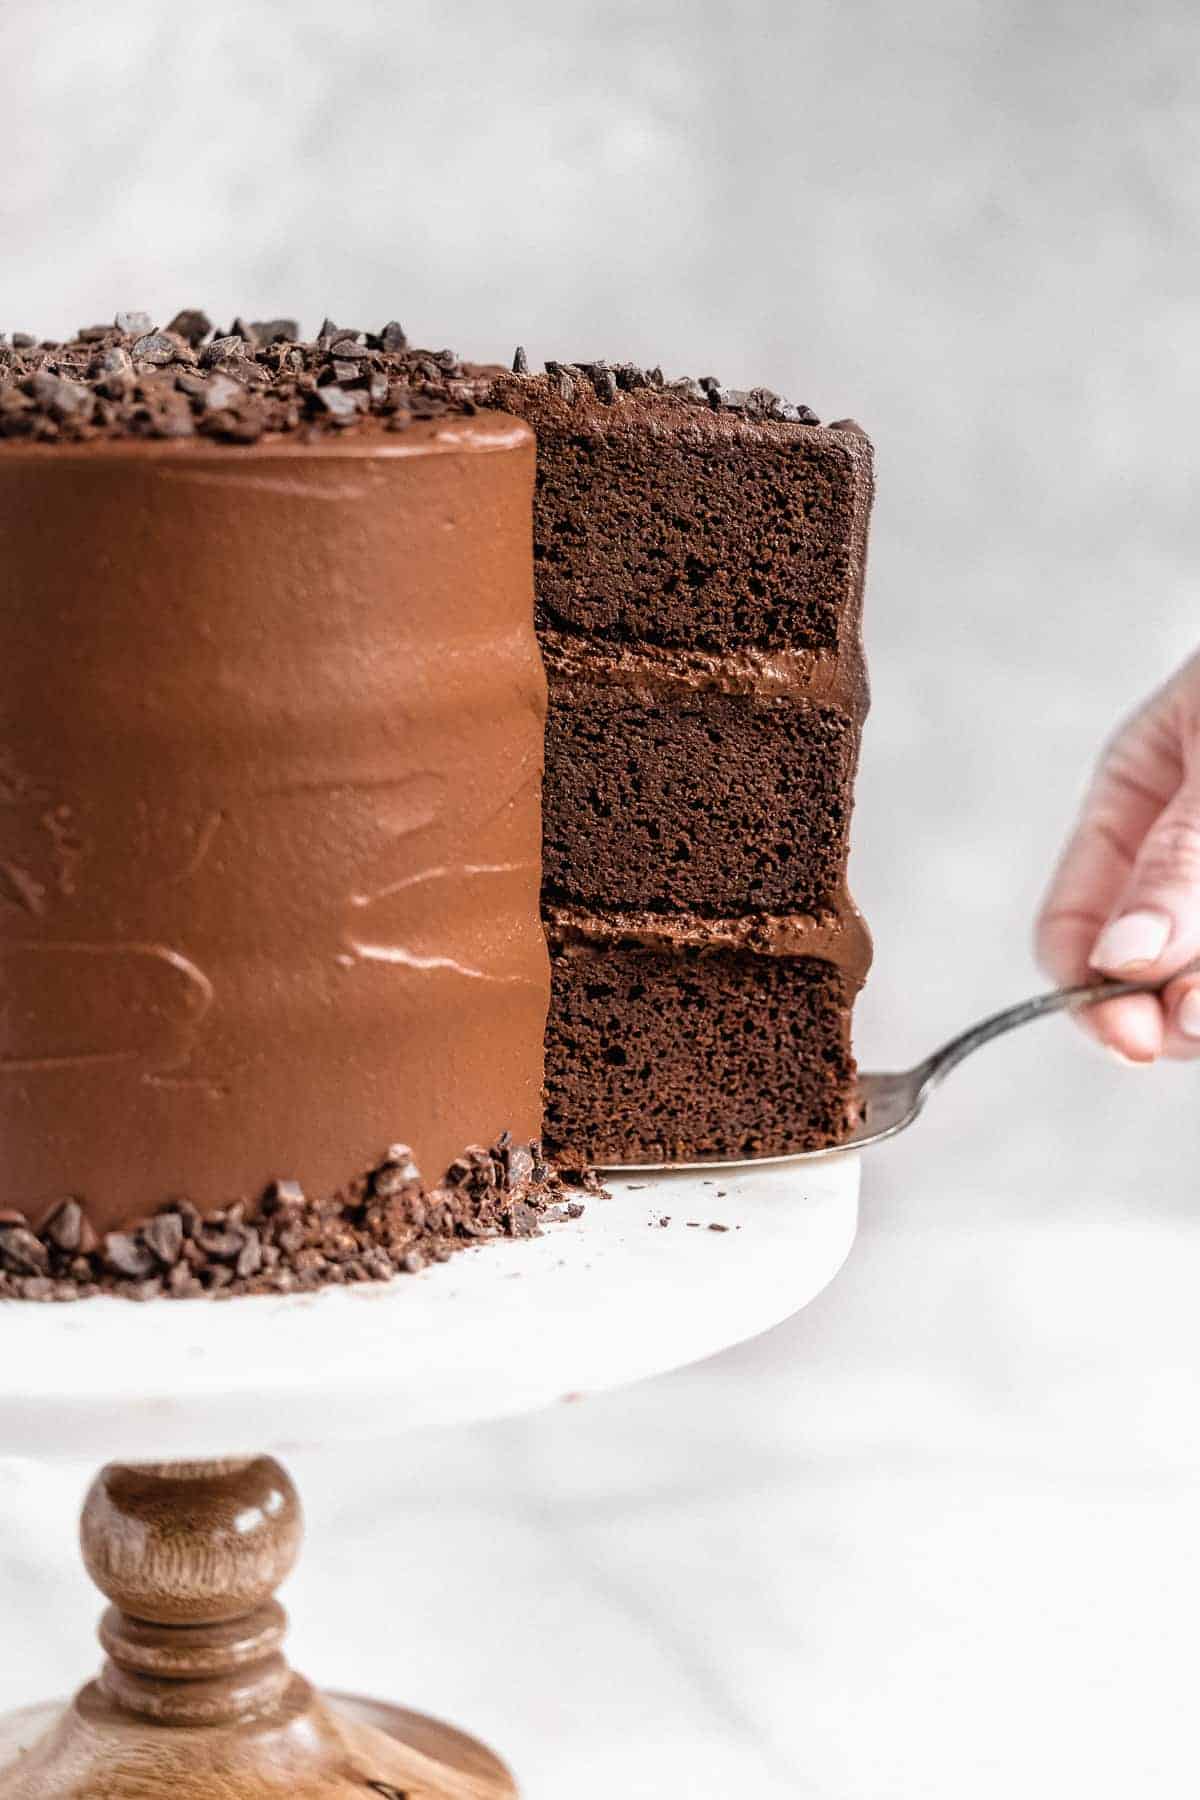
If you've been on the hunt for the perfect almond flour chocolate cake, look no further. This cake has double the chocolate with a rich and moist chocolate cake and layers of decadent chocolate ganache-style icing. It's perfect for any gathering, birthday, or even just because!
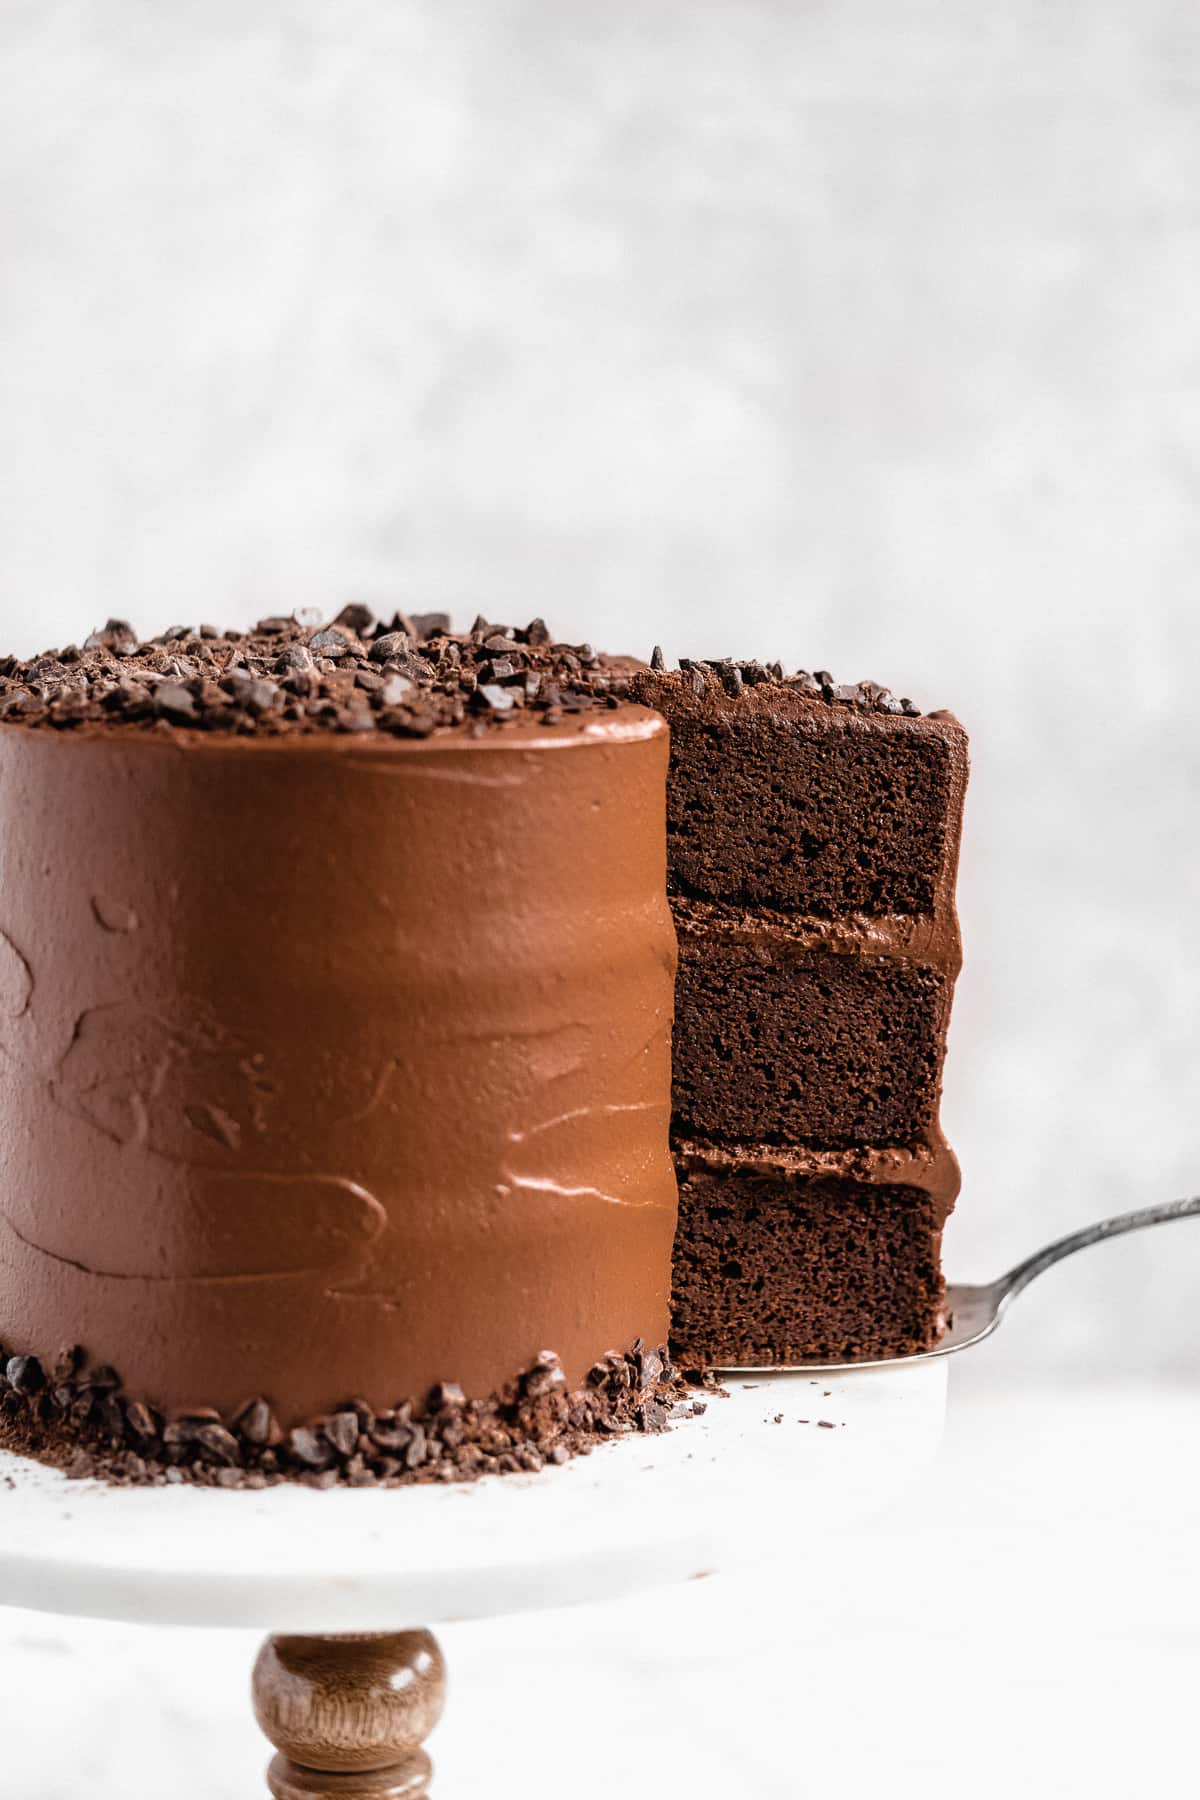
This layered cake is one of my favorites. With intense spongy moist chocolate cake layers and a light and subtle chocolate frosting that you could eat by the spoonful, it just may be the best chocolate cake.
It's a rich chocolate cake without the heaviness of a traditional indulgent Matilda-style chocolate cake. I've made it time and time again and it's always a crowd pleaser. And nobody even knew it was a gluten-free cake!
Jump to:
- Why You Will Love this Paleo Chocolate Cake!
- Dairy Free Gluten Free Chocolate Cake Ingredients
- How to Make Gluten Free Chocolate Cake
- How to Make Paleo Chocolate Cake Frosting
- Gluten Free Chocolate Cake Recipe Tips
- Gluten and Dairy Free Chocolate Cake Recipe Variations
- How to Slice Paleo Chocolate Cake
- How to Store Gluten Free Dairy Free Chocolate Cake
- Dairy Free Gluten Free Chocolate Cake Recipe FAQs
- Recipe
- Reviews
Why You Will Love this Paleo Chocolate Cake!
- Because chocolate. Who doesn't love chocolate cake? It's the perfect celebratory baked treat for any and all chocolate lovers.
- It's made gluten free and dairy free! You wouldn't even know it though 😉
- Easy one bowl style cake recipe. Everything can be mixed in one bowl and then poured into cake pans.
- 2 ingredient icing. Enough said.
- It's super versatile. Want to make it a 2 layer cake? A sheet cake? You can do that too!
Dairy Free Gluten Free Chocolate Cake Ingredients
Here are some ingredients notes and substitutions. For a full list of ingredients, check out the recipe card below.
- Eggs - Use room temperature large eggs for this recipe for best results. At this time I do not recommend an egg substitution.
- Coconut sugar - Granulated coconut sugar adds a rich sweet taste to the cake. Substitute light brown sugar if needed.
- Coconut oil - Make sure your coconut oil is melted and cooled down to room temperature before mixing it in to the batter. Swap with vegetable oil or avocado oil if needed.
- Coconut milk + Apple cider vinegar - We use a "vegan buttermilk" in this recipe which is comprised of full-fat coconut milk and apple cider vinegar. Don't worry though, you wont' taste the vinegar at all. It is simply used so that the baking soda and powder have a acid to react with and therefore give the cake a super fluffy texture.
- Almond flour - This almond flour chocolate cake has an almond flour base (duh!). I do not recommend substituting with coconut flour or any other gluten free flour.
- Tapioca flour - A bit of tapioca flour helps reduce the density as almond flour can sometimes be heavy. Arrowroot starch will also work here.
- Cacao powder - Cacao powder is what provides that deep chocolate-y flavor we know and love. You can replace this with cocoa powder if desired.
- Baking soda + Baking powder - A combination of baking powder and soda is used to ensure this chocolate cake rises perfectly.
- Hot Coffee - No, your cake will not taste like coffee. Hot coffee will "poof" the cacao powder. I have found this to be the key in any chocolate cake so I wouldn't leave this out! You can substitute hot water if needed.
- Coconut cream - A can is needed for the chocolate ganache frosting. Make sure to use coconut cream and not coconut milk.
- Dark Chocolate - Any type of chocolate will work but I love to use a rich deep chocolate in the frosting to give it that chocolate flavor. These are my go-to chocolate chips for baking and they're dairy free and vegan too.
How to Make Gluten Free Chocolate Cake
Below is the general process of making this chocolate almond flour cake. For specific instructions, view the recipe card below.
Step 1 : Mix the wet ingredients. Start by beating the eggs, coconut sugar, coconut oil, and vanilla extract in a large mixing bowl with a hand mixer or in the bowl of a stand mixer. Once well combined, add the coconut milk and apple cider vinegar and mix again.
Step 2 : Add the dry ingredients. Slowly fold in the almond flour, tapioca flour, cacao powder, baking powder, and baking soda until no flour clumps remain. The batter will be fairly thick at this point.
Step 3 : Stir in the hot coffee. Do this slowly so it doesn't splash back up at you. You will notice the hot liquid will almost immediately thin out the batter. Stir until the batter is smooth with no clumps.
Step 4 : Bake! Pour the cake batter into three 6-inch cake pans and bake in the oven. Insert a toothpick into the center of the cake to check if it's done - if the toothpick comes out clean, the cake is done. If there is still some cake left on the toothpick, it needs a few more minutes.
Let the cake cool before icing. I like to let it cool on a wire rack and then pop the layers in the fridge for a few minutes to make sure before icing.
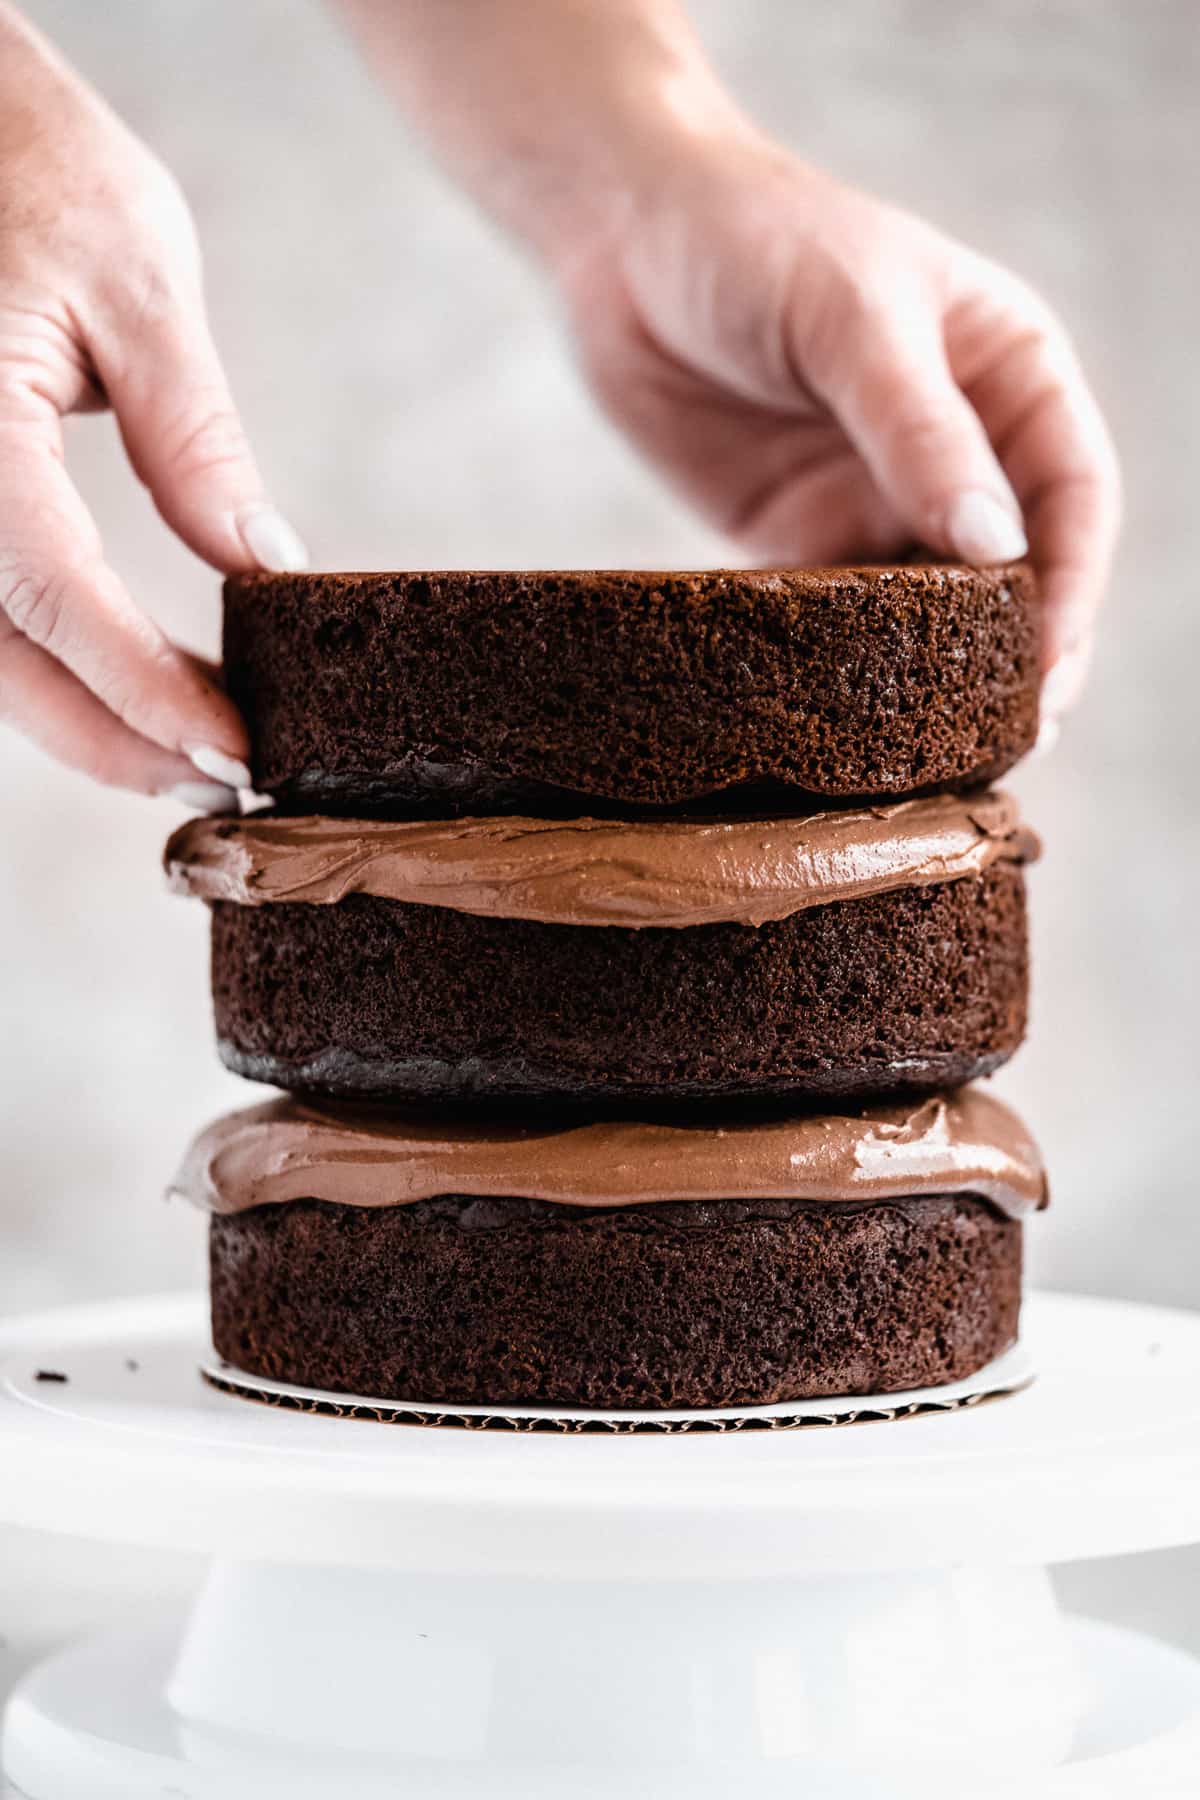
Step 5 : Assemble. Once the cake layers have cooled down, it's time to assemble to cake! Take the icing out of the fridge and give if a big stir. You can also use a hand-mixer and beat the mixture again to make the icing more soft and fluffy.
First do a light crumb coat over the cake. Use a turntable if you have one or a simple plate will do. Place one cake layer down followed by a thick layer of icing. Spread the icing on top and allow it to spread off the sides just a bit. Repeat this step with the other two layers of cake. Take an uneven spatula and spread a thin layer of icing over the sides of the cake. This is the crumb coat! Place the cake in the fridge or freezer for about a half an hour to set. Then spread a thicker layer of icing over the cake. Use a cake scraper to smooth it out if desired.
To decorate, sprinkle some chopped chocolate on the top of the cake. Let the icing set before slicing it into pieces and enjoy!

How to Make Paleo Chocolate Cake Frosting
Step 1 : Prepare the icing. Do this step first so the chocolate frosting has time to set before assembling the cake. Add the can of coconut cream and the chocolate to a pot and heat over medium-low heat. Stir continuously to so the melted chocolate combines into the milk. Once it's smooth and fully melted, pour the mixture into a bowl. Wrap the bowl with plastic wrap and let it set in the fridge for at least 3 hours. It will be firm enough to spread like icing once the cake layers have cooled down.
Gluten Free Chocolate Cake Recipe Tips
- Don't skip the hot coffee or water. This is really great way to deepen the chocolate flavor of your cake. No, the hot coffee will not cook the eggs, we are using hot coffee not boiling. If needed, swap it out for hot water to achieve the same effect.
- Make sure not to overcook your cake. To get the perfect fluffy and moist texture, keep a close eye on the timer and do a toothpick check in the center of your cake to make sure it's done.
- Prep your icing ahead of time. The icing, although incredibly easy and delicious, does take a couple hours to set in the fridge (at least 3 hours). Go ahead and make the icing at the beginning before you get into making your cake. By the time your cake is baked and cooled, your icing should be ready.
- Mix the icing one more time before frosting the cake. Once the icing has set in the fridge, you'll want to mix it one last time with a beater to get a spreadable consistency.
- Lastly, I highly recommend doing a 'crumb coat' on your cake before icing the whole thing. This just means adding a very thin coat of icing over the entire cake (this is not the layers of icing), placing it in the fridge/freezer for a couple minutes to set, and then going forward with applying a thick coat of icing. This ensures a very sleek and beautiful finish to your cake!

Gluten and Dairy Free Chocolate Cake Recipe Variations
- Make this a 2-tiered cake with a 9-inch cake pan. Add a few more minutes to the bake time as the layers will be thicker.
- Keep things easy with a sheet cake. Use a 9 x 13 inch pan with parchment paper. The cake will need a few more minutes in the oven to bake all the way through. You will want to do a half batch of the frosting for a sheet cake.
- Top with a variety of fresh berries - strawberries or raspberry sounds delicious!
- Make the cake into cupcakes
How to Slice Paleo Chocolate Cake
Make sure the icing has set before slicing the cake. If needed, place the cake back in the fridge before serving. Then use a sharp knife to cut the cake. For clean slices, wipe the knife clean after each cut.
How to Store Gluten Free Dairy Free Chocolate Cake
This cake is best stored in the fridge for up to 5 days to keep the icing nice and creamy.
Whole cake - Store the cake covered or uncovered in the fridge for 3 - 4 days.
Whole cake unsliced - Place a piece of parchment paper over the cut part of the cake. If you have room in the fridge, store it uncovered and it will keep for 3 - 4 days.
Slices of cake - Place each slice of cake in an airtight container and keep them in the fridge for 3 - 5 days.
Dairy Free Gluten Free Chocolate Cake Recipe FAQs
Yes, if you want to make the cake ahead of time I recommend baking the layers as directed, letting the cool down, and then wrapping each in plastic wrap and storing in the freezer until ready to frost. The cake layers will stay good for 3 weeks in the freezer. Let the thaw for an hour or two out on the counter before assembling the cake.
No, you can make a two layered cake with two 9-inch cake pans or even a sheet cake in a 9 x 13 inch pan. The cake will need a few more minutes to bake in the oven.
Yes and I have a specific recipe right here!
Absolutely! Use any frosting recipe you like - this chocolate cream cheese icing is on of my favorite.
Almond flour is one of my favorite alternative gluten free flours to bake with as it has a soft and tender texture when baked, similar to all purpose flour. Because almond flour has a higher fat content than wheat flour, it can be a little heavy when baked. This is why I like to add tapioca flour or arrowroot starch to help lighten it up. I use this combination of almond flour + tapioca flour in almost all of my cake recipes - my cookie dough cake, gluten free lemon cake, and my peach cobbler pound cake.
Almond flour is made by pulverizing blanched almonds, meaning the skins have been removed. Almond meal is simply ground almonds, just like almond flour, but the almonds still have the skin on them. This means you will see little specks of brown in your bake. You can usually swap them 1:1 in most recipes including this one!
Almond flour is naturally gluten free as is tapioca flour. Because those are the only two flours in this almond flour chocolate cake recipe, it's completely gluten free and grain free. I promise you won't even know the difference!
For more chocolate-filled treats, check out my:


PS : If you make this recipe, be sure to leave a star review and comment below! Also be sure to follow along with me on Instagram and Pinterest to stay up to date on all tasty recipes here at The Fit Peach!
Recipe

Gluten and Dairy Free Chocolate Cake
Ingredients
For the Icing
- 13 oz can coconut cream
- 1 ½ cup dark chocolate
For the Cake
- 4 eggs - room temperature
- 1 ½ cup coconut sugar
- ⅓ cup coconut oil - melted and cooled
- ½ tablespoon vanilla extract
- 13 oz can full-fat coconut milk
- 2 tablespoon apple cider vinegar
- 3 cups almond flour
- 1 cup tapioca flour
- 1 cup cacao powder
- 3 teaspoon baking powder
- 1 ½ teaspoon baking soda
- 1 cup hot coffee - or hot water
Instructions
For the Icing
- In a pot, heat the coconut cream and chocolate over medium-low heat. Stir until the chocolate is melted and the consistency is smooth.
- Pour into a bowl, wrap with cling wrap, and place in fridge to set for at least 3 hours. By the time you bake the cake and it cools, the icing will be ready!
- When ready to ice, mix the icing with a hand mixer to achieve a spreadable consistency.
For the Cake
- Preheat oven to 350F. In a large mixing bowl or in the bowl of a stand mixer, beat the eggs, coconut sugar, coconut oil, and vanilla until well mixed. Add the coconut milk and apple cider and continue to beat well.
- Slowly fold in the almond flour, tapioca flour, cacao powder, baking powder, and baking soda until no flour clumps remain. The batter will be thick at this point.
- Carefully pour in the hot coffee and mix well into the batter. You should notice the batter begin to thin out and resemble cake batter.
- Pour the batter into three 6-inch cake pans lined with parchment paper or greased with oil. Bake for 25 - 30 minutes until a tooth pick can be inserted in the middle and come out clean. Let cool completely before icing. I like to pop y cake layers in the fridge once they have cooled down to make sure they have a chill to them before icing.
To Assemble
- When ready to assemble the cake, take the icing out of the fridge and give it a big stir or beat it for a few seconds with a hand mixer to make it light and fluffy.
- Place one of the cake layers down on a turntable or large plate. Top with a large scoop of icing and spread it across the cake, pushing some off the edges of the cake. Repeat with the other 2 layers.
- Do a "crumb coat" around the sides and top of the cake. This is simply a really thin layer of icing that is used to set the crumbs in place. Place the cake in the fridge or freezer for about 20 minutes to set the crumb coat.
- After the crumb coat is set, ice the cake with the remaining icing, top with desired toppings, and enjoy!
- To store, place in an air-tight container in the fridge. You can leave this cake out on the counter but the icing will soften so I recommend the fridge to ensure the best texture.
Love this recipe! Can it be used for cupcakes?
Wow this recipe is incredible!!! Thank you so much 🙂
I'm so glad you enjoyed it!
What can I Substitute for tapioca flour ?
Arrowroot flour or corn starch will work as well.
Hi! Please advise.. can I omit baking powder and baking soda? I cant consume both of them 🙁
Hi Shinta! You should be able to omit it. I would add another tablespoon of tapioca flour to the batter though. Hope that helps!
I don't drink, or even have coffee in my house. Can I just use either hot water or hot chocolate instead? Thanks.
Yes! Hot water will work as well.
A quick question about the chocolate for the ganache. Are you using a bar of chocolate or cacao powder?
Hi Janine, I'm using chocolate chips. A chocolate bar will work too. I would chop it up and then measure it.
This looks amazing. Unfortunately, I don’t see the eggs in your ingredients for the cake. How many eggs??
Thank you! It's the third ingredient in the list. There should be 4 eggs!
This is AMAZING!!!! Just made it for my sister in law, who is egg, gluten and dairy free (replaced the egg with flax eggs) and we are all in shock. This cake is fluffy and decadent and delicious, you wouldn’t know it’s a healthier alternative and allergy friendly!
Thanks a bunch. 👍🏾
Hi Candice!
Oh my gosh you just made my day! I'm so happy to hear you enjoyed it. Good to know this works with flax eggs too!