


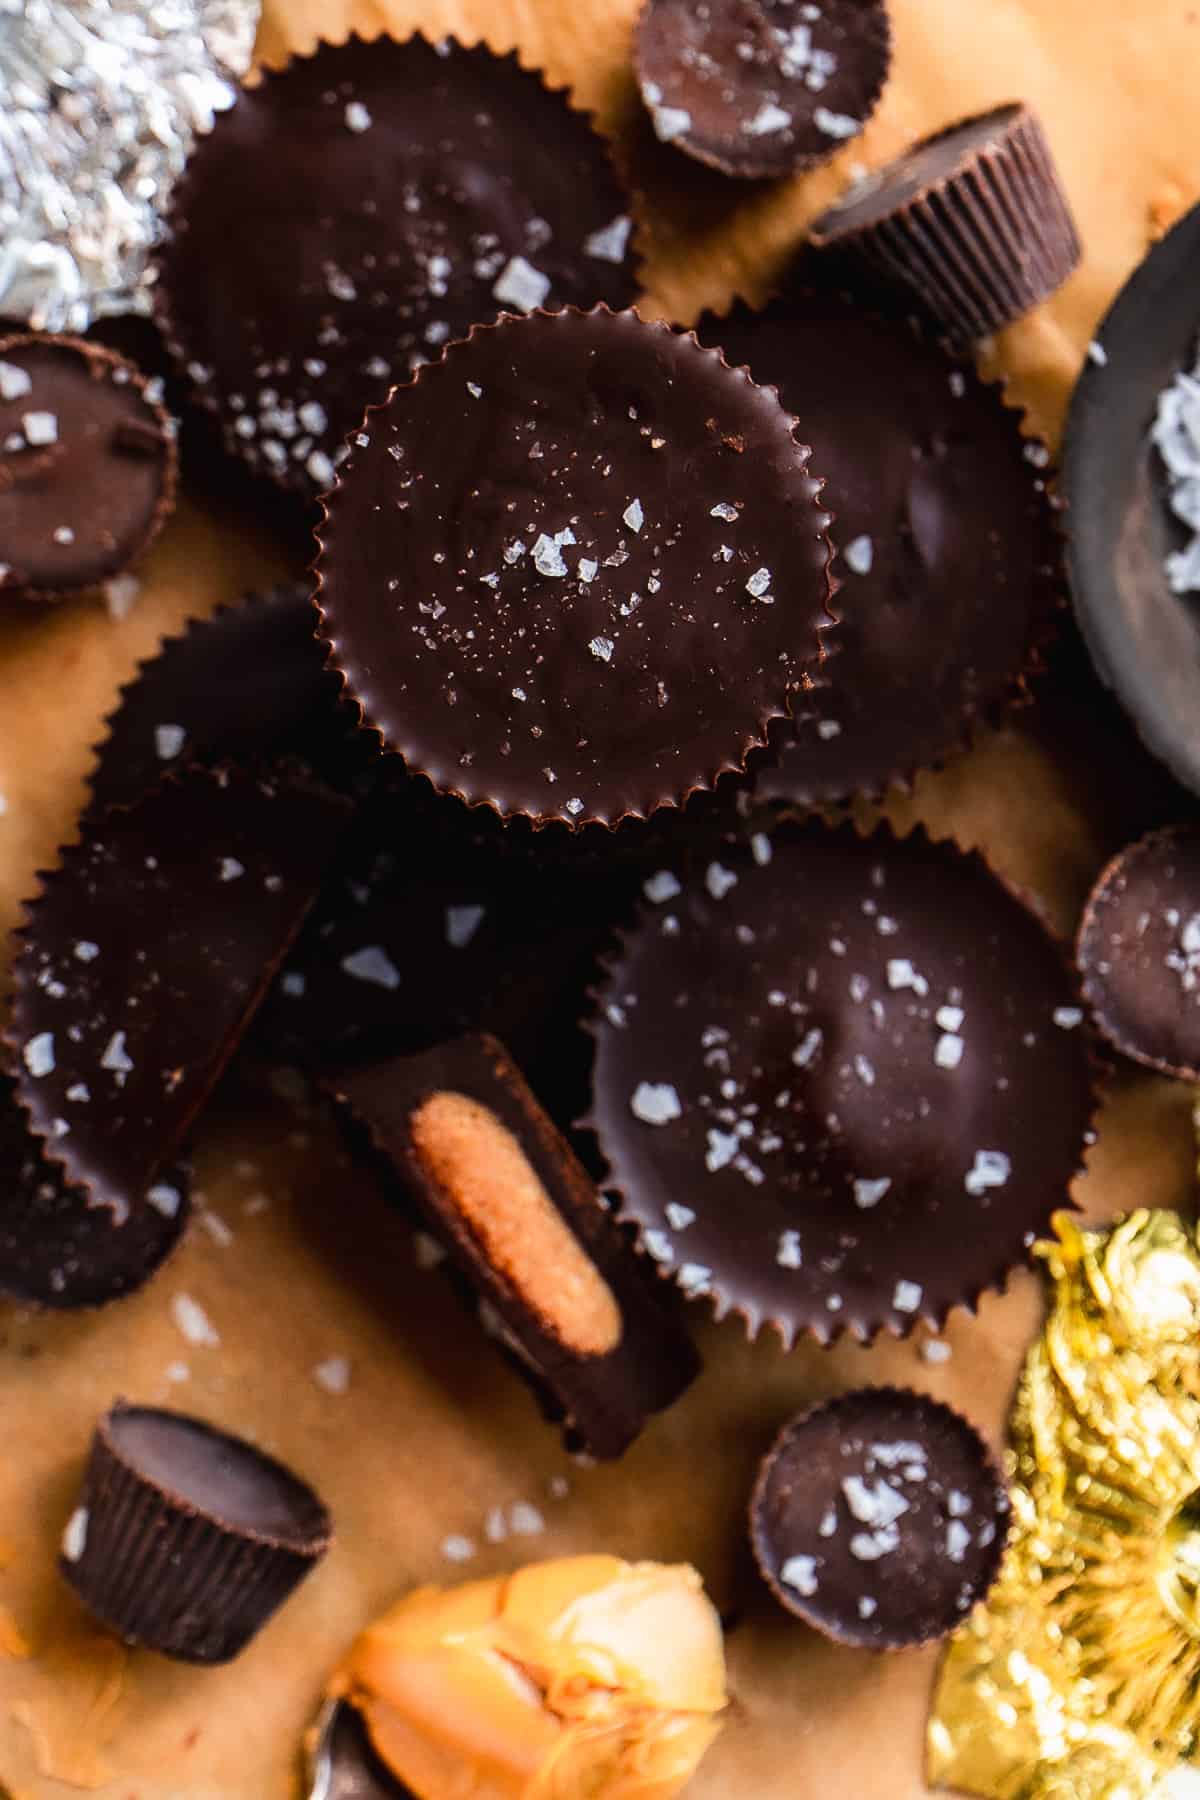
Dark Chocolate Peanut Butter Cups
As a foodie who’s spent years perfecting dessert recipes, I can promise these homemade peanut butter cups are made with better-for-you ingredients and taste just like the real thing (maybe even better). They’re a sweet treat you can store in the fridge or freezer when the chocolate craving strikes.
Healthy Dark Chocolate Reese's Cups
Hey there, chocolate and peanut butter lovers! If you're anything like me, you know that peanut butter chocolate cups are basically little bites of heaven. But guess what? I've found a way to make them even better – healthier! Now, you can indulge and still satisfying those chocolate cravings.
Jump to:
- Healthy Dark Chocolate Reese's Cups
- Why you will love these Homemade Reese's Peanut Butter Cups
- Dark Chocolate Reese's Peanut Butter Cup ingredients
- Dark Chocolate Reeses customizations
- How to make Homemade Reese’s Peanut Butter Cups
- Serving Homemade Dark Chocolate Reese Peanut Butter Cups
- Storing Reese's Dark Chocolate Cups
- Dark Chocolate Reese FAQs
- Recipe
- Reviews
Why you will love these Homemade Reese's Peanut Butter Cups
- Dietary features - gluten free, vegan, dairy free, paleo options.
- Nut free options
- No bake recipe
- Kid friendly
Dark Chocolate Reese's Peanut Butter Cup ingredients
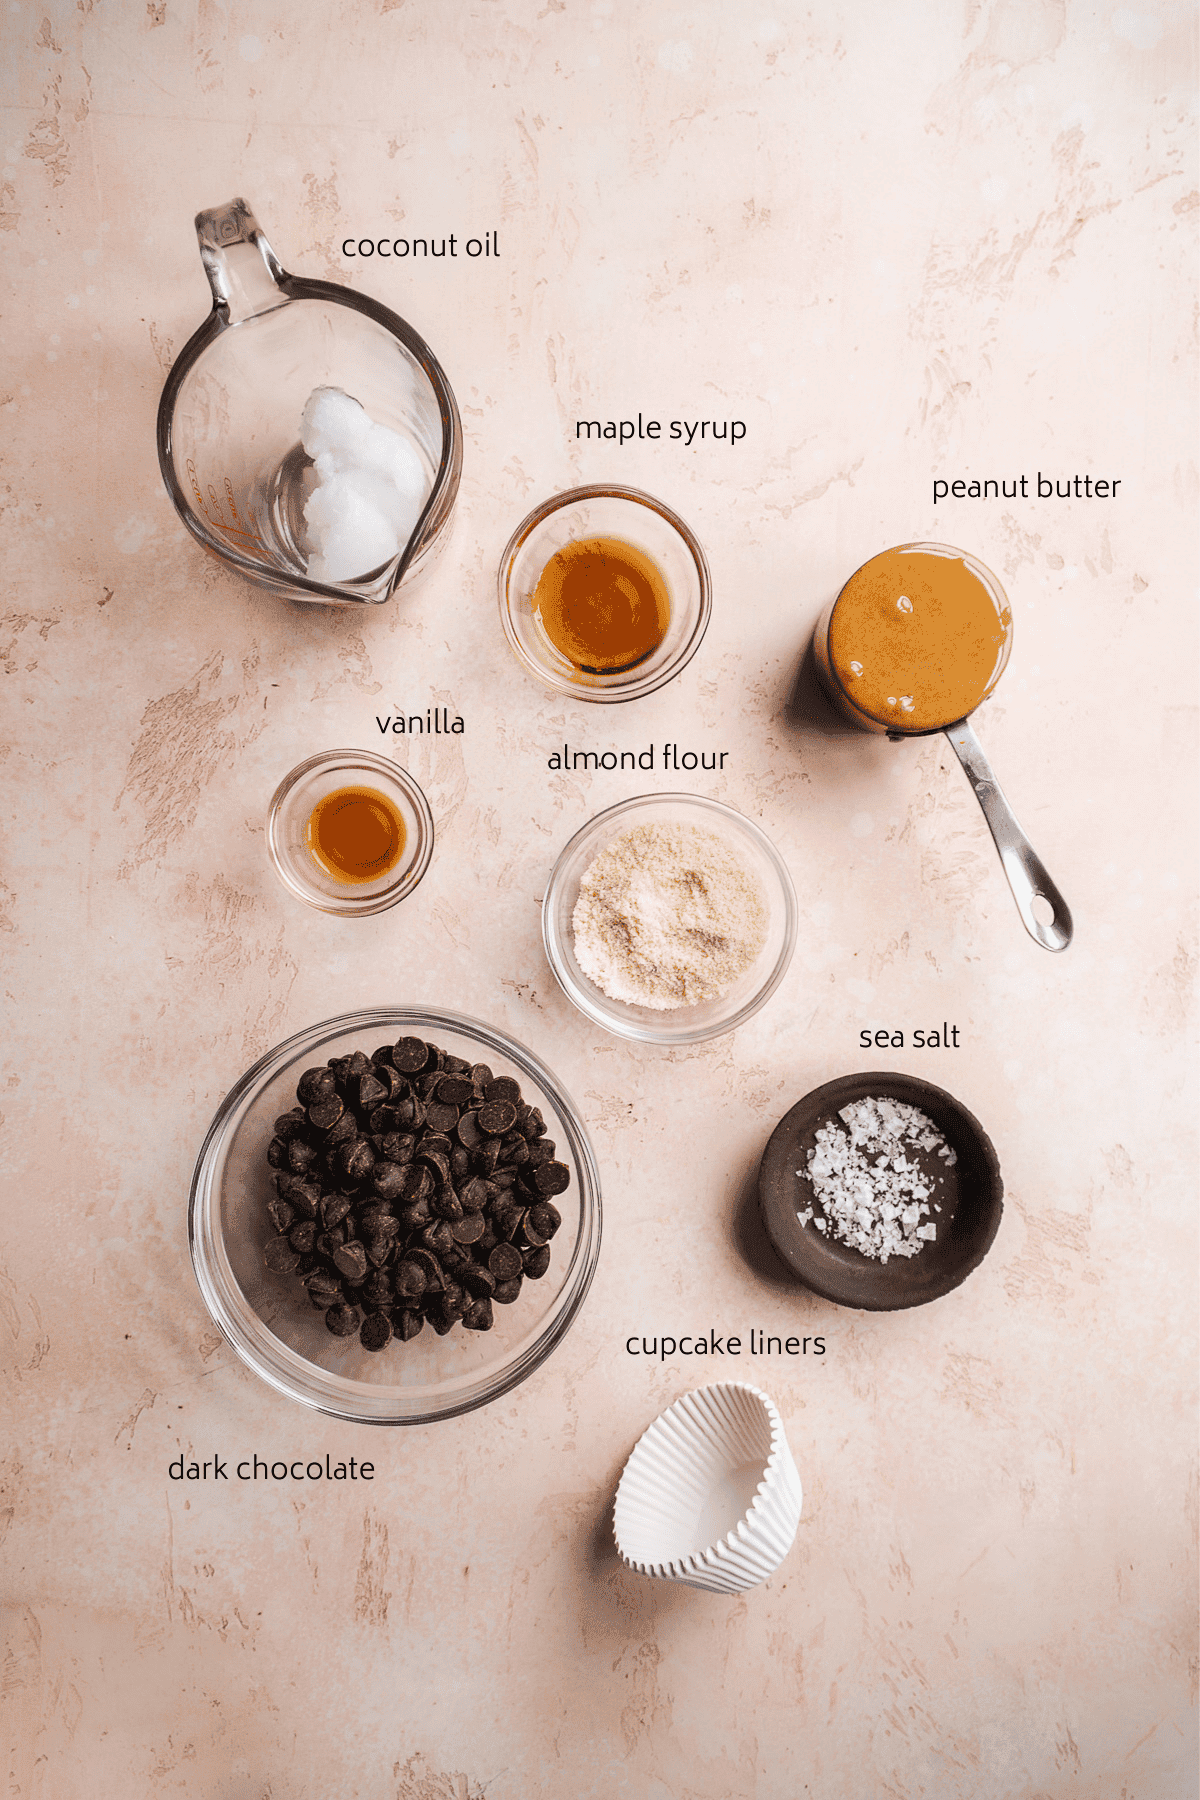
- Peanut butter - Use high quality creamy peanut butter for best results. Look at the ingredients on the jar. There should only be 1 - 2 ingredients - peanuts and maybe salt. Use almond butter or cashew butter to make these paleo-friendly and sunflower butter for a nut-free option.
- Almond flour - This is used to thicken up the peanut butter filling. Swap for oat flour or cassava flour to make these nut-free.
- Dark chocolate - High quality dark chocolate is best. The Enjoy Life brand is my favorite and is nut-free and vegan.
- Maple syrup - To sweeten the filling. Swap for honey or agave if needed.
Dark Chocolate Reeses customizations
There are SO many ways to make these homemade Reece's cups your own! Here are a few of my favorite ways to switch it up:
- Use cashew butter or almond butter in the middle
- Make them mini by using mini liners and a mini muffin pan
- You can even make them into different shapes with a variety of molds (no liners needed!) Here is a fall mold, butterfly mold, and a holiday mold.
- Top with sprinkles instead of sea salt
- Use semi-sweet chocolate or even white chocolate for the shell
- Add some cinnamon or pumpkin spice to the filling mixture for a fall-inspired feel
How to make Homemade Reese’s Peanut Butter Cups
To make these homemade Reece's cups you will need a pot to melt the chocolate, a cupcake pan, liners, and a bowl for the filling.
Step 1 : Melt the chocolate and fill liners
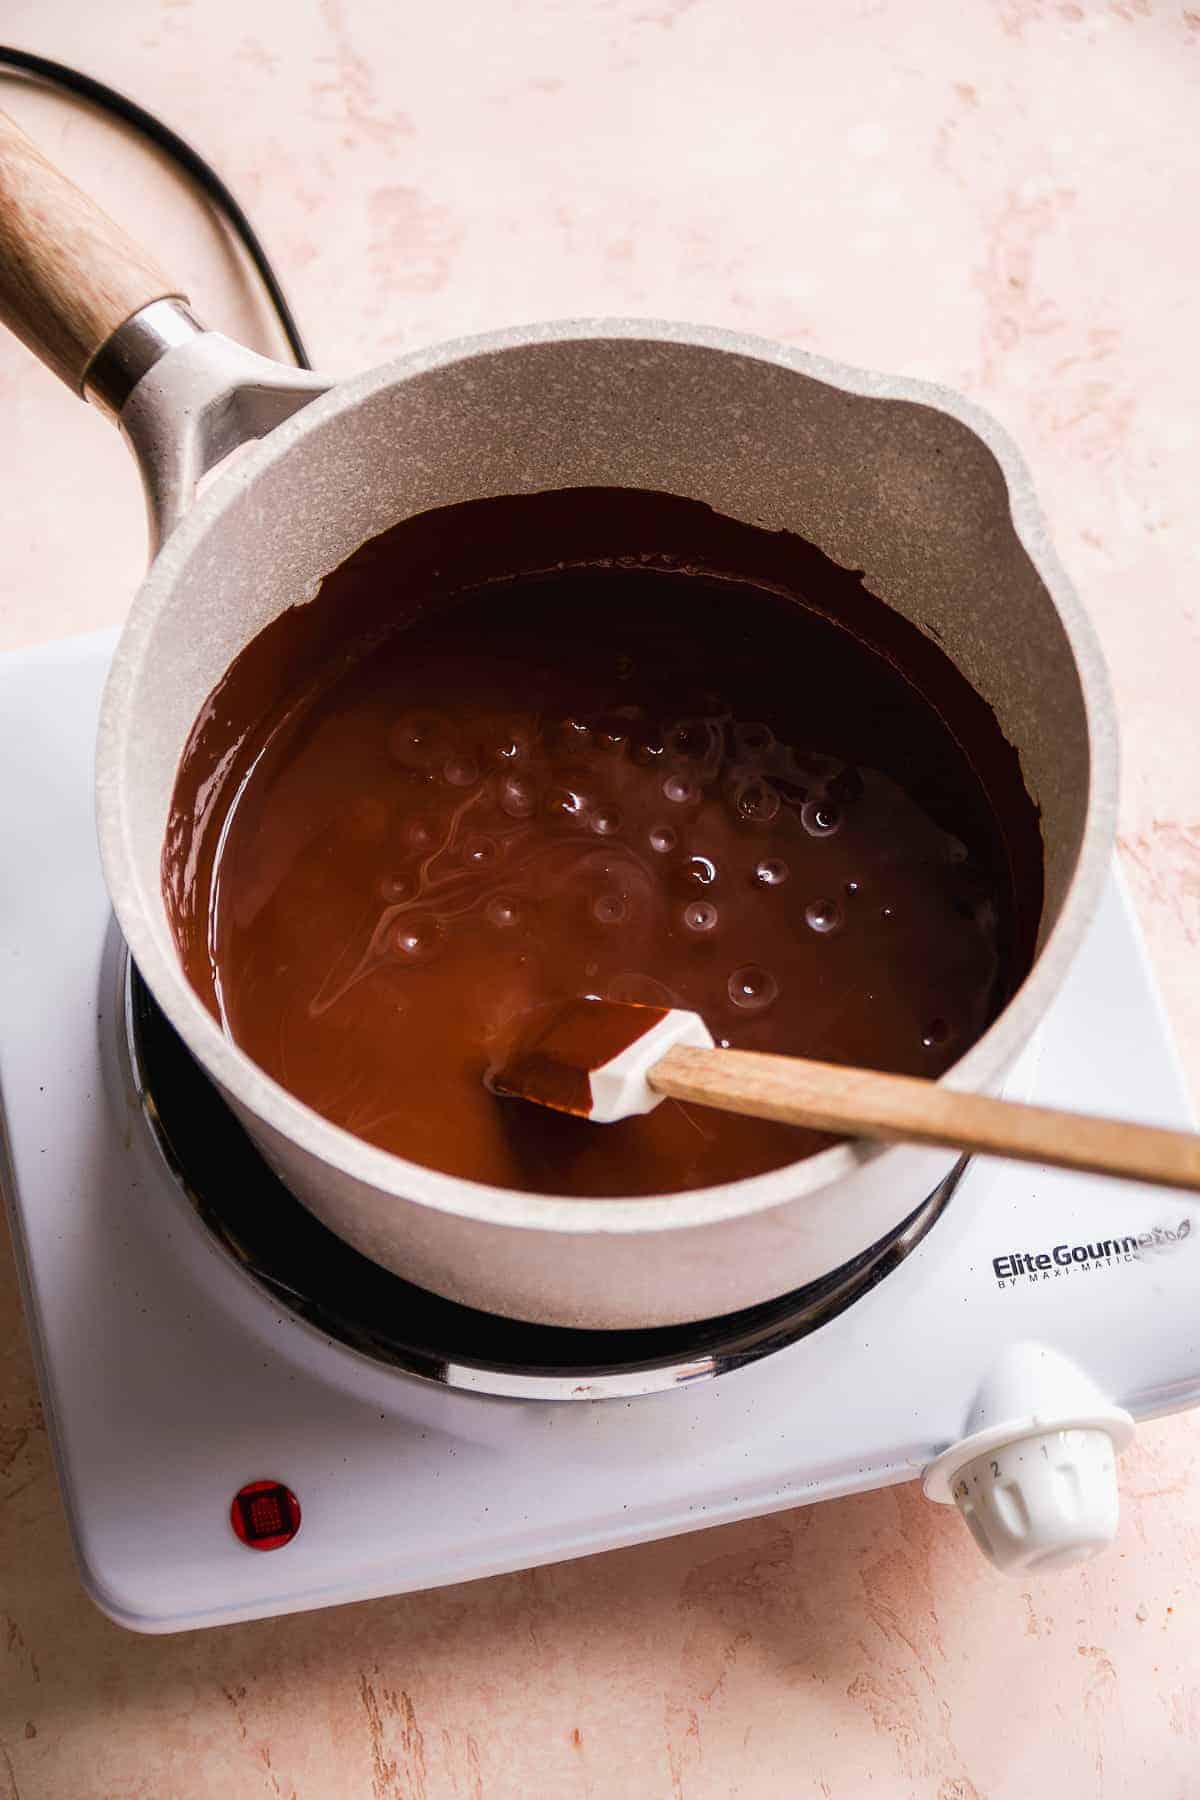
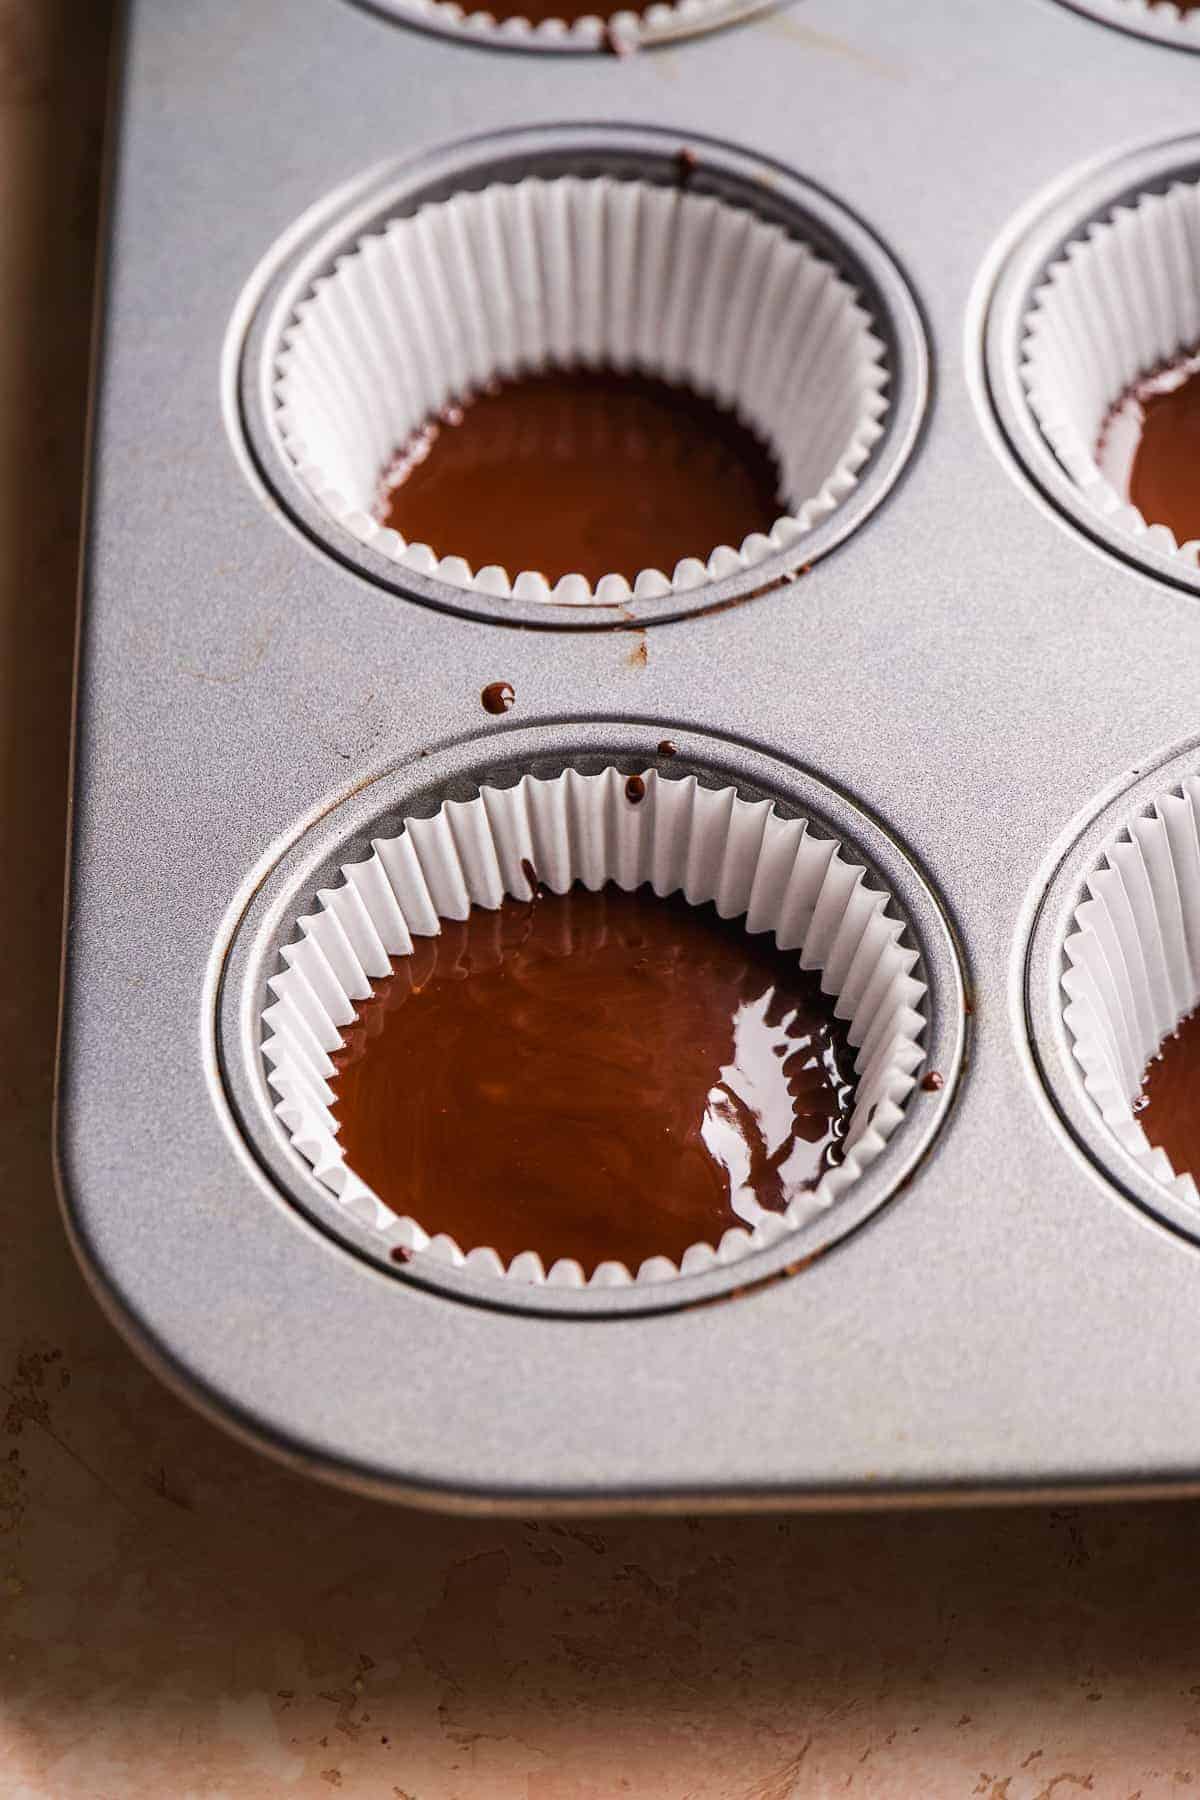
First, melt the dark chocolate with the coconut oil. I like to do this first so we can go ahead and fill the bottom of the liners with chocolate and let it set a little before adding the filling. This allows the chocolate on the bottom to be some-what set so when the filling goes on top, it doesn't sink to the bottom.
Make sure to watch the pot and stir continuously to prevent the chocolate from burning. Stir until it's think and smooth.
Place liners into the cavities of a cupcake pan and spoon in just enough melted chocolate to cover the bottom of the liner. Set the pot back on the stove over low heat so it stays warm while you prepare the filling.
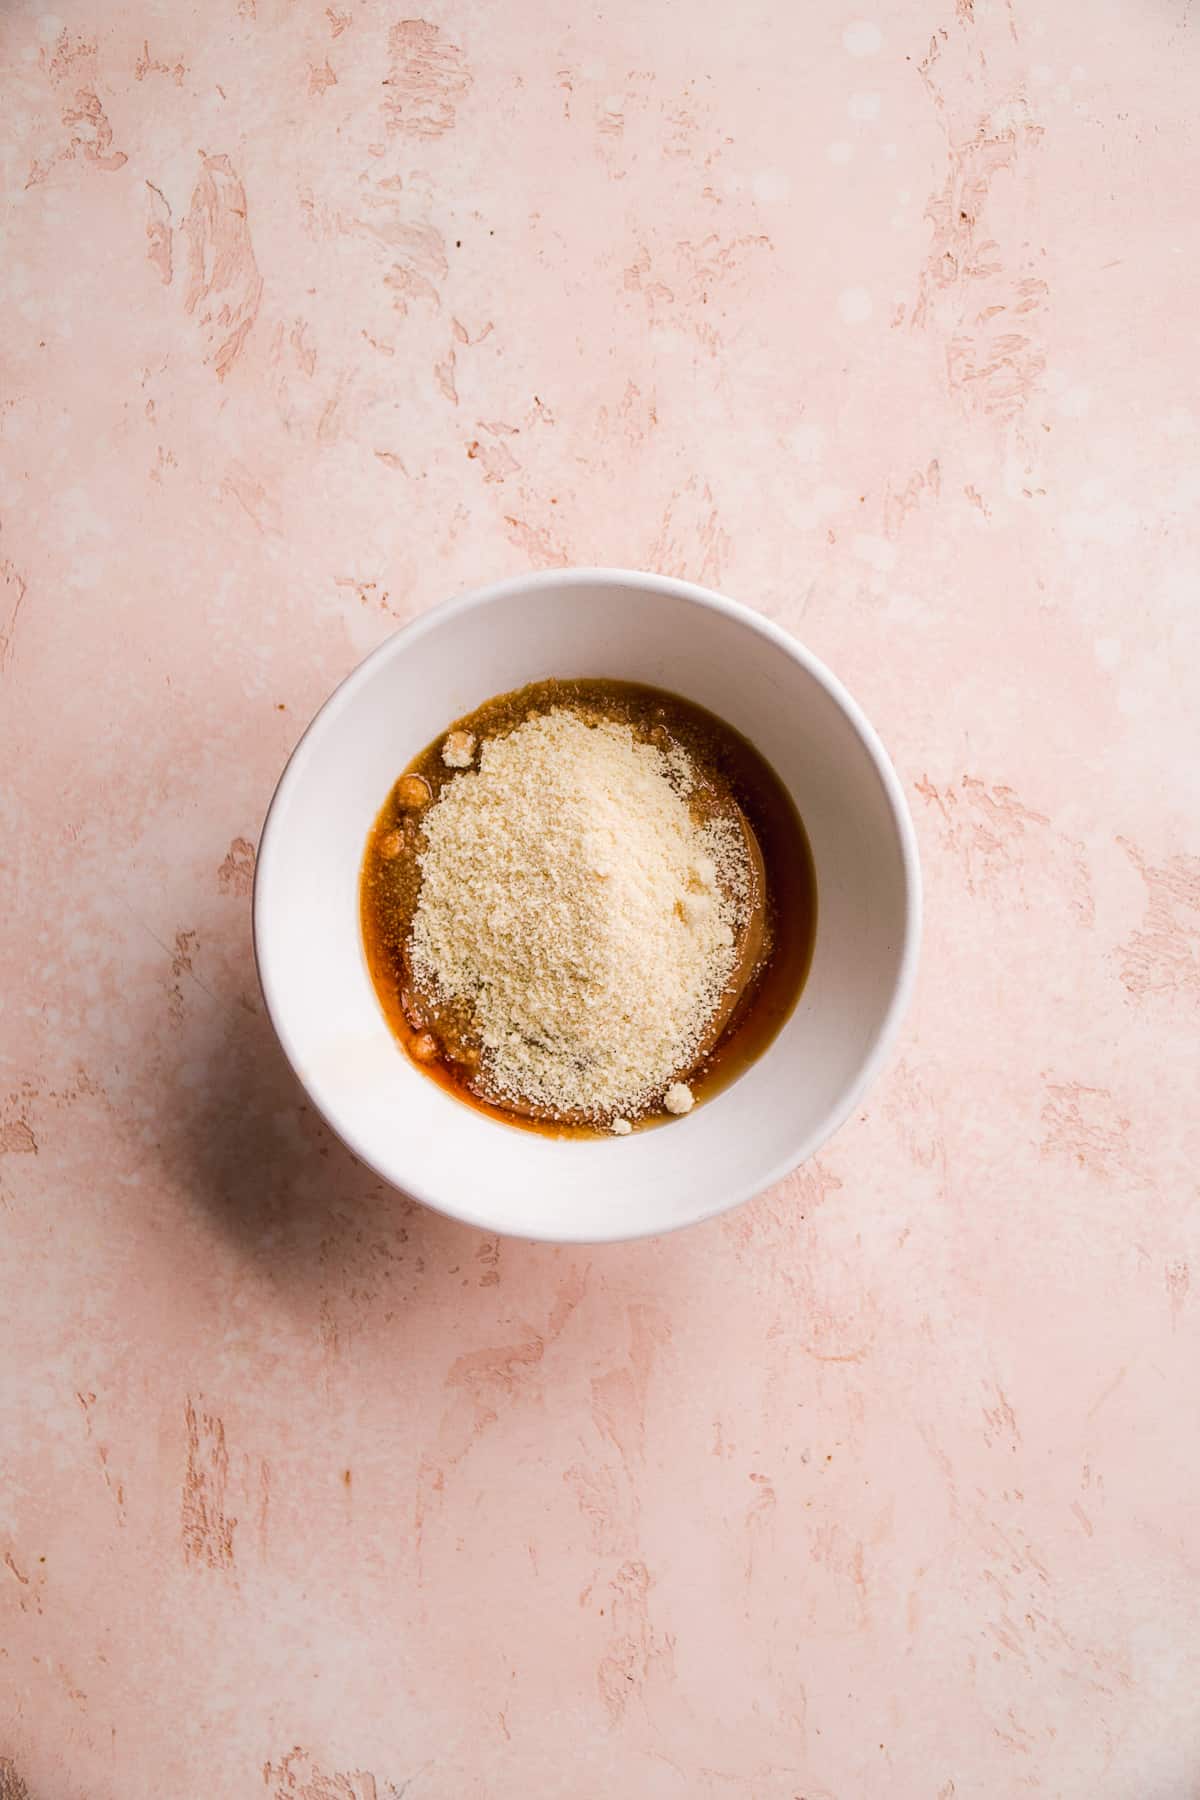
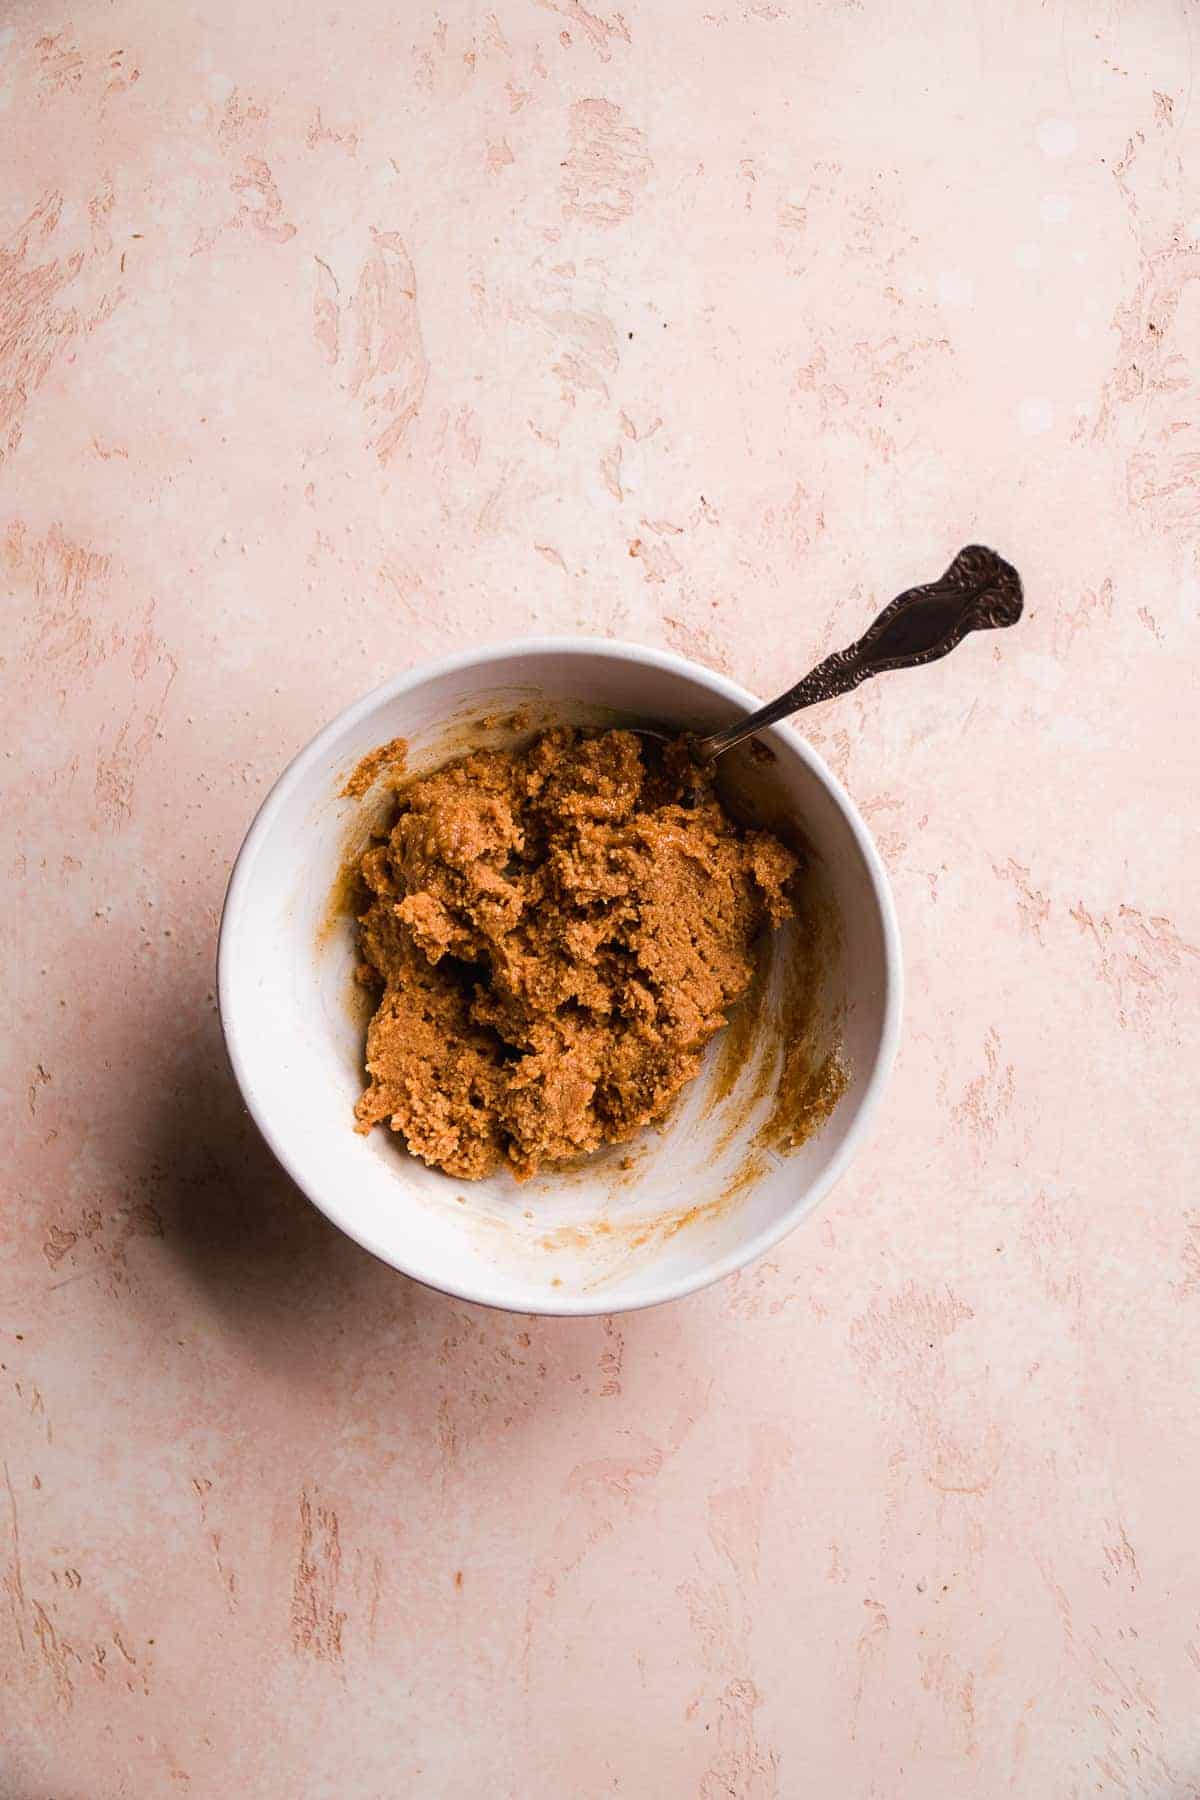
Step 2 : Make the filling
Place all the filling ingredients in a bowl and mix well with a spoon or spatula. Continue to stir until the flour is incorporated and the mixture is thick.
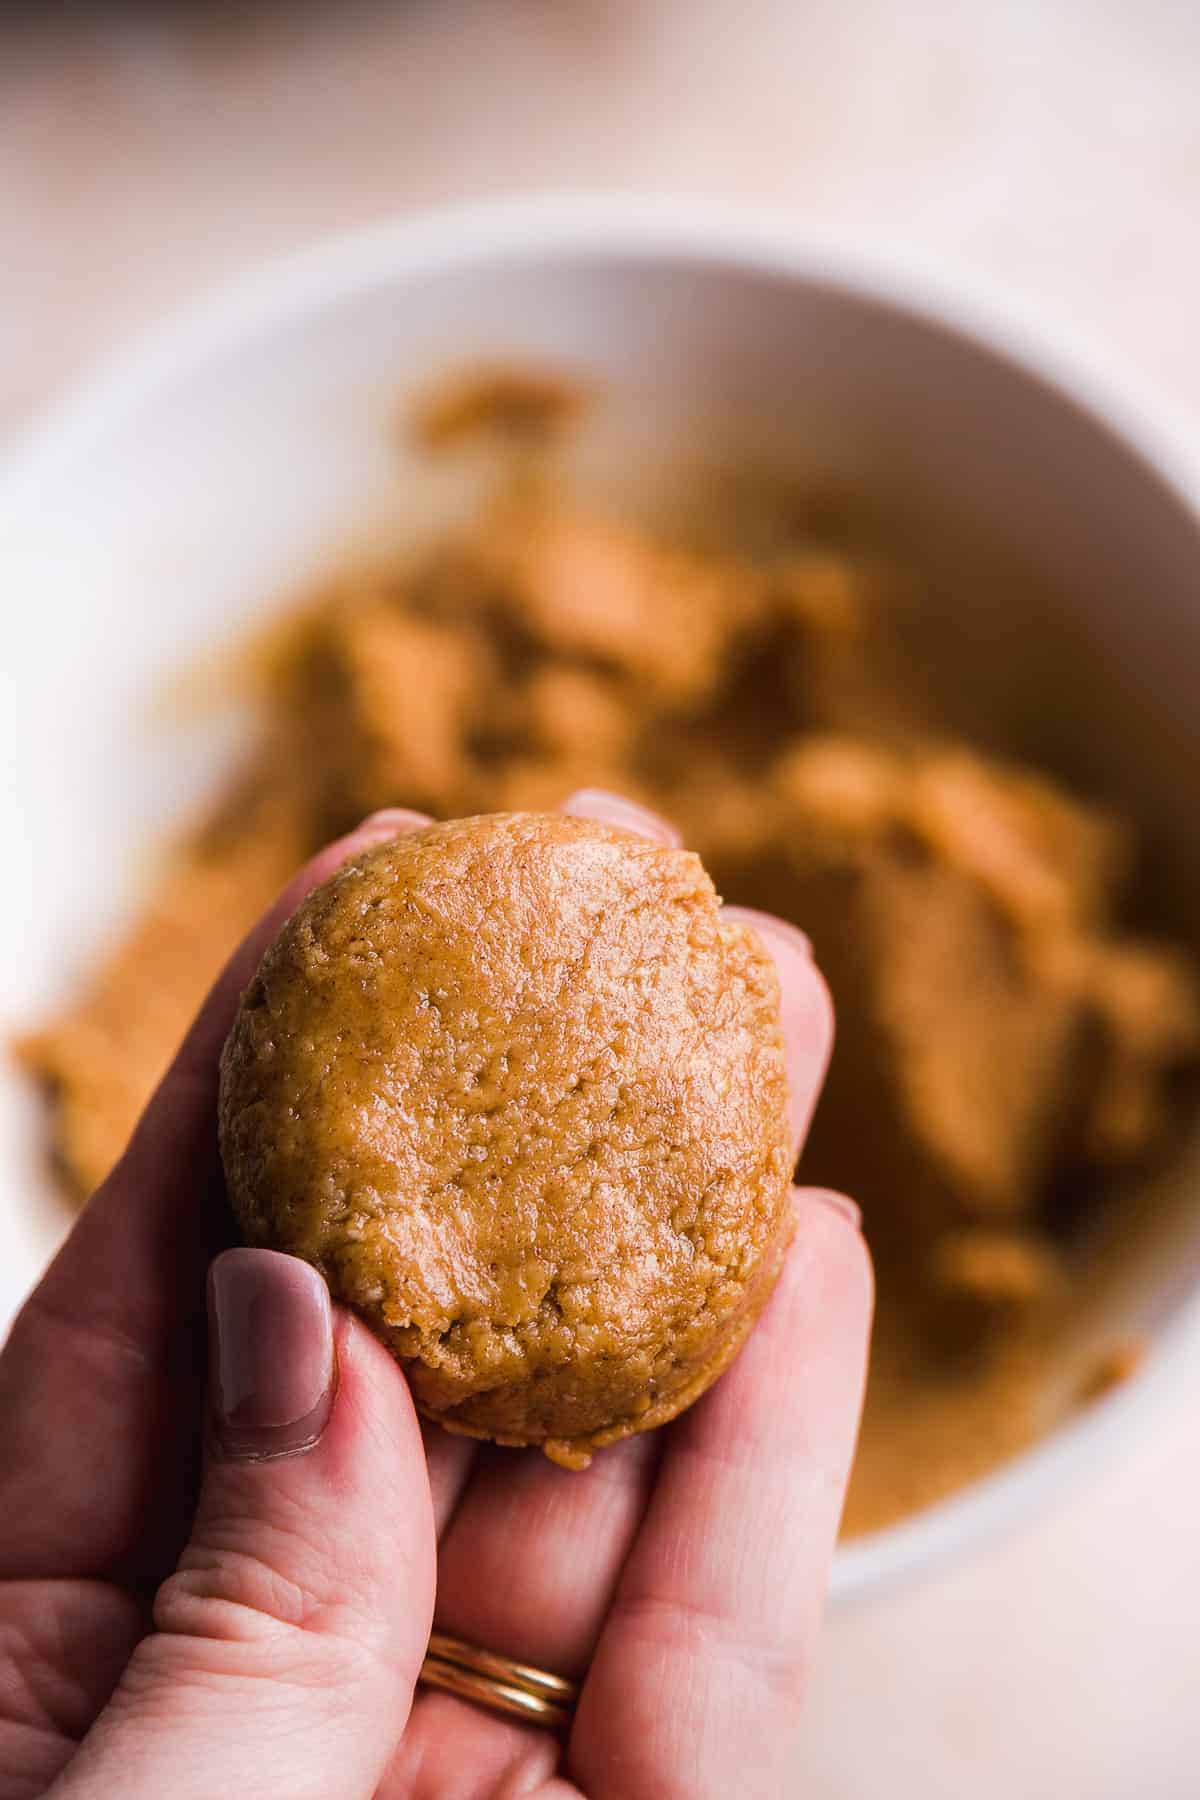
Step 3 : Assemble
With a tablespoon or small cookie scoop, scoop the filling and roll into a a ball with the palms of your hands. Press down gently to flatten it out into a hockey puck shape.
Place the filling on top of the chocolate in each of the liners.
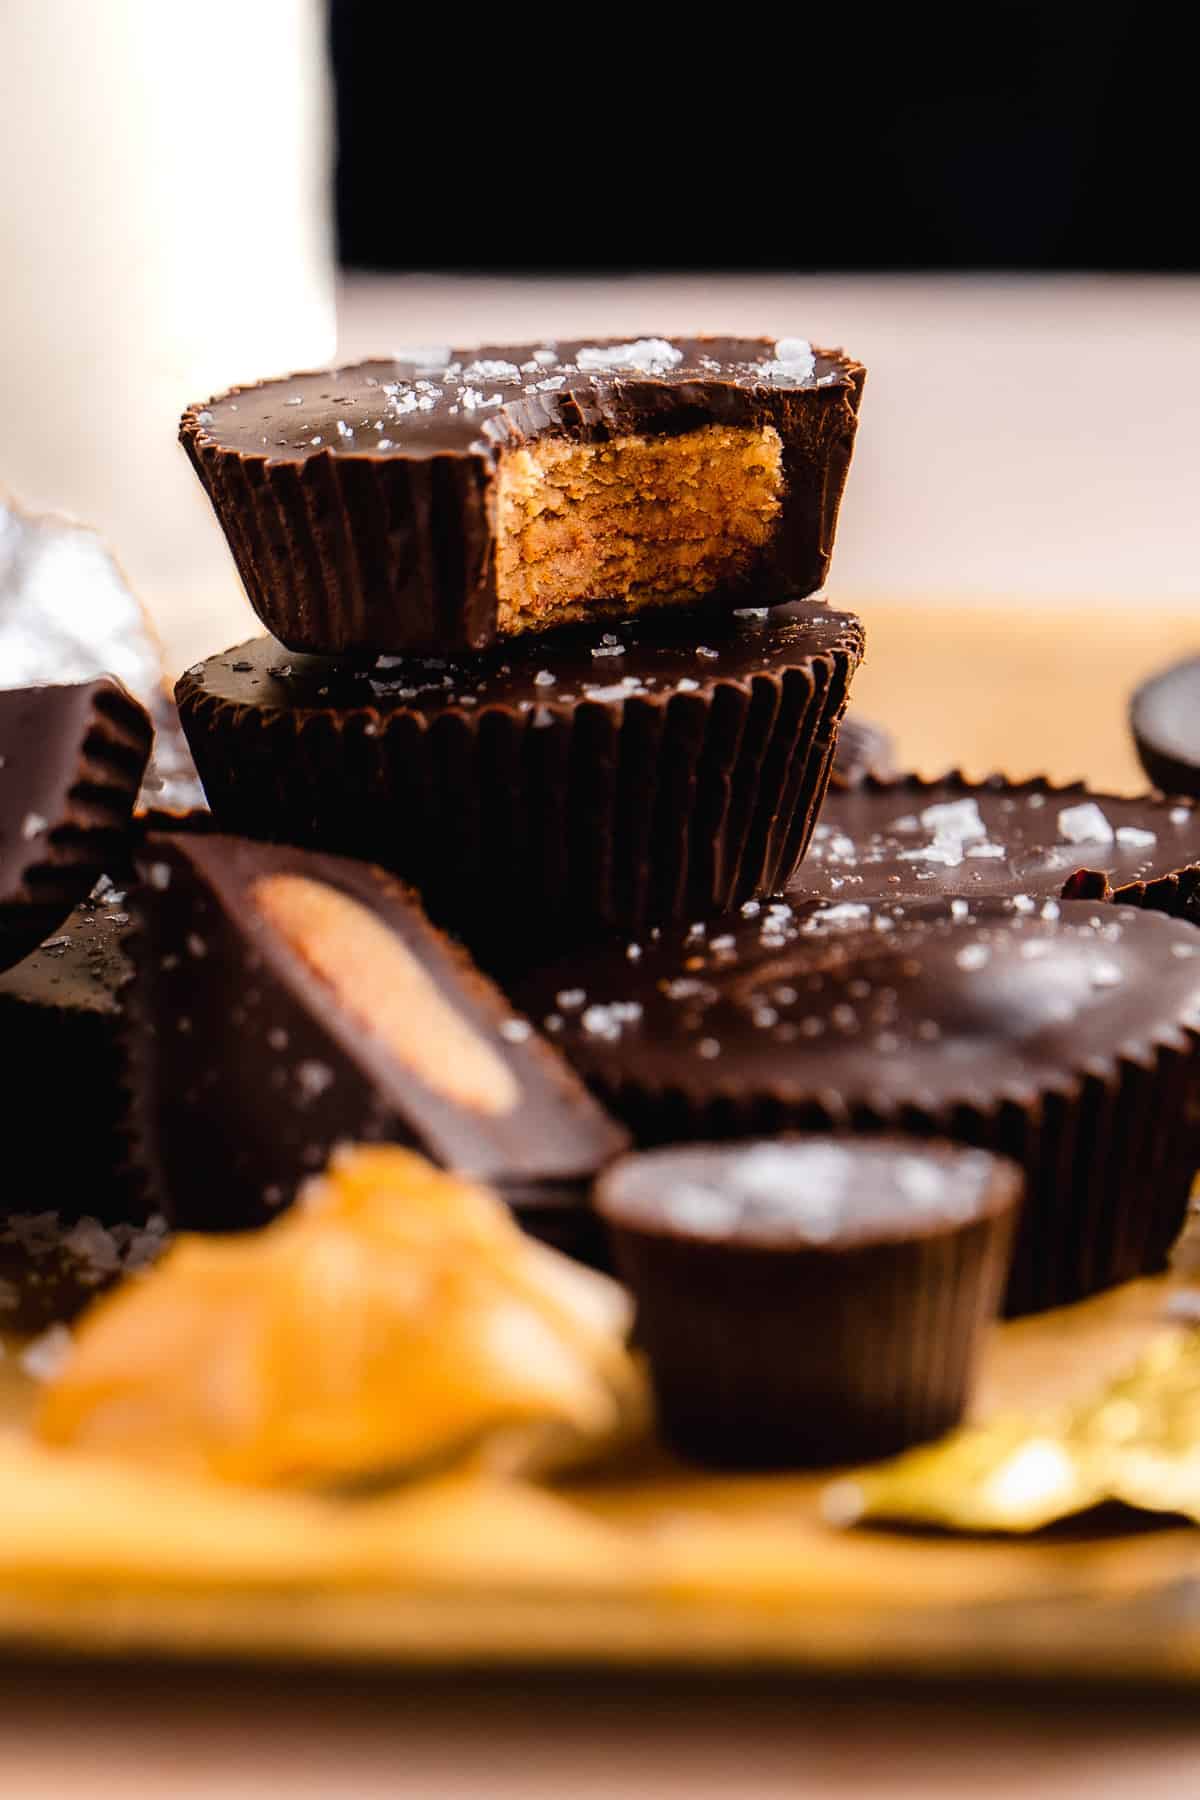
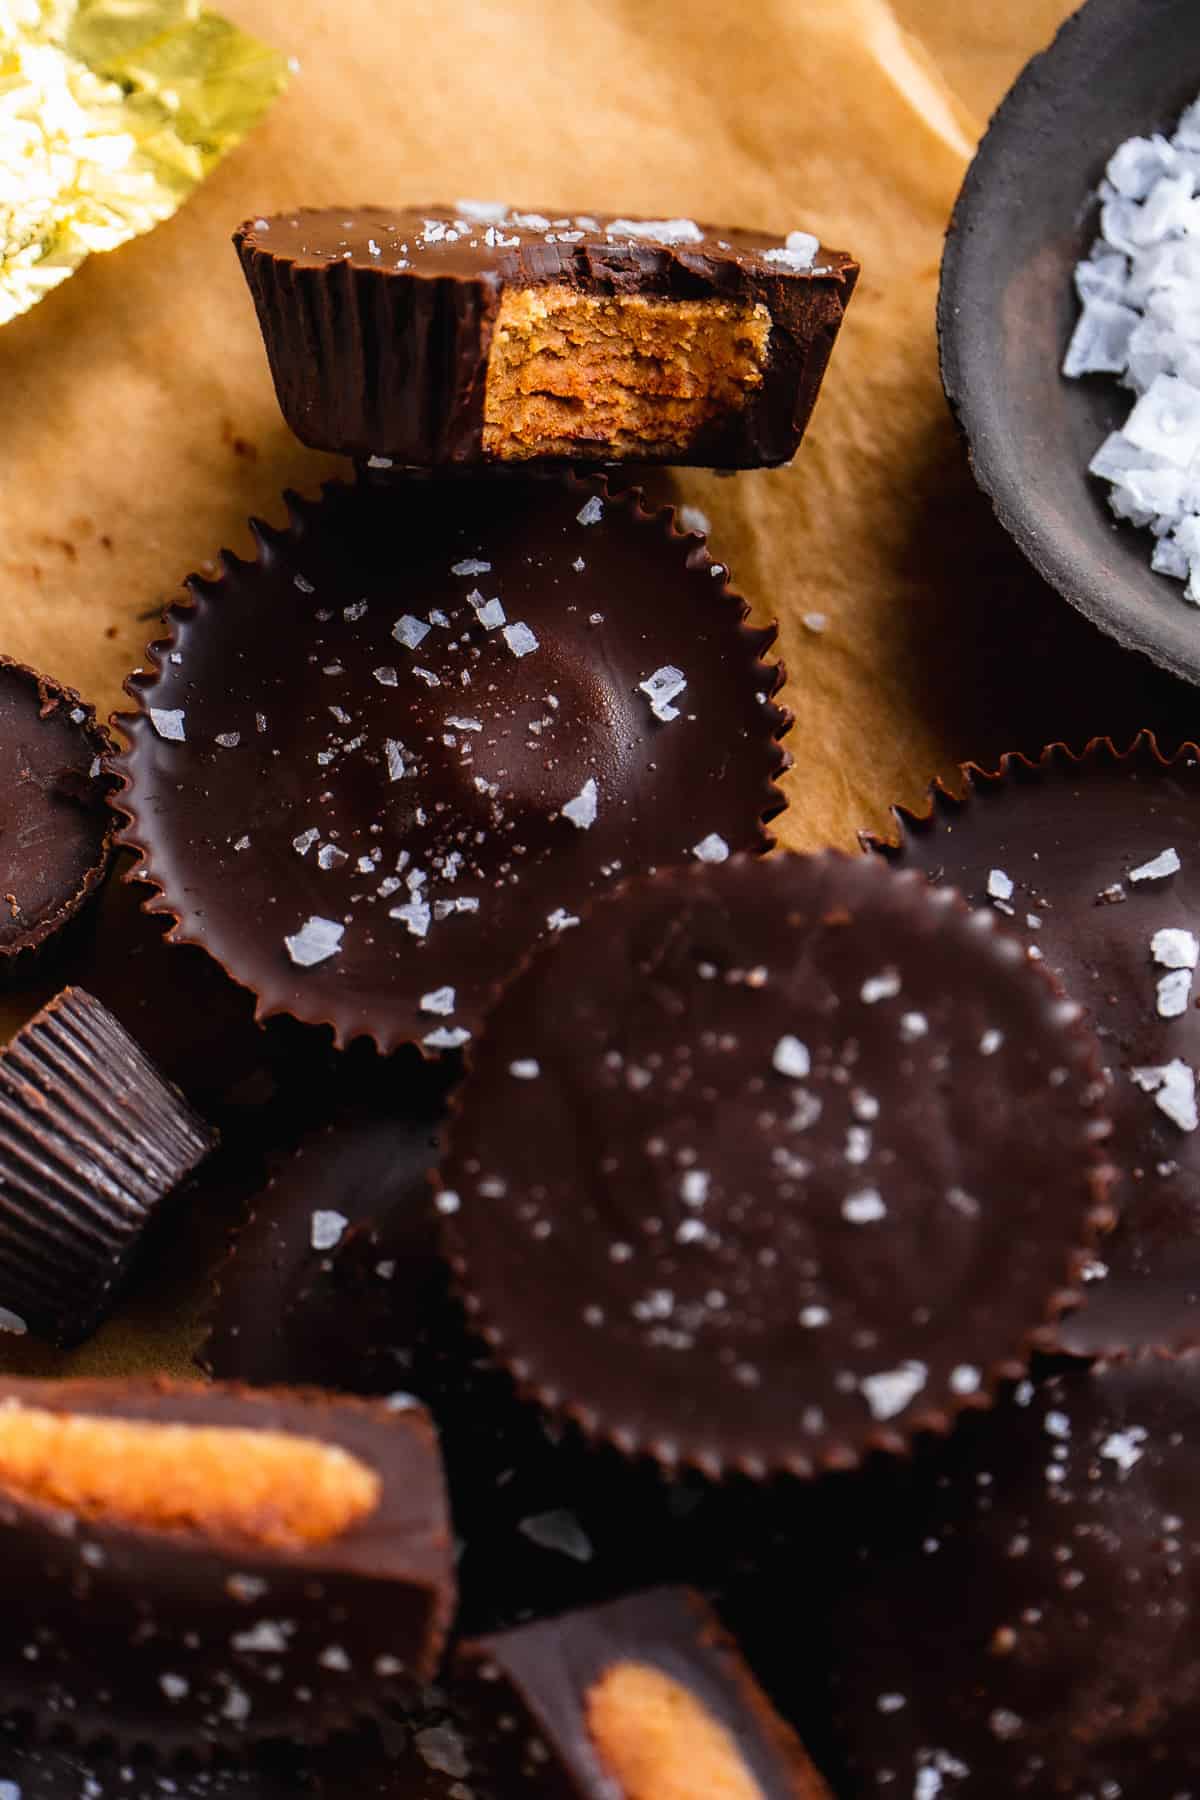
If you want your cups to look like the classic Reece's, make sure the filling is smaller in circumference than the bottom of the liner. This is so chocolate can fit around the sides and fill up the liner so the peanut butter filling is right in the middle!
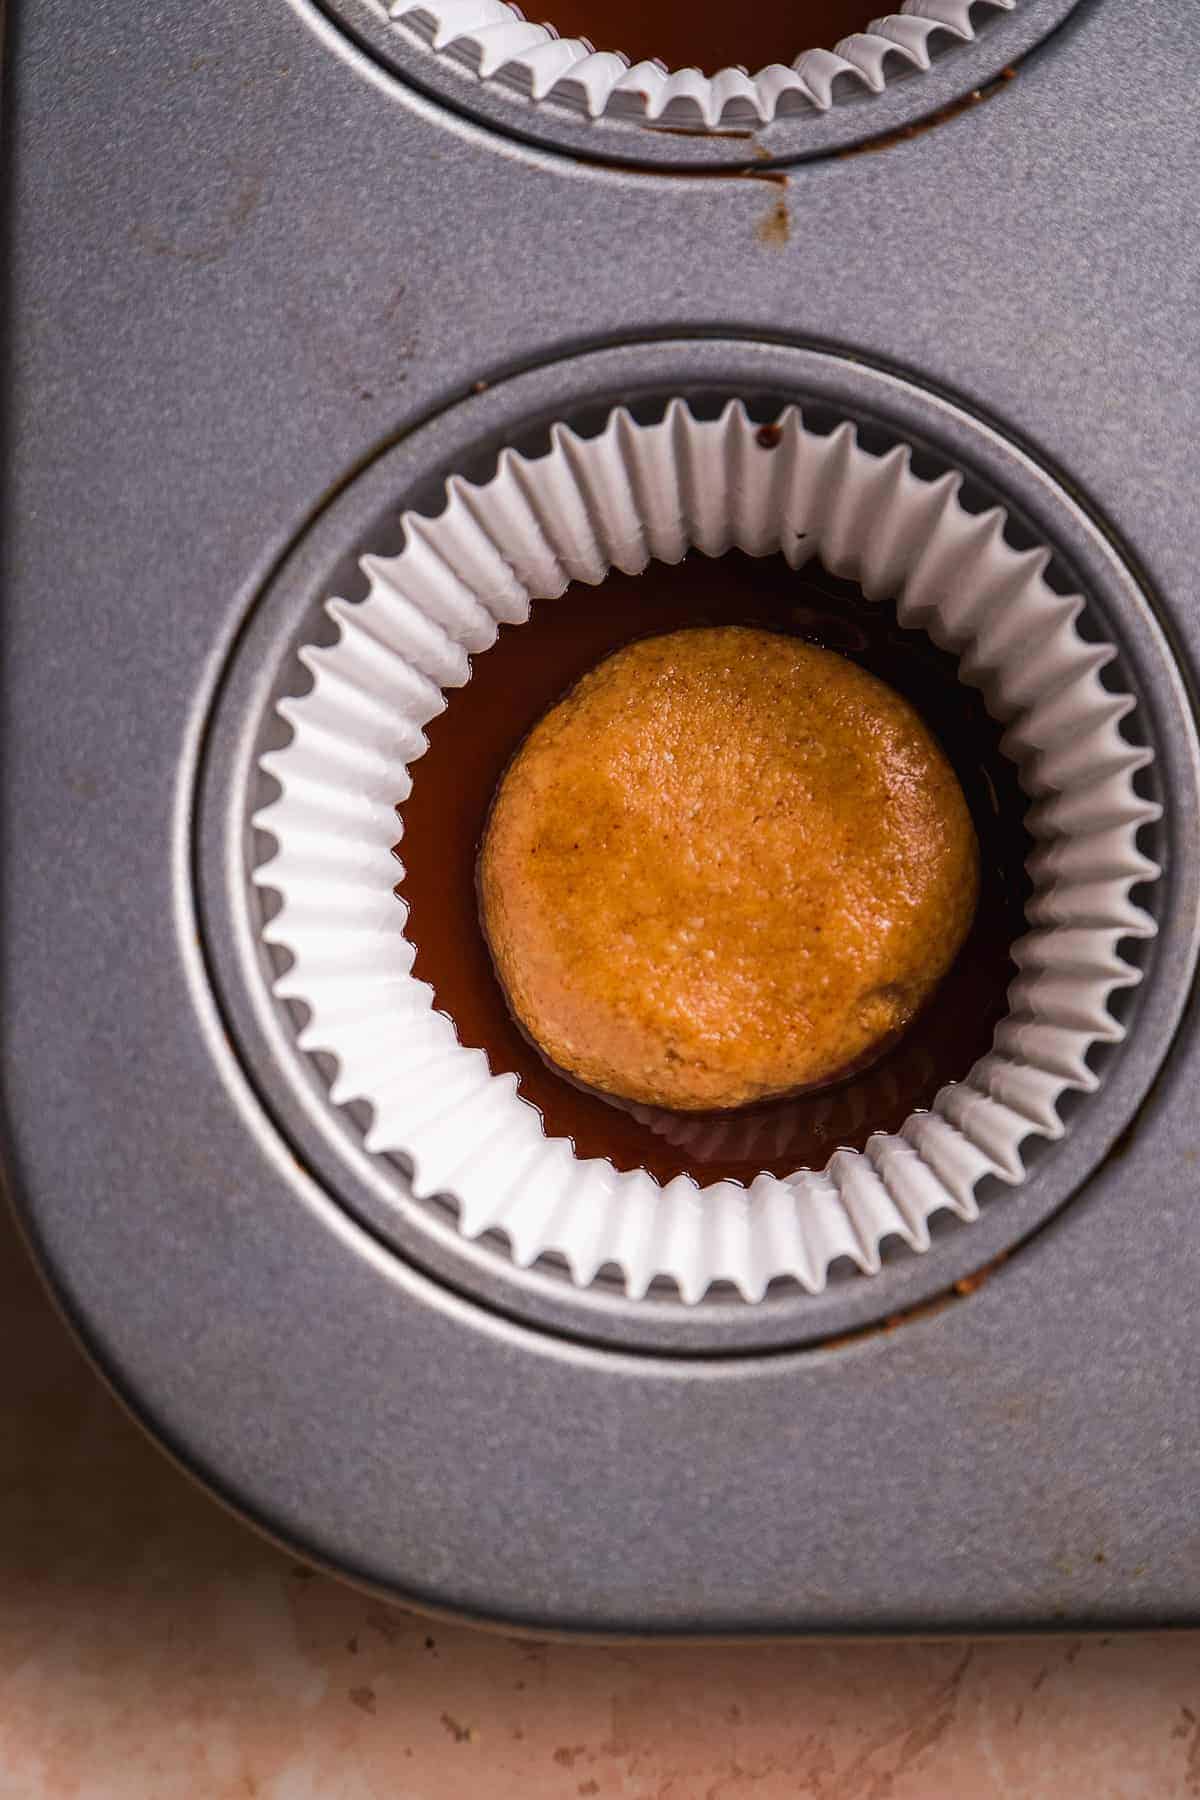
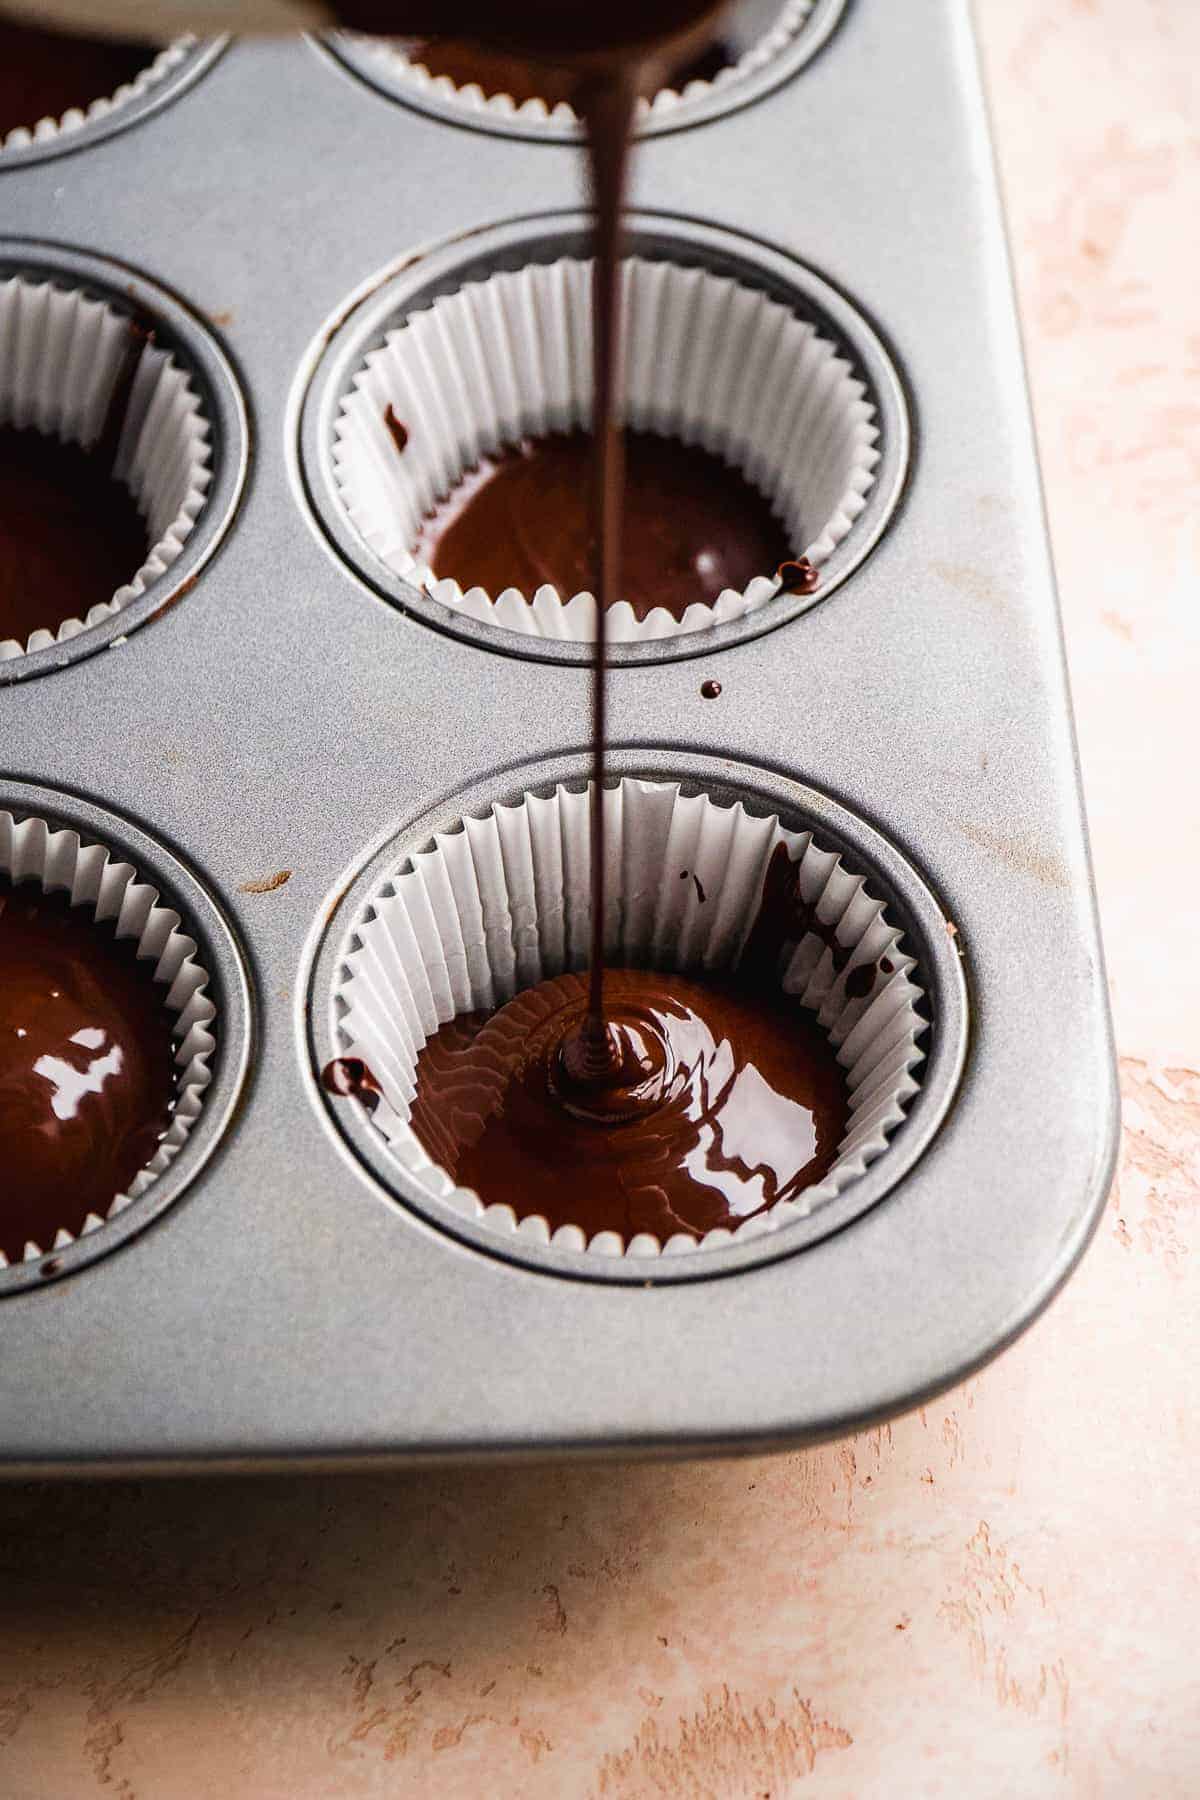
Then stir the chocolate in the pot to make sure it's still thin and smooth. If needed, warm it up again over medium-low heat. Pour over the filling in each liner to cover the peanut butter ball.
Don't fill too high or it will be an extra large Reece's cup (not a bad thing...but also very hard to eat).
Transfer the pan to the fridge where the chocolate will set in about 30 minutes.
Serving Homemade Dark Chocolate Reese Peanut Butter Cups
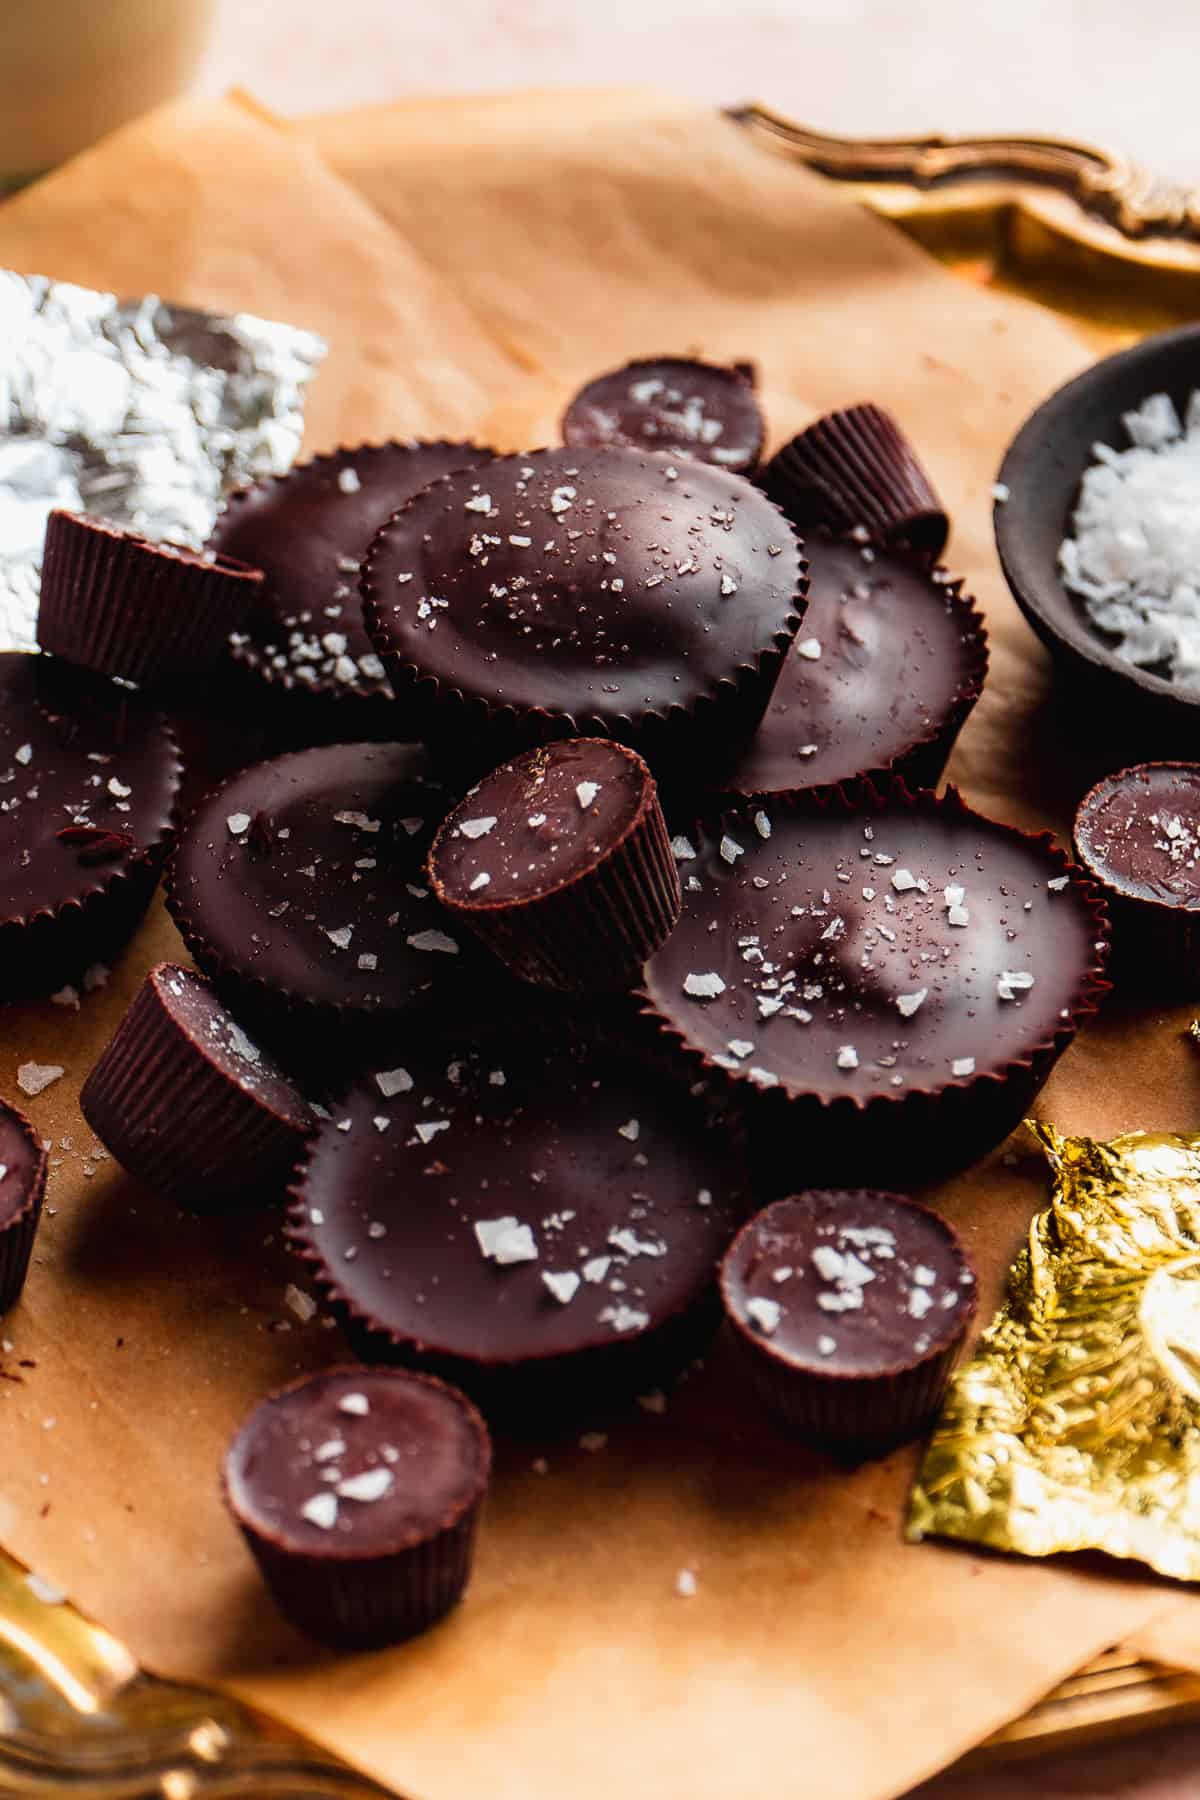
When ready to enjoy, peel the liner off of each peanut butter cup. Then sprinkle with sea salt and serve while still chilled.
These do melt as they come to room temperature so I recommend taking them out of the fridge just a few minutes before wanting to serve.
Storing Reese's Dark Chocolate Cups
Remove the liners from each peanut butter cup before storing. It's best to take them off within a few hours of when the chocolate has set or the next day. Once the chocolate has set, the longer they are on the peanut butter cups the harder they are to remove.
This is because most cupcake liners have a paper liner whereas Reece's cups are wrapped in a liner that has a parchment paper feel so they are easy to unwrap.
Store the peanut butter cups in a container with a lid or in a freezer bag in the fridge. Because they chocolate has set, you can stack them on top of each other. Don't store them out on the counter unless you have tempered your chocolate.
Dark Chocolate Reese FAQs
Yes, the traditional Reese's brand dark chocolate peanut butter cups contain dairy. That's why I made this recipe which is dairy free!
Most dark chocolate does contain dairy but there are some brands out there that are vegan like Enjoy Life (my favorite).
Yes in fact most traditional Reece's cups are gluten free. However, some of their seasonal shapes like their iconic eggs are not gluten free so make sure to read the label if this is something you are concerned about.
I think this depends on how you define u0022good for youu0022. These peanut butter cups in particular are made with healthy and cleaner ingredients than the typical Reece's but do still contain chocolate and yes, sugar. I'm of the opinion that they are the perfect way to satisfy that sweet tooth!
PS : If you make this recipe, be sure to leave a star review and comment below! Also be sure to follow along with me on Instagram and Pinterest to stay up to date on all tasty recipes here at The Fit Peach!
For more nut butter recipes, check out my:


Recipe

Homemade Dark Chocolate Reese's Peanut Butter Cups
Ingredients
- 13- oz dark chocolate
- 2 tablespoon coconut oil
- ½ cup peanut butter - creamy
- 1 tablespoon maple syrup
- 1 teaspoon vanilla
- ⅓ cup almond flour
- sea salt to top
Instructions
- Melt the dark chocolate and coconut oil in a pot on the stove over medium-low heat. Stir continuously until the chocolate is thin and smooth.
- Fill a cupcake pan with liners. Spoon the melted chocolate into the liners so the bottom is just coated in chocolate. Don't over fill in this step. Set the pot back on the stove over low heat so the chocolate remains warm.
- In a bowl, mix together the peanut butter, maple syrup, vanilla, and almond flour until the flour is well incorporated. This is best done with a spoon or spatula. The mixture should be thick. Use a tablespoon or a small cookie scoop to scoop the mixture and roll into a ball with the palms of your hands. Press down gently to flat the ball into a hockey puck shape. If you want your peanut butter cups to look like the classic Reece's, make sure the filling is smaller in circumference than the bottom of the liners. This allows the chocolate to fill up around the filling like a Reece's cup. Place the filling inside each liner in the center of the chocolate.
- Stir the melted chocolate a few times to make sure it's still thin and silky smooth. If needed, warm it up again on the stove over medium-low heat with another tablespoon of coconut oil. Pour the melted chocolate into each liner enough to cover the peanut butter filling. Don't over fill or your peanut butter cup will be super big and hard to eat. You want the chocolate to just barely cover the filling.
- Transfer the pan to the fridge and allow the chocolate to set for about 30 minutes. Once the chocolate has set, peel off the liners, sprinkle with sea salt, and enjoy!
As you say on your tik tok video “these are better than the real thing”. You are so right!! I love these so much!
Thank you for your wonderful recipe!
They totally are better! So glad you enjoyed them!
Just made these with Ghirardelli dark chocolate chips to replace Reese’s Thins for my elderly mother in law. I doubled the recipe but tried to make them so thin in mini baking cups I wound up with way more chocolate and filling than needed. I mixed the remaining chocolate & peanut butter together and I’ll be throwing it in the Vitamix tomorrow with some frozen strawberries, spinach, and almond milk for a decadent smoothie! Delicious, thanks!
Yum! So glad you enjoyed the recipe!
Woah, Just Take it Easy Man
Ohmygosh! These look and sound amazing!
I just listened to the FBP Podcast and learned a TON.
I'm just starting out, so thank you.
Will be checking back on your site frequently.
Best Wishes,
Sandy
nadinesbakeryandblog on IG
Hi Sandy! Thank you so much! Good luck on your blogging endeavor 🙂