


Chocolate and Orange Cake
Layers of cake and homemade icing combine to create this showstopping chocolate orange cake recipe. Made with simple ingredients, it effortlessly combines the decadent flavor of chocolate with a bright pop of citrus making it the perfect dessert for holidays, birthdays, and everything in between!
This Orange Chocolate Cake is a heavenly mashup
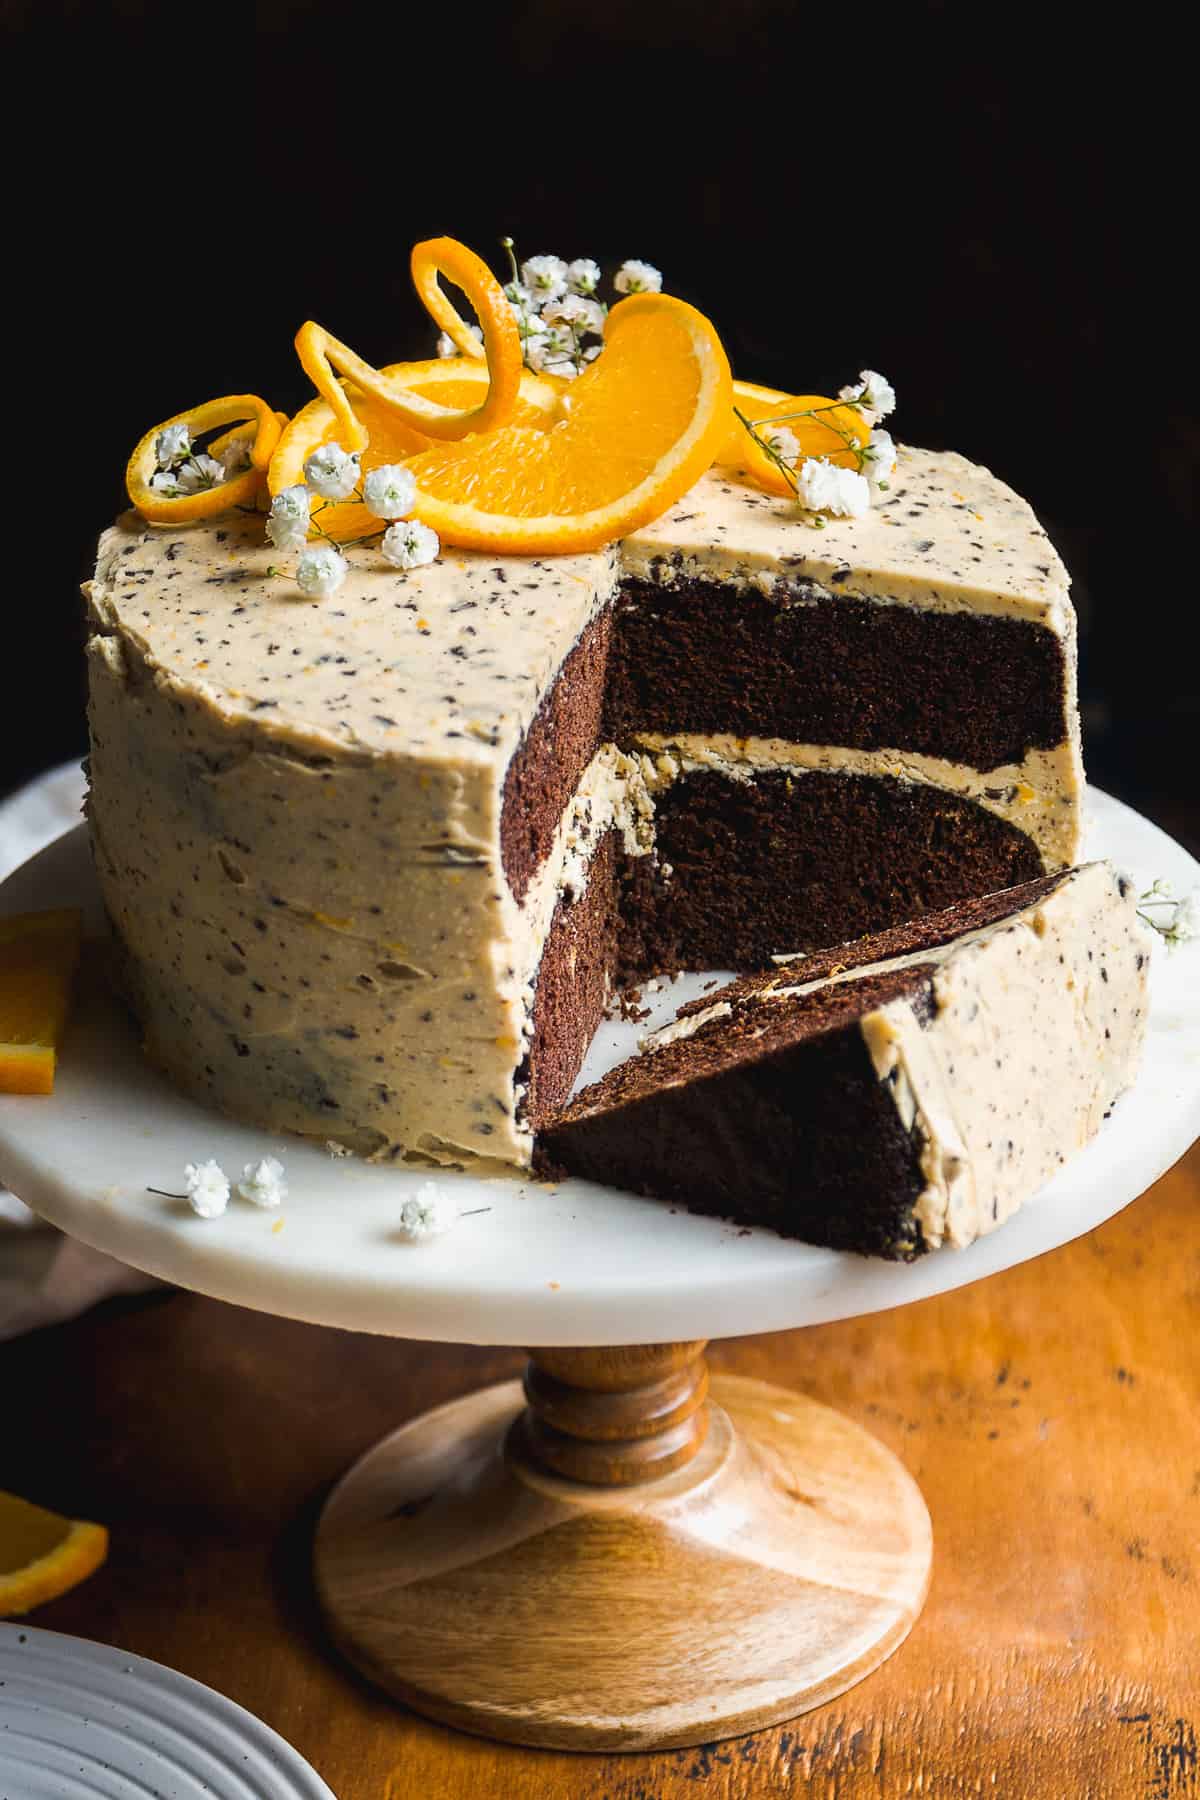
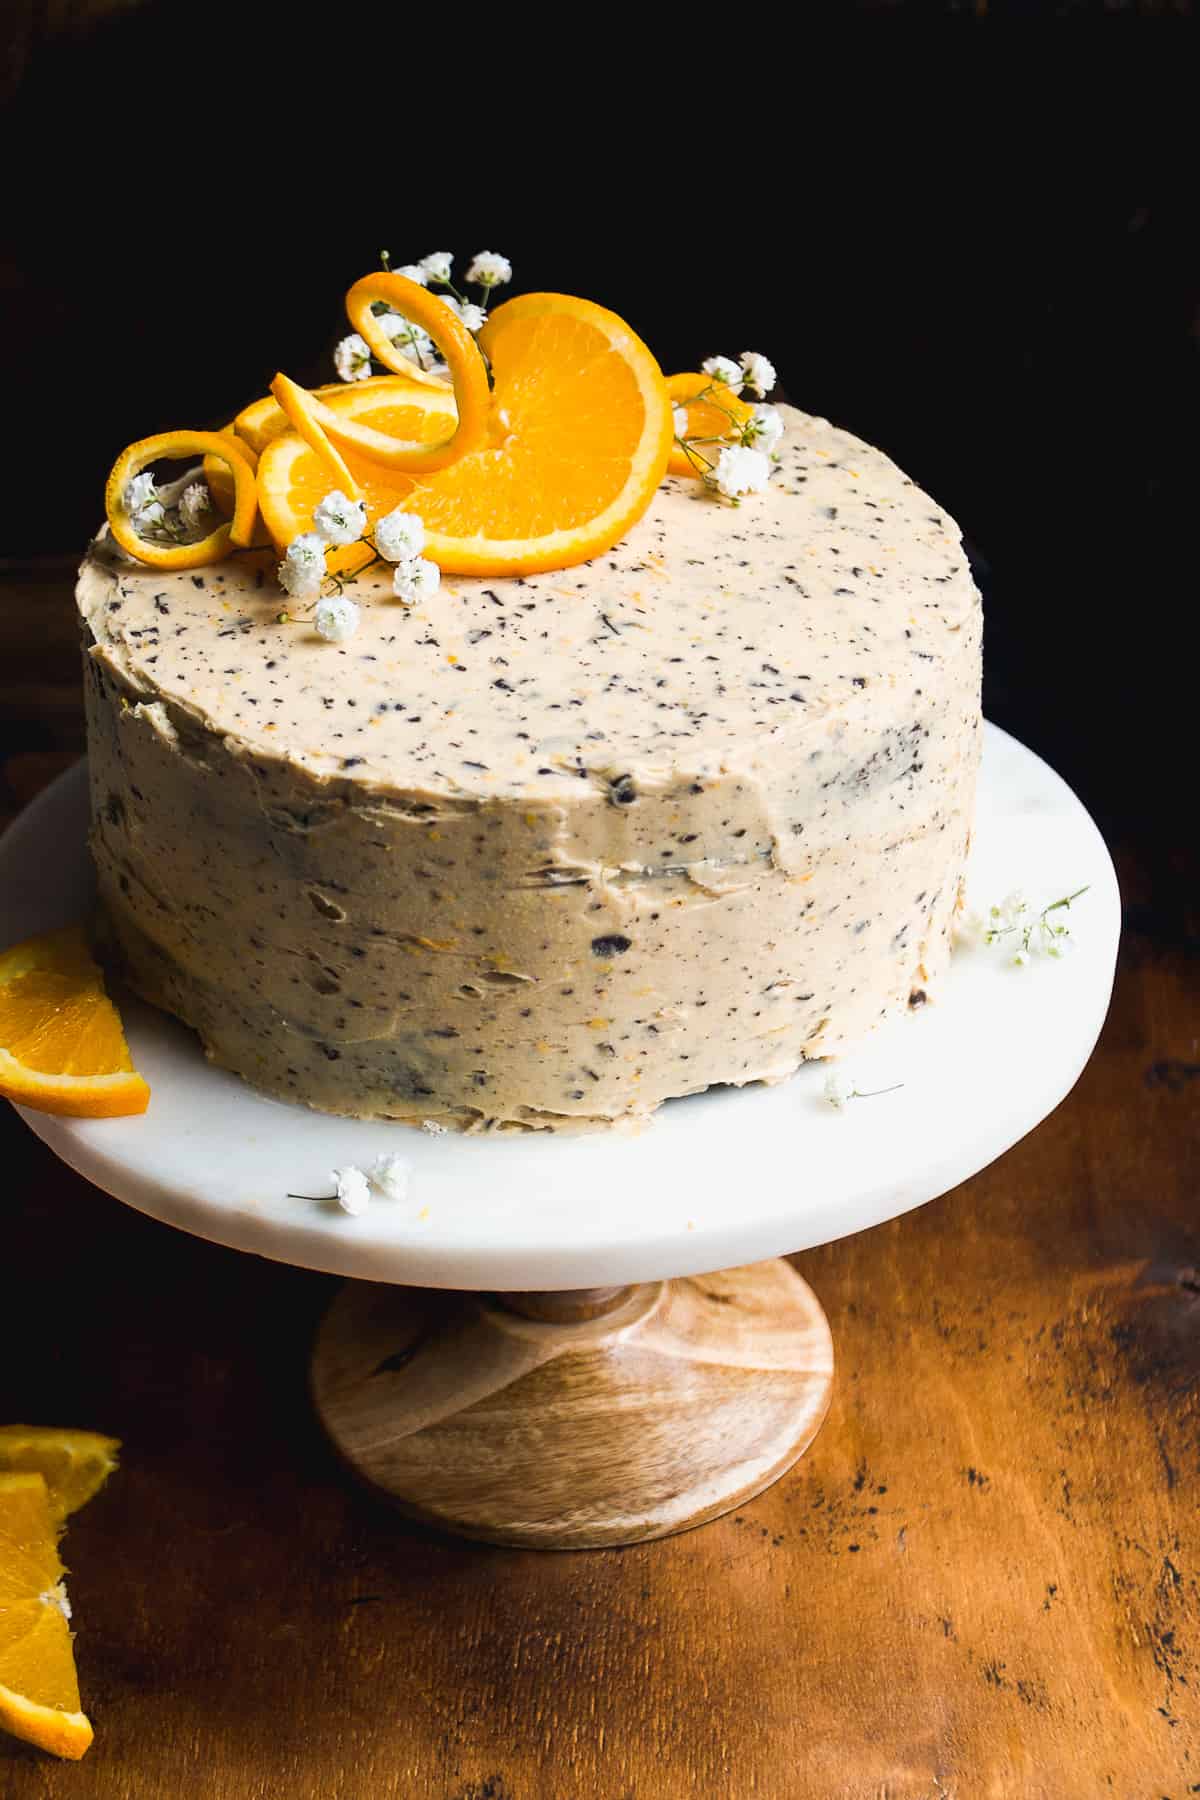
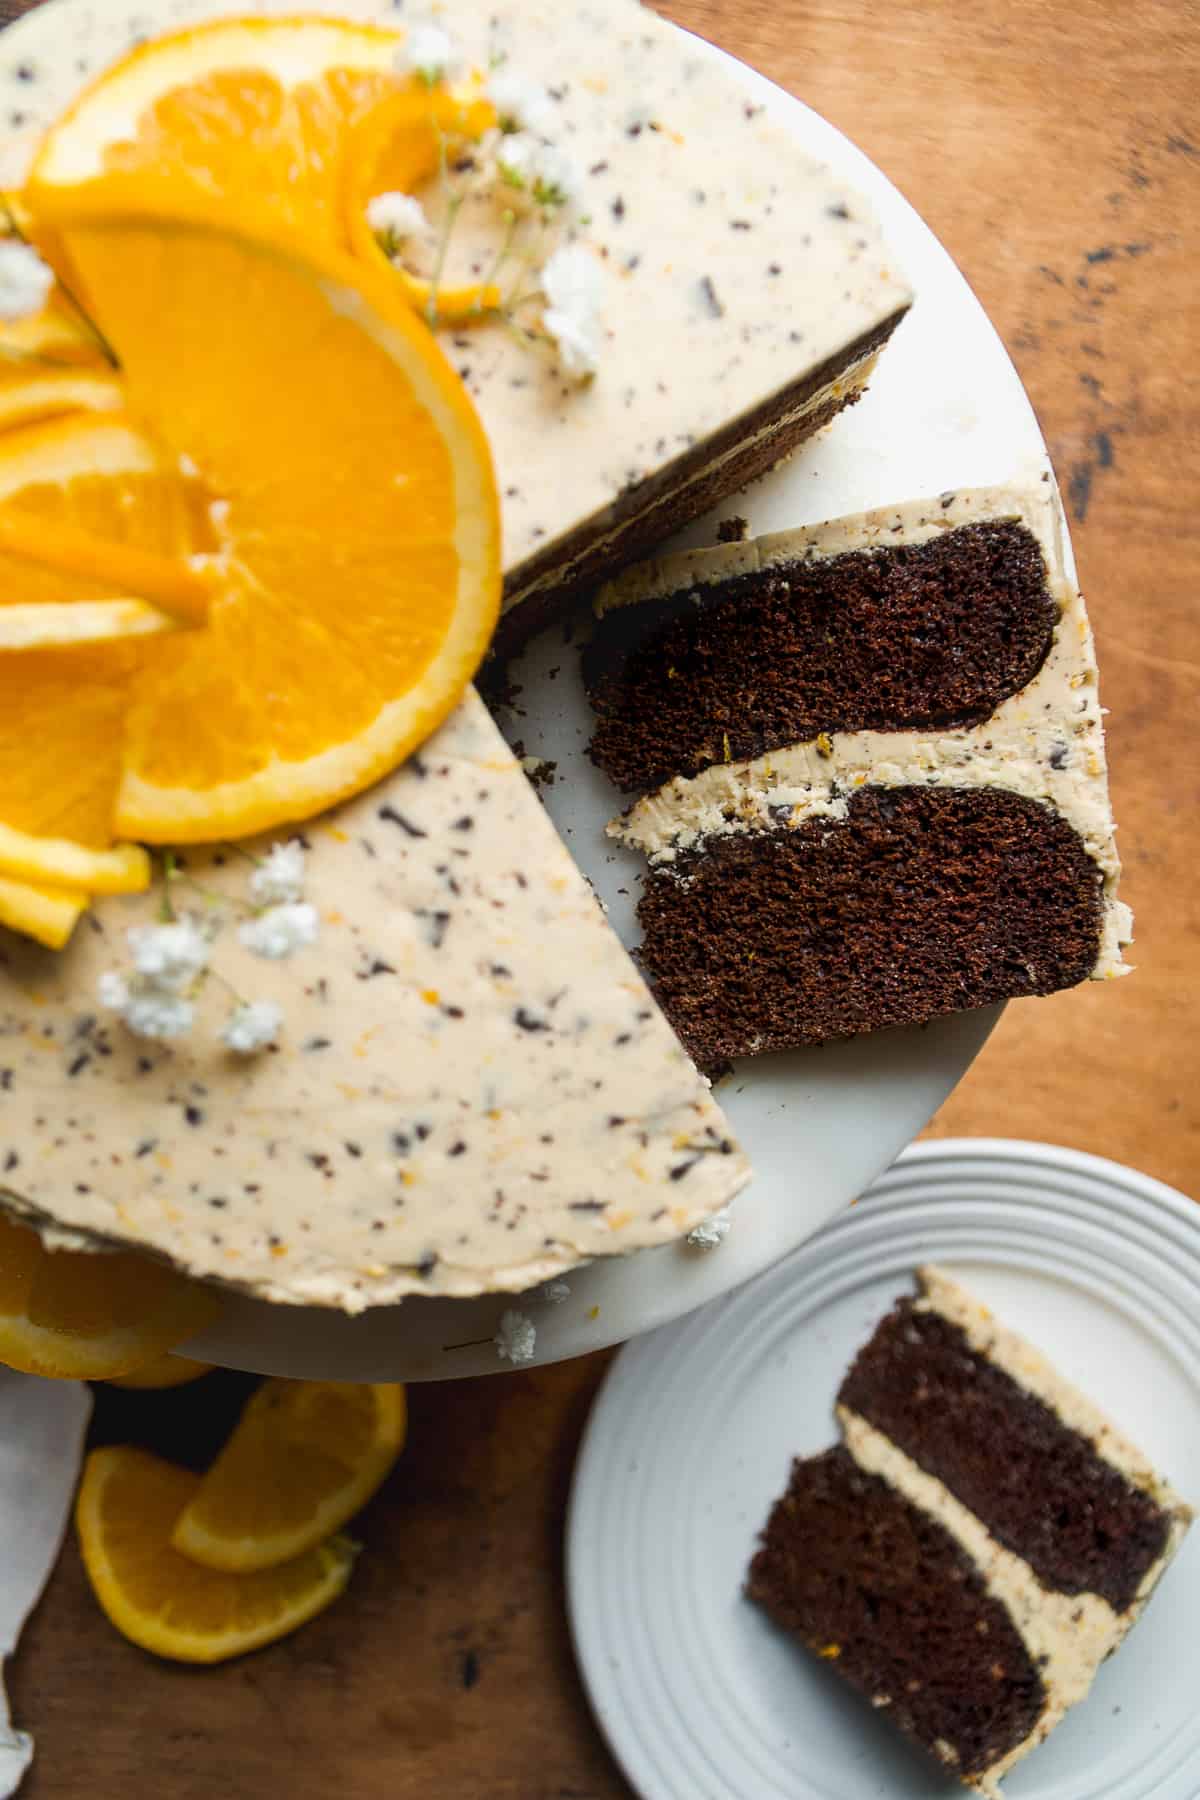
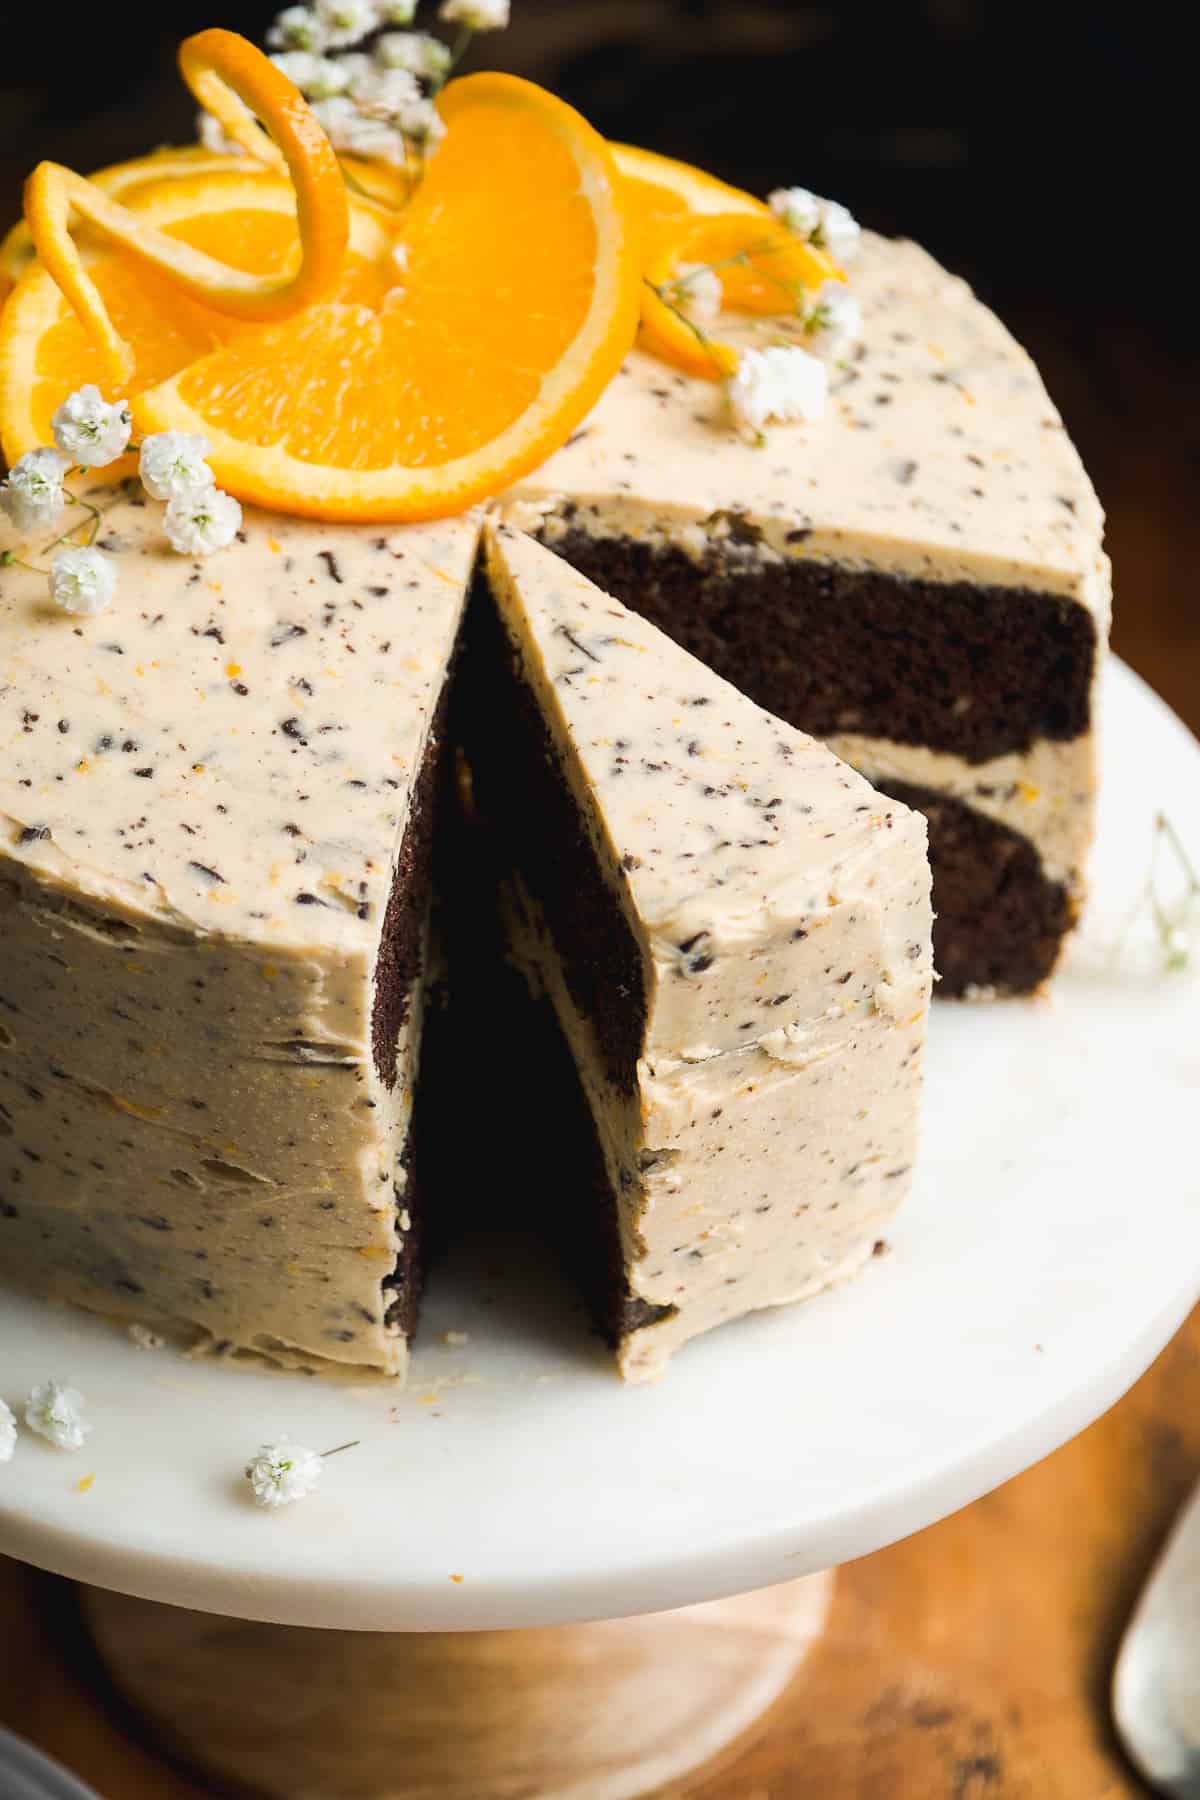
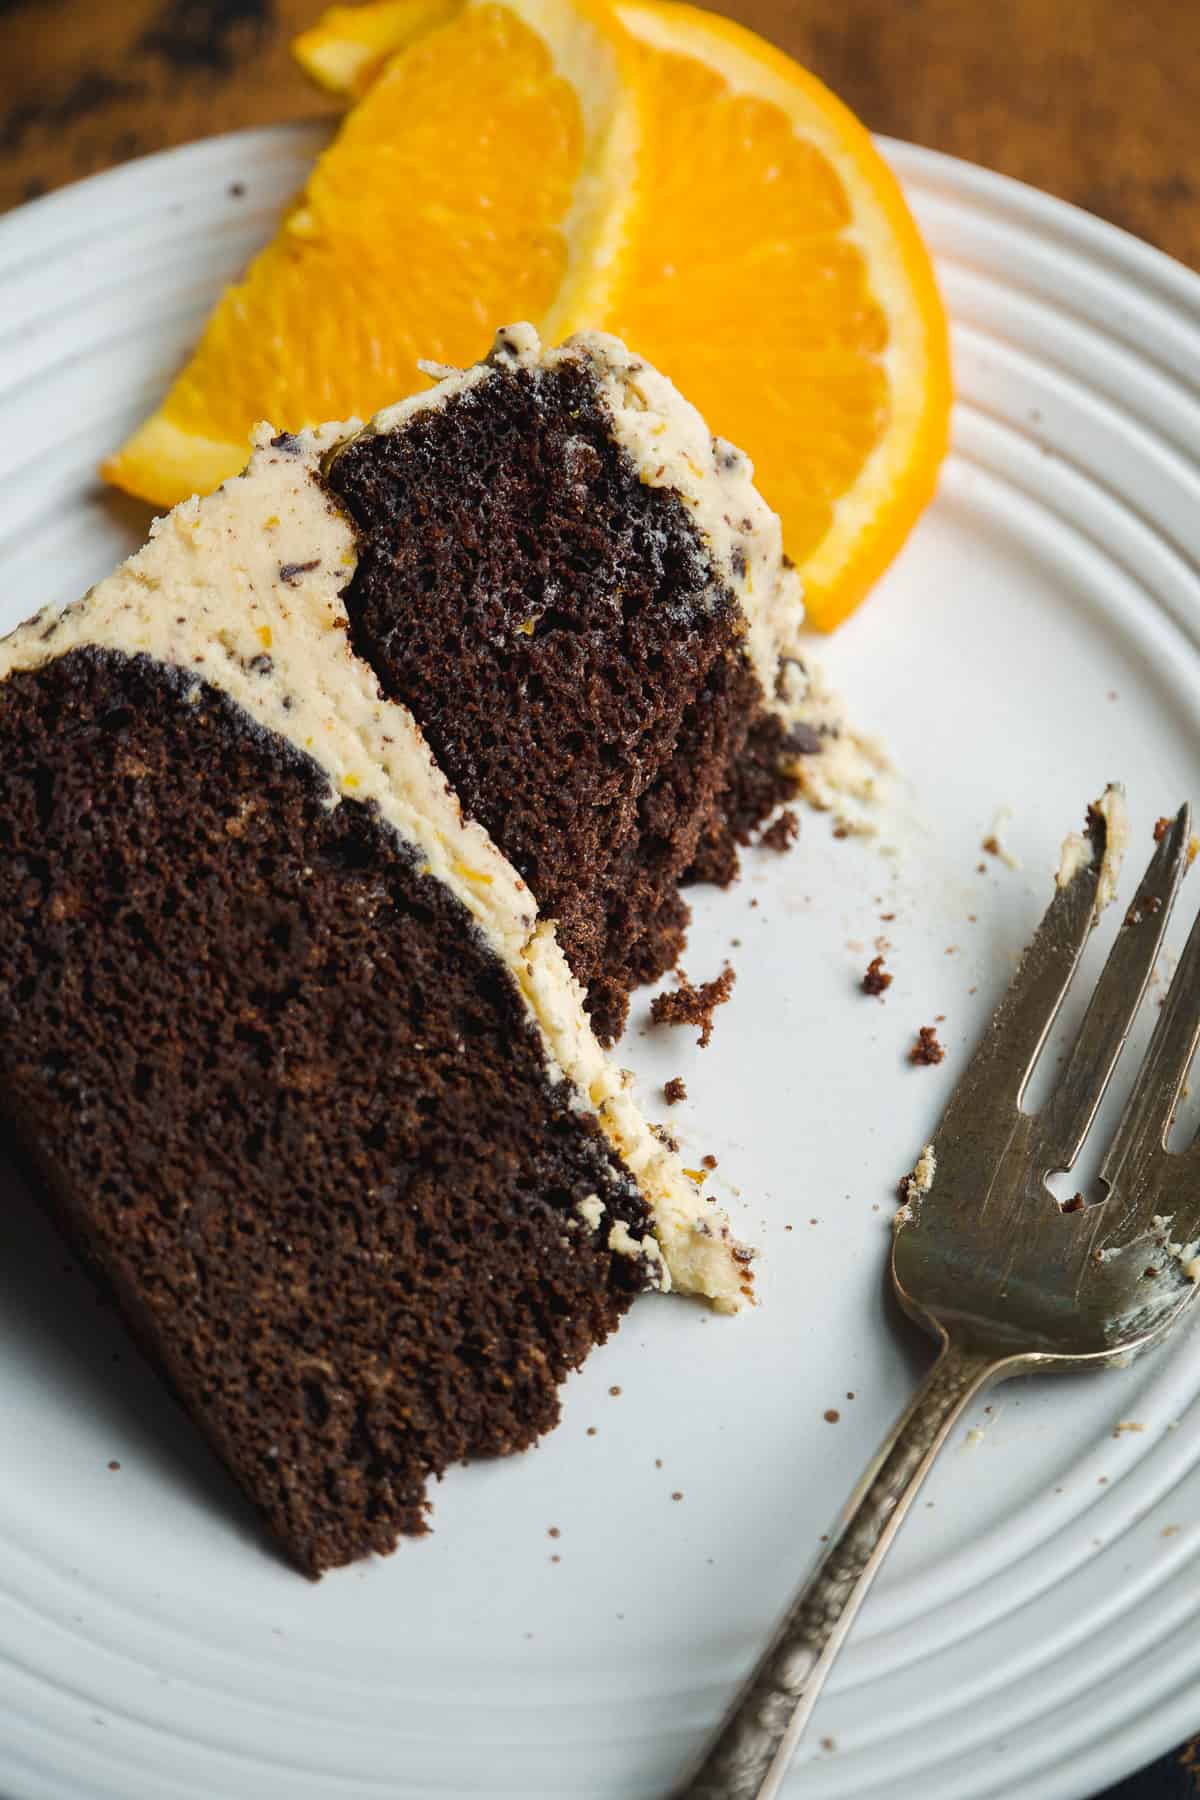
This is by far one of my top 3 favorite cakes I’ve ever made (it’s up there with my brownie cake and peach cobbler pound cake). And that says a lot because I’ve made a lot of cakes! One bite of this chocolate orange cake left me wondering where this flavor combo had been all my life. It’s rich, plenty chocolatey, and the addition of orange brightens the taste without being overpowering. Finished off with layers of homemade creamy orange frosting, this recipe is absolutely a dream. Pretty in presentation and extra moist, it’s the perfect classic combination to serve at every occasion and guaranteed to have your guests begging for the recipe!
Jump to:
Why you'll love this Chocolate Orange Cake Recipe
- It’s rich and chocolaty but not overpowering
- Soft and tender cake layers
- Homemade zesty orange buttercream with real chocolate specks
- It’s elevated in flavor profile but simple to whip up
- Can easily be made gluten free
Orange Birthday Cake Frosting
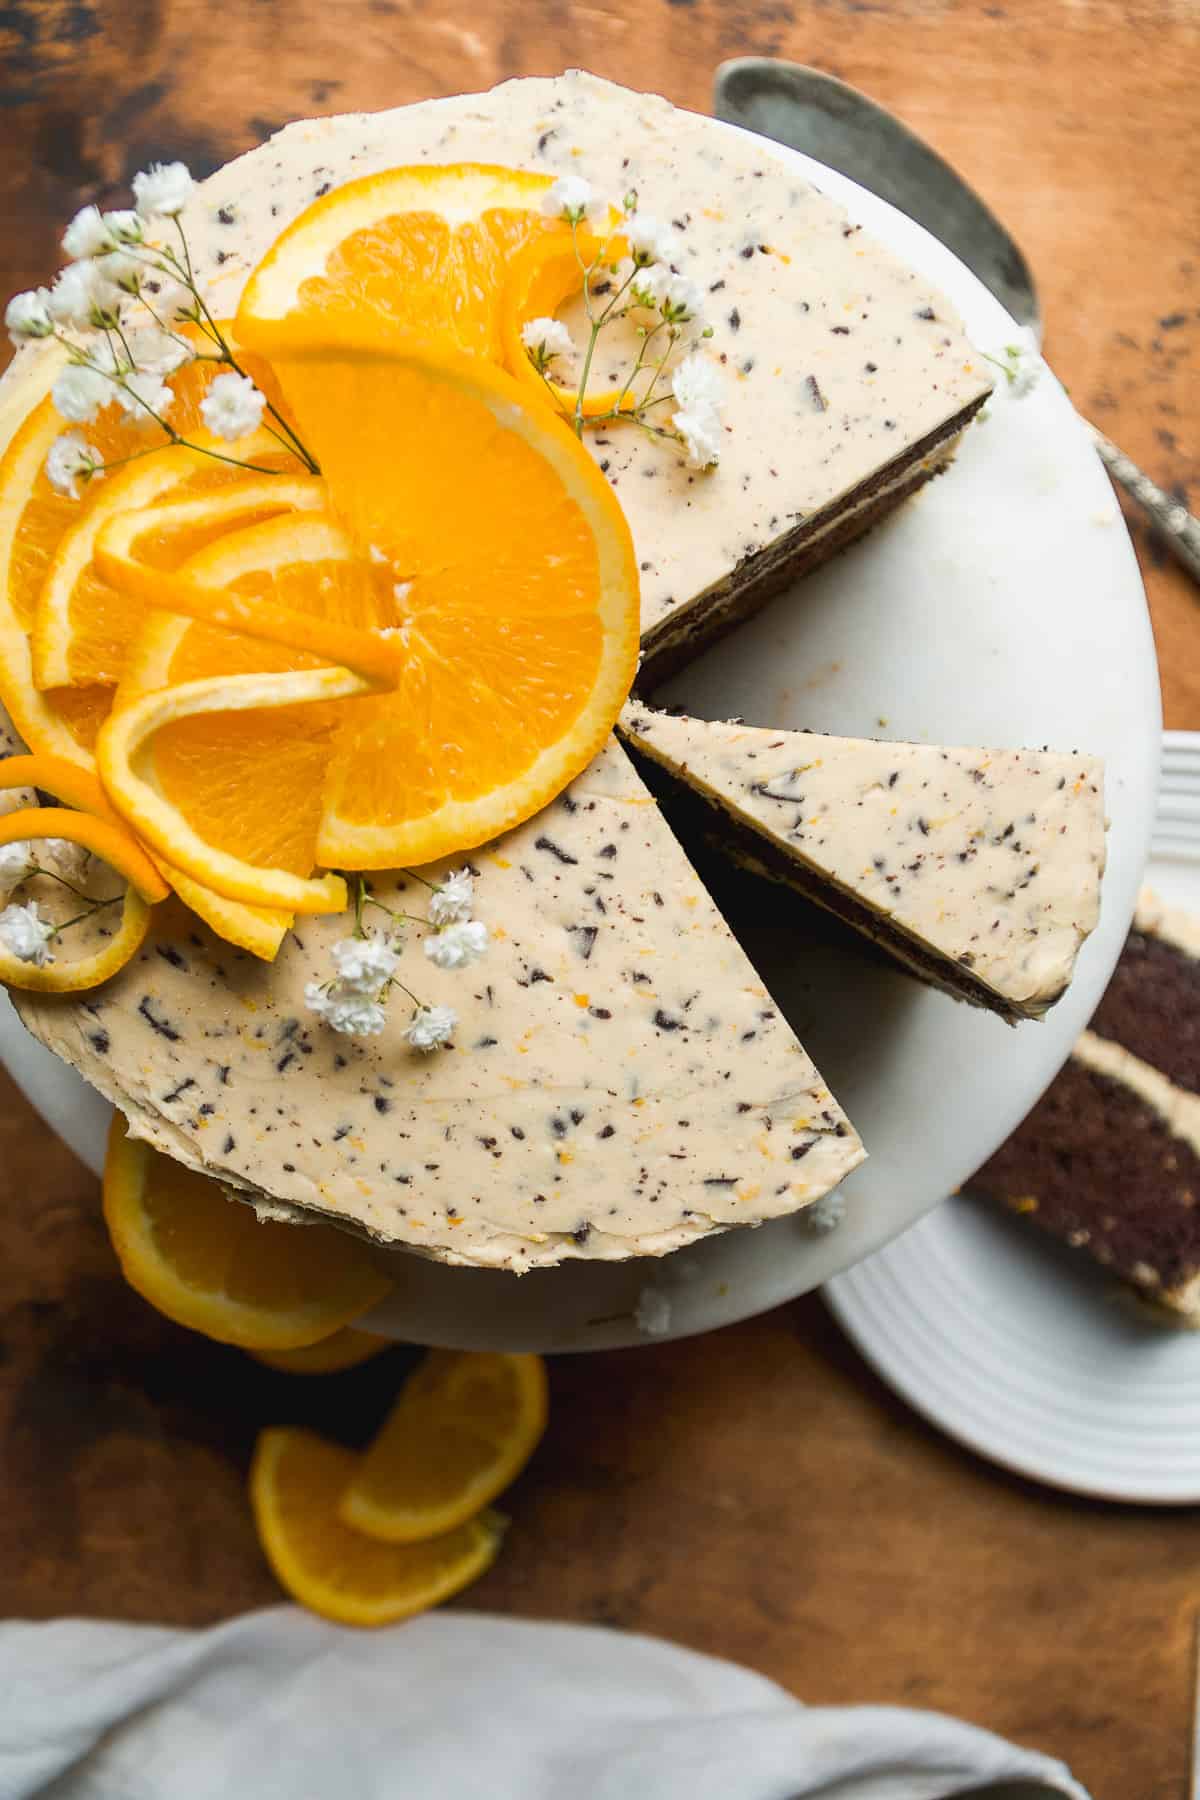
While the chocolate cake layers are a treat on their own, the orange frosting takes it to the next level. Because the cake is more chocolate than orange, I wanted the frosting to really have that pop of citrus and that’s just what it does. It’s a simple orange buttercream with orange zest and juice but the real magic comes when we fold in chopped chocolate. It adds a speckled effect to the icing that effortlessly elevates the cake making decorating it a breeze.
Ingredients and Substitutions
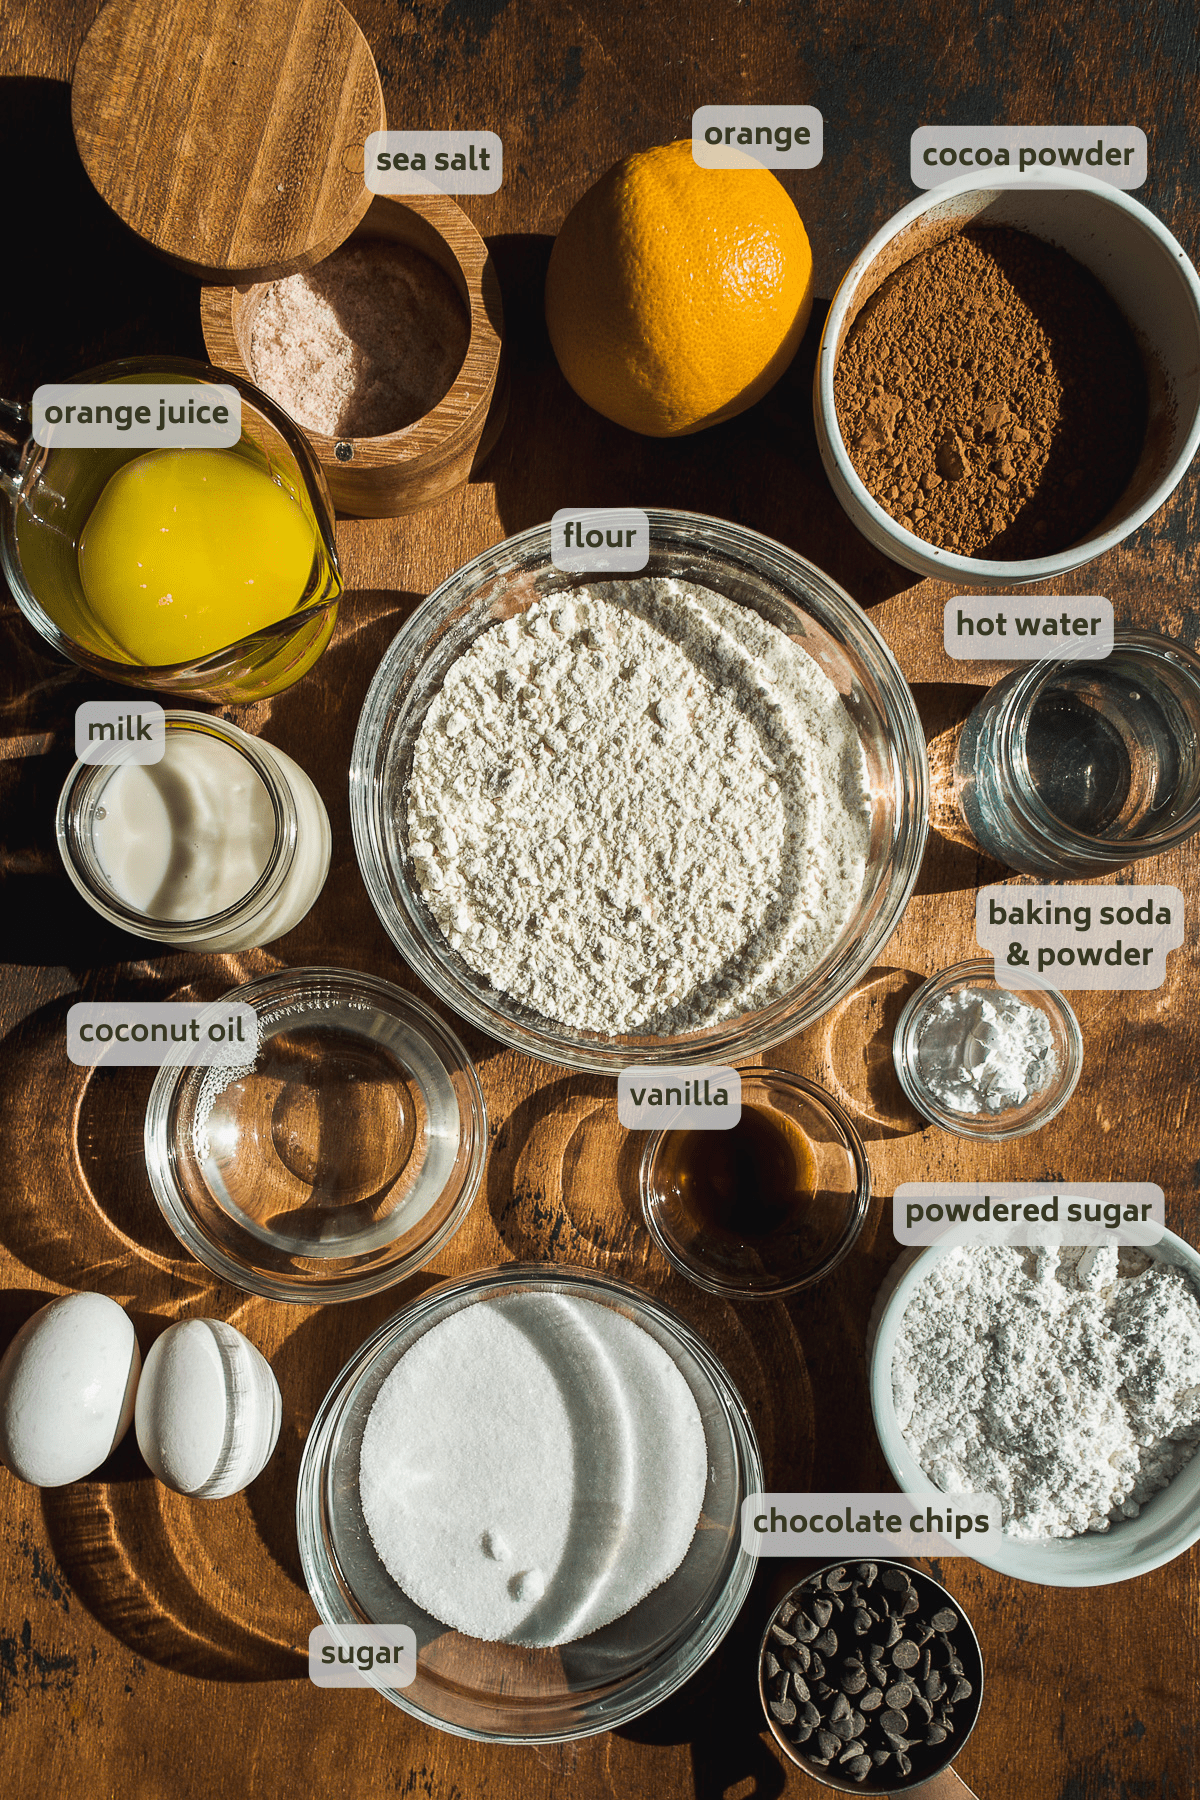
For the cake
- Eggs - Help create a rich flavor and provide plenty of structure so your cake holds together. I haven’t tested it for this recipe yet, but you could try replacing the eggs with flax eggs if needed.
- Sugar - Regular granulated sugar helps add the perfect amount of sweetness.
- Oil - I use coconut oil to add moisture to the batter, but substitute with other oil or even melted butter if needed.
- Milk - Used to combine the ingredients, creating a smooth batter. Opt for dairy-free milk if needed.
- Orange juice and zest - Fresh, unsweetened orange juice and a bit of zest provide the best flavor for orange cake.
- Vanilla extract - Helps enhance the rest of the ingredients. If you can, use 100% pure vanilla extract for the best taste.
- Flour - I made this recipe with regular all-purpose flour, but it also works with a 1:1 gluten free flour alternative.
- Cocoa powder - To create the rich chocolatey taste. Make sure your cocoa powder is unsweetened. Or, for an even stronger flavor, use cacao powder in its place.
- Baking soda and baking powder - These two ingredients work together as a chemical leavener to help the cake rise and creating the soft, fluffy texture we want.
- Sea salt - An essential in all the best baked goods!
- Hot water - Used to combine the ingredients without overpowering the taste.
For the icing
- Butter - Unsalted, softened butter is the key to decadent frosting. Use dairy-free butter if needed.
- Sea salt - Necessary to create the best frosting.
- Powdered sugar - This helps create a smooth, fluffy texture while sweetening the taste.
- Orange juice and zest - Helps tie the flavors together for one cohesive and delicious cake.
- Shaved chocolate - Gently folded into the frosting for a bit of texture.
How to Make a Chocolate Orange Cake
For this chocolate orange cake recipe, we’re dividing the batter into two sections to create a double-decker layered cake that’s truly a masterpiece. You’ll need a large mixing bowl, two 8-inch cake pans, a turntable, and a spatula.
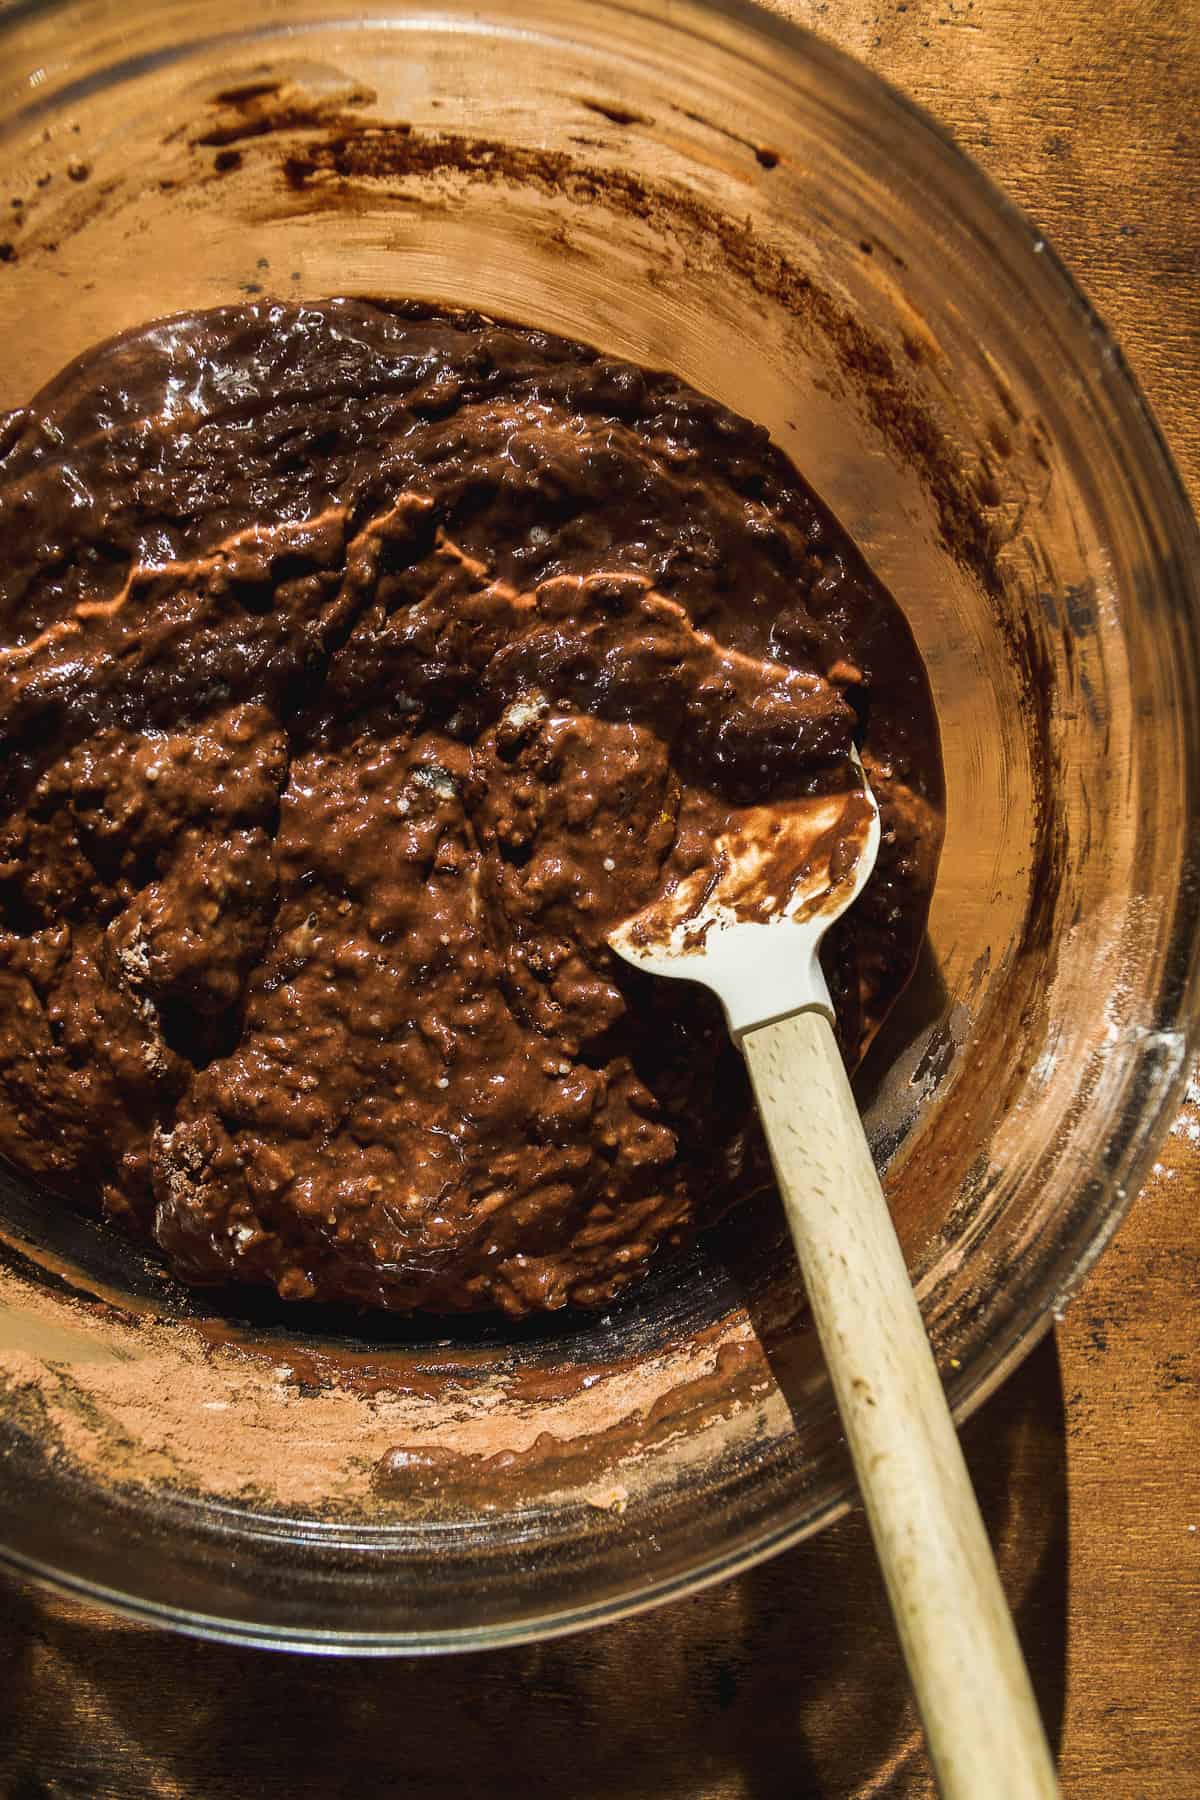
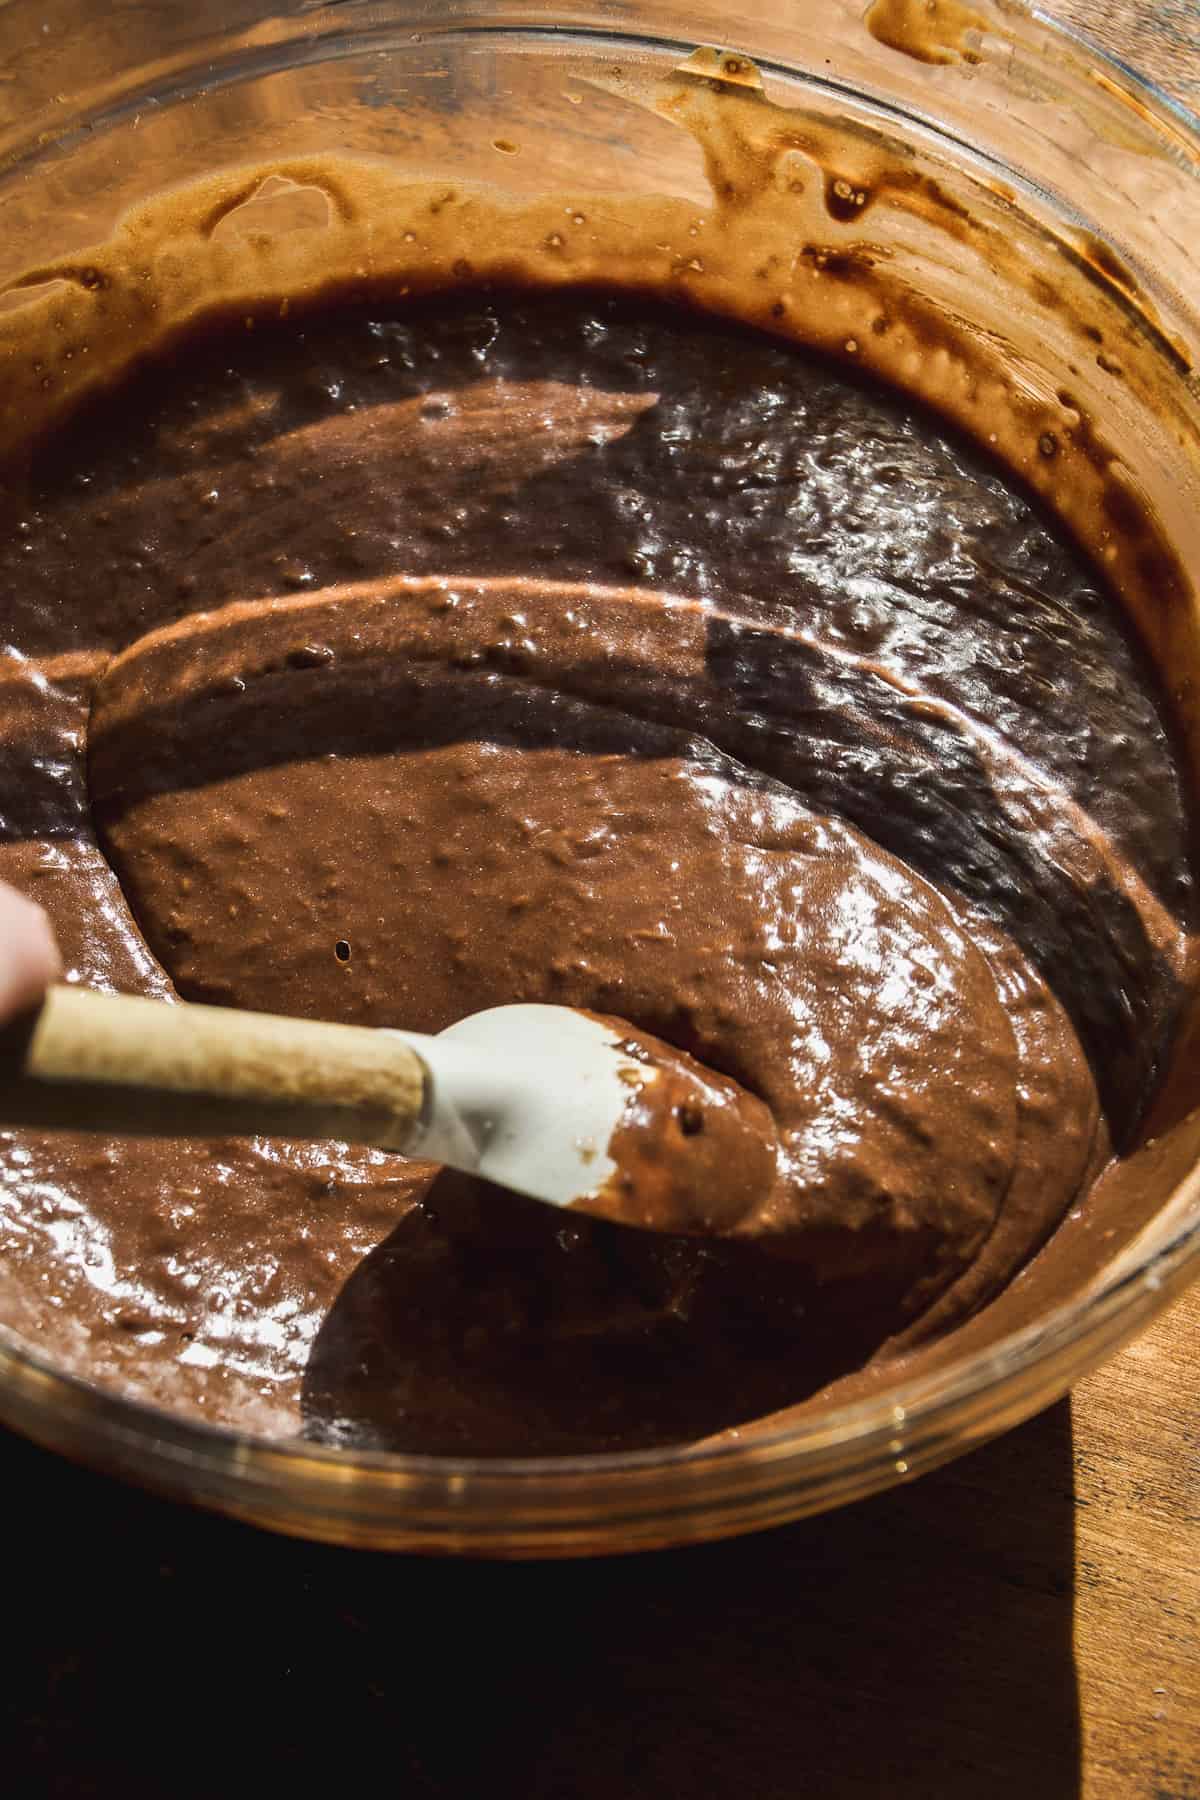
Step 1: Combine the ingredients. To begin, preheat the oven to 350 F. Then, whisk the eggs, sugar, melted coconut oil, milk, orange juice, and vanilla extract together in a large mixing bowl.
Fold in the dry ingredients including the flour, cocoa powder, orange zest, baking soda, baking powder, and sea salt, mixing just until the flour is about 90% incorporated.
Add the hot water. Pour the hot water over the batter, and working quickly, whisk to incorporate it into the mixture. Stir until the batter is smooth and no clumps remain.
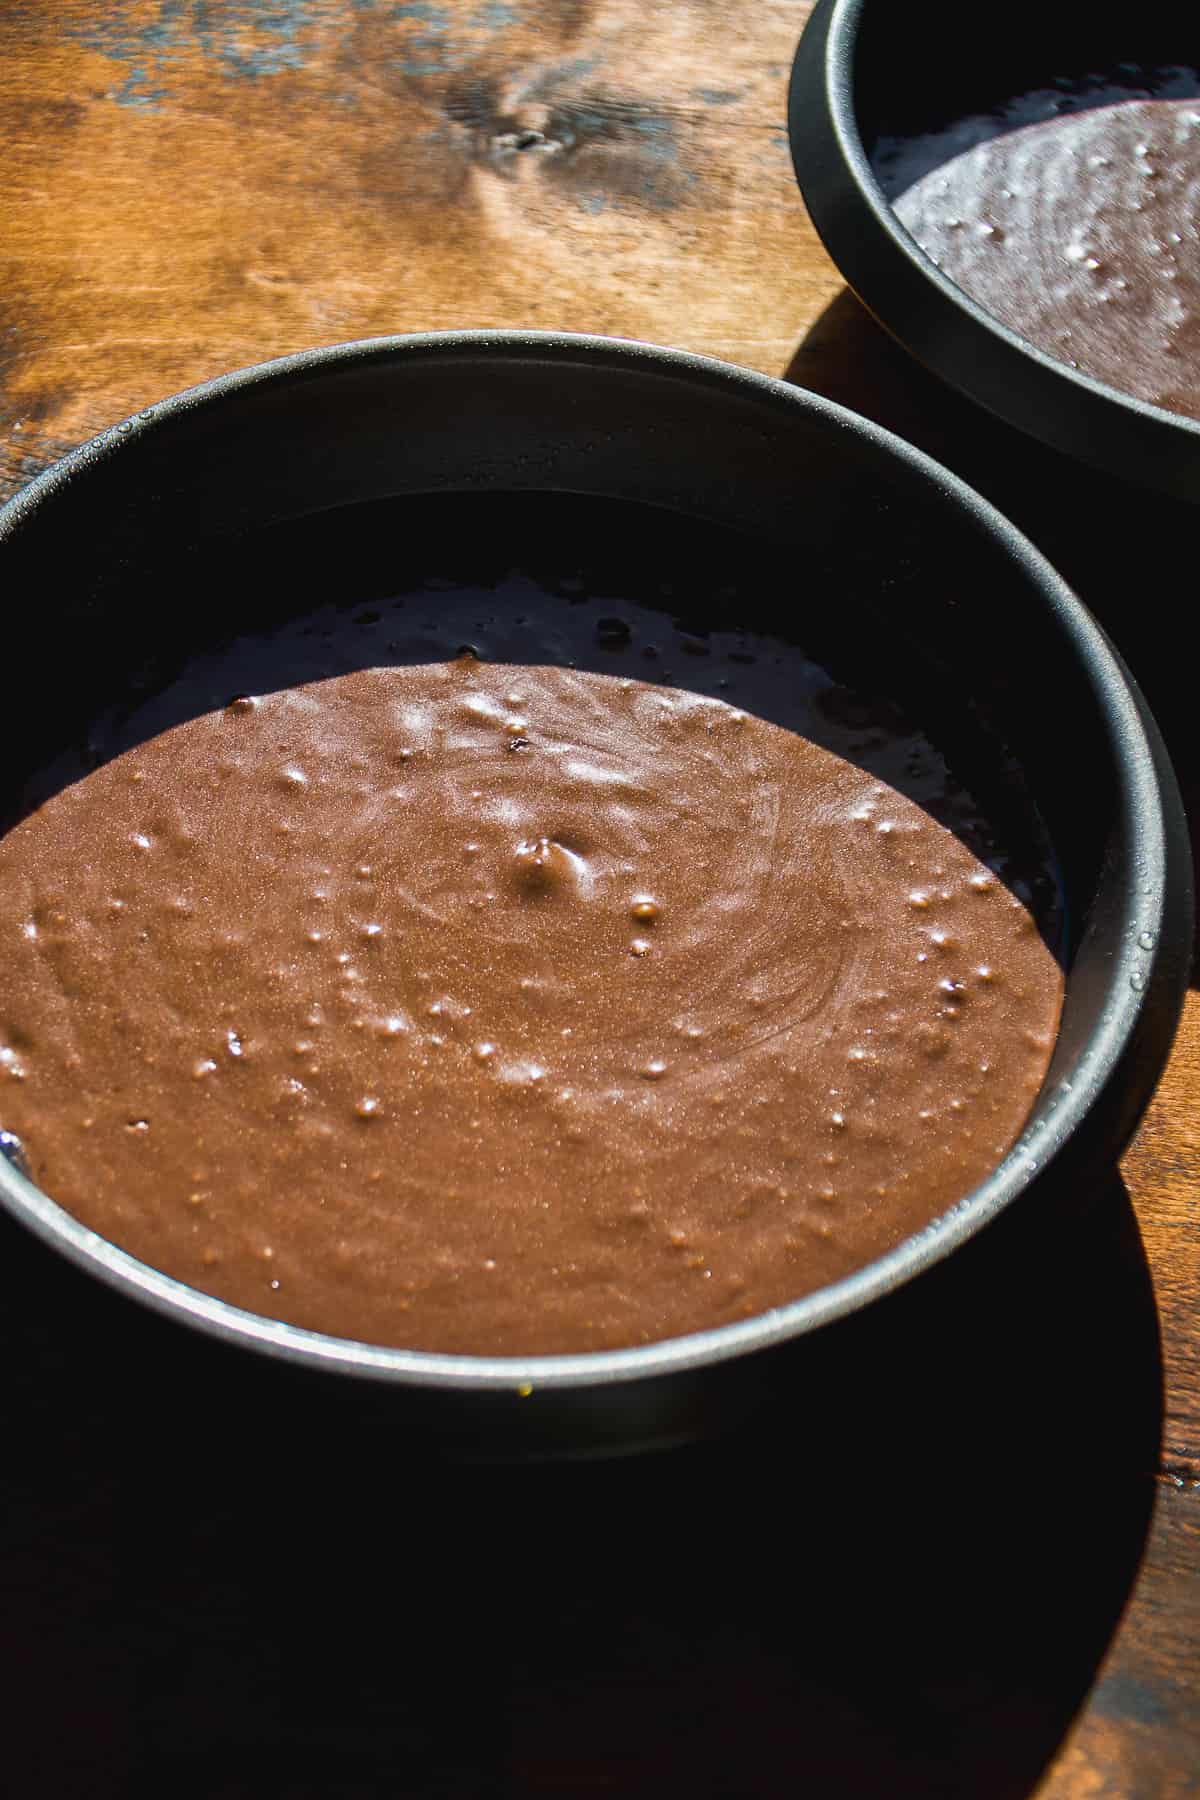
Step 2: Bake. Divide the batter equally between two greased 8-inch cake pans. Bake until a toothpick can be inserted into the center and comes out clean. Let the cakes cool in their pans. Then, place them in the fridge to chill.
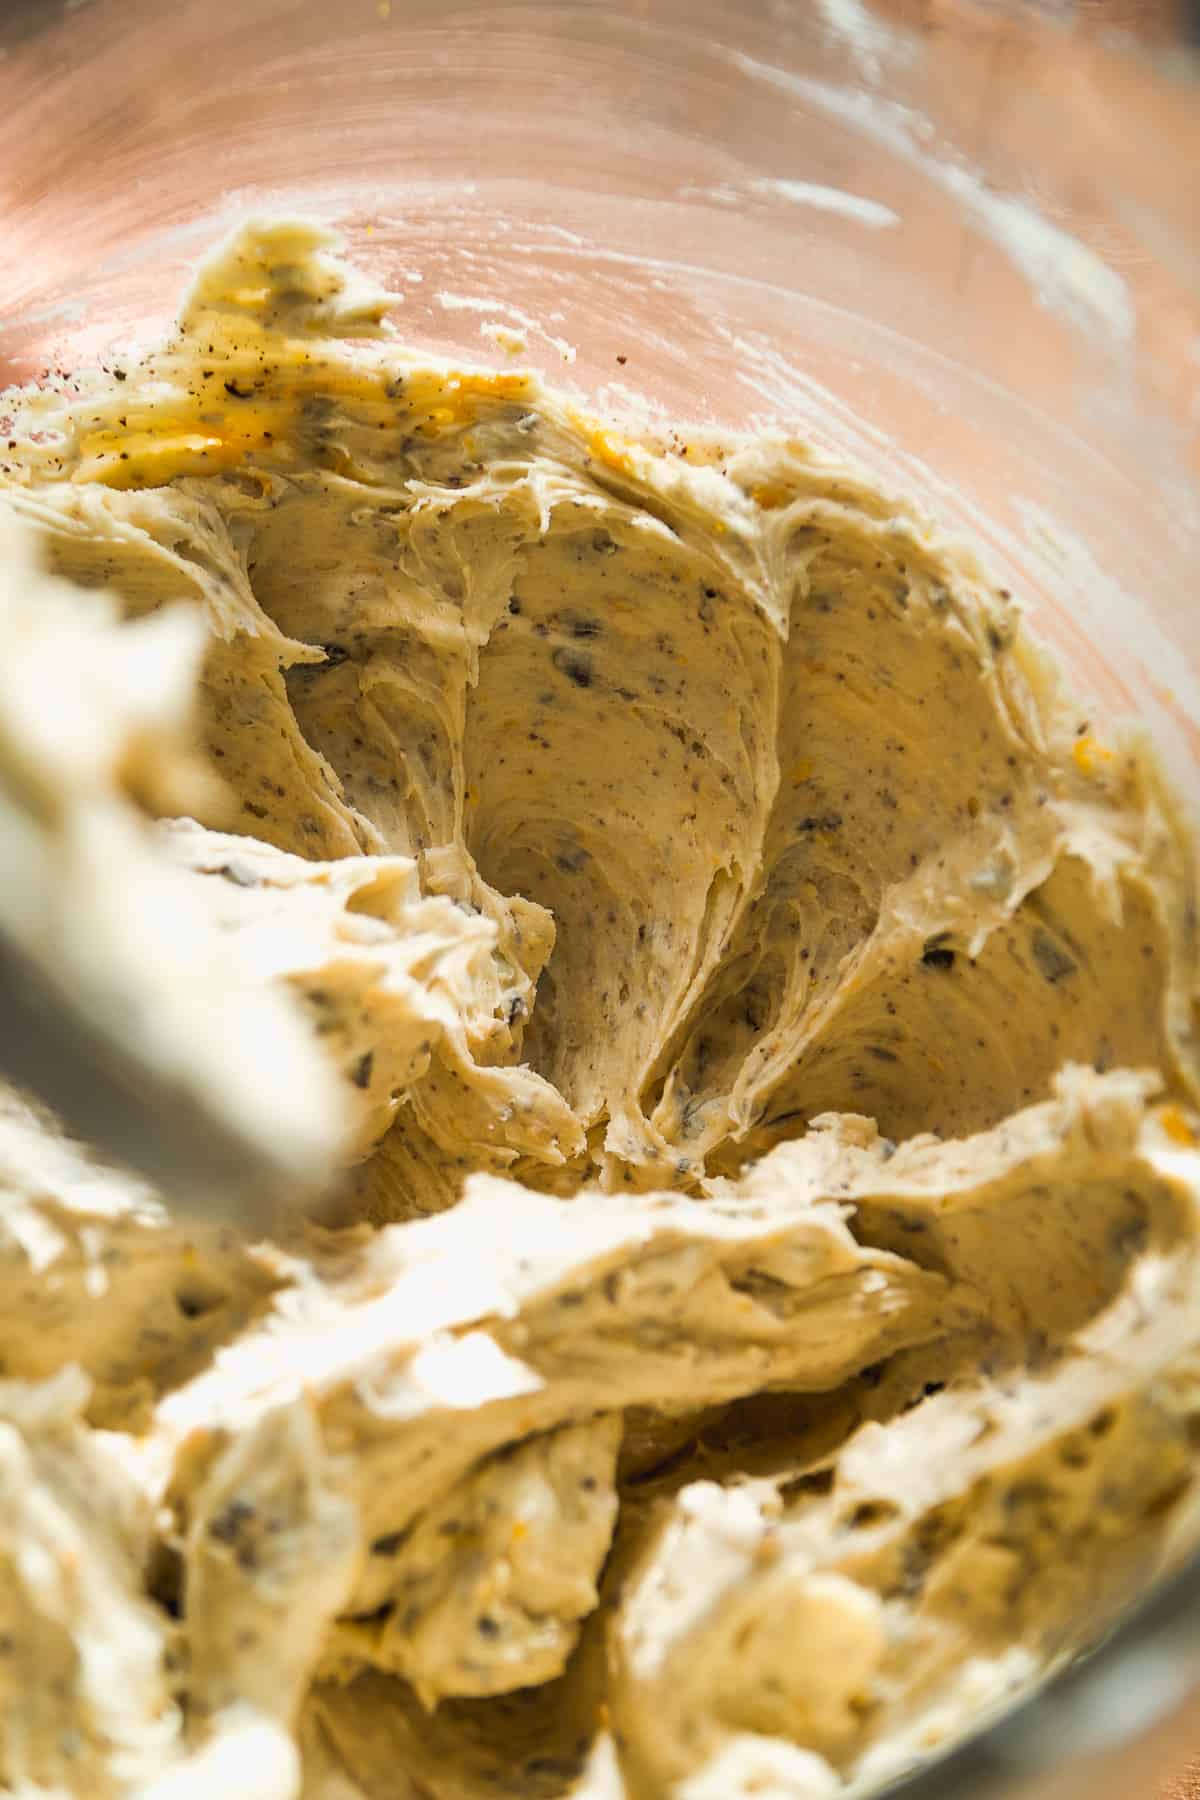
Step 3: Prepare the icing. In a mixing bowl, beat together the softened butter and sea salt until they are smooth and fluffy. Working in ½ cup increments, slowly add the powdered sugar to the bowl along with the orange juice and orange zest.
Mix continuously until you reach your desired consistency. Gently fold in the shaved chocolate, being careful not to overmix.

Step 4: Assemble the cake. Shave and level the top off of each cake to ensure an even, stable cake. Place one layer on a turntable, and spread ⅓ of the ceiling on top, making sure to cover the edges.
Next, place the second layer of cake on top followed by another ⅓ of the icing. Use a spatula to spread it in an even layer. Then, use the remaining icing to smooth around the edges of the cake.
How to make Orange and Chocolate Cake cupcakes
Follow the directions as laid out in the recipe card below. Then, instead of adding the batter to cake pans, fill a muffin tin with liners, and fill each cavity ¾ of the way full. Bake in the oven for 16 - 20 minutes until the cupcakes have a dome-shaped top and you can insert a toothpick into the center of one and it comes out clean.
You can frost the cupcakes with the same frosting. I recommend using a large piping tip if you add the chocolate shavings into the icing. This helps make sure the piping tip doesn’t get clogged. Alternatively, instead of folding the chocolate into the icing, leave it out, and simply ice the cupcakes with the orange frosting and sprinkle some chocolate on top.
Expert Tips
- Use a high-quality orange juice in the cake and the icing. The strong orange flavor is what you want to shine through the chocolate cake!
- Don’t skip the orange zest. This is what takes the cake from kinda orange flavored to WOW orange flavored. It adds special oils and texture to the cake that really makes the oranginess come through.
- Don’t overmix the batter. This can lead to a dry and tough cake. Only mix until the flour is almost completely incorporated. Then gently fold in the hot water just until the ingredients are combined and smooth.
- Do your best to evenly distribute the batter into the two cake pans. If you want to be 100% sure, use a food scale to measure the batter equally into the pans. This is how we know the cakes will bake for the same amount of time.
- Make sure the cake layers are completely cooled before icing. I like to throw the layers in the fridge so they have a slight chill to them beforehand.
Storing
This chocolate orange cake is pretty much guaranteed to disappear immediately. However, if you do have leftovers, individual slices can be stored in an airtight container in the fridge for up to 3 days.
Or, place a piece of parchment paper over the part of the cake that has been sliced to lock in moisture and prevent it from drying out. Then, place the entire cake uncovered in the fridge for up to 3 days.
Frequently Asked Questions
Made with all-purpose flour, this chocolate orange cake recipe is not naturally gluten free. However, you can easily use gluten free 1:1 flour to make it completely gluten free to fit your needs.
Use a dairy-free milk in the batter and a dairy-free butter or shortening for the icing to make this cake free from dairy.
Yes! Oh my gosh, the flavor combination of zesty orange and deep rich chocolate is amazing and surpassed all my expectations.
I like to add natural flavor with pure orange juice and orange zest.
I made this recipe as a two-tiered 8-inch cake, but it can be adjusted into a variety of different sizes:
Three-tiered cake - Simply prepare the batter as directed, and use three 6-inch cake pans. The cake will be smaller in diameter but taller with an extra layer on top! The smaller cakes should bake for the same amount of time.
9-inch pan - You can use a 9-inch cake pan with the same amount of cake batter. The cake layers will just be a tad thinner. However, the cakes won’t take as long to bake! So, I recommend checking on them after 22 minutes.
Sheet cake - This cake can be made into a 9 x 13 inch sheet cake with the same amount of batter. Check the cake after 22 minutes of baking, and adjust the coking time as needed until a toothpick can be inserted into the center and comes out clean.
for more scrumptious cake recipes, check out my:


PS : If you make this recipe, be sure to leave a star review and comment below! Also be sure to follow along with me on Instagram and Pinterest to stay up to date on all tasty recipes here at The Fit Peach!
Recipe

Orange and Chocolate Cake
Ingredients
For the cake
- 2 eggs
- ⅔ cup sugar
- ⅓ cup coconut oil - melted, any oil or melted butter will work
- ⅔ cup milk - use dairy-free if needed
- ½ cup orange juice - unsweetened
- 1 teaspoon vanilla extract
- 2 cups flour - use gluten free 1:1 if needed
- ⅔ cup cocoa powder
- 1 tablespoon orange zest - approx. 1 orange
- 2 teaspoon baking soda
- 1 teaspoon baking powder
- ¼ teaspoon sea salt
- ⅔ cup hot water
For the icing
- 1 cup unsalted butter - softened, use dairy-free if needed
- ¼ teaspoon sea salt
- 3 - 4 cups powdered sugar
- 2 tablespoon orange juice
- 1 tablespoon orange zest - approx. 1 orange
- ½ cup shaved chocolate
Instructions
- Preheat oven to 350 F. In a large mixing bowl, whisk together the eggs, sugar, melted coconut oil, milk, orange juice, and vanilla extract.
- Fold in the flour, cocoa powder, orange zest, baking soda, baking powder, and sea salt until the flour is about 90% combined. The batter will be fairly thick.
- Pour the hot water over the batter and gently whisk to incorporate. The batter will thin out pretty quickly. Stir until no flour clumps remain.
- Distribute the batter equally into two greased 8 inch cake pans. Bake in the oven for 30 - 35 minutes until you can insert a toothpick into the center and it comes out clean. Let the cakes cool before removing them from the pan. Once they are completely cool, place the cake layers in the fridge to chill while you prepare the icing. This just makes icing the cake easier.
- For the icing, beat together the softened butter with the sea salt in a mixing bowl for at least 2 minutes until light and fluffy. Then slowly add the powdered sugar to the bowl in ½ cup increments along with the orange juice and orange zest. Continue to mix while adding in the powdered sugar until you reach your desired consistency. Then gently fold in the shaved chocolate. Don’t over mix the chocolate or you risk darkening the color of the icing.
- To assemble the cake, first shave the tops off the cake layers if needed. This helps ensure a stable even cake. Then place one layer on a turntable with about ⅓ of the icing on top. Use an offset spatula to spread the icing over top, allowing it to spread over the edges. Place the second cake layer on top along with another ⅓ of the icing on top. Again use the spatula to spread the icing in an even layer. Then use the remaining icing around the edges of the cake. Use a cake scraper or a knife to smooth the top and sides of the cake. There will be a few lumps and bumps from the chocolate which is okay!
- If desired, top the cake with a few orange slices and twists. Use a sharp knife to cut it into slices and enjoy!

Hi! Thank you for sharing your recipe! I can’t wait to make this cake for my family. Would you mind sharing what chocolate you used in the icing; if it was dark, semisweet, or milk chocolate?
Thank you again!
Hi! I used dark chocolate (my favorite). Semi-sweet would be my next choice though.