


How to Make a Small Simple Charcuterie Board
Learn how to whip up a show-stopping easy, simple, and small charcuterie board that's sure to impress your guests! Whether you're making a small charcuterie board for two or a modest gathering, get all the tips and tricks on how to make a perfect board. For everyone from beginner to pro, the step-by-step instructions will guarantee you create an epic easy charcuterie board.
Impress your guests with a simple Small Charcuterie Board
I’ve made my fair share of charcuterie boards over the last decade and based on this reader’s review, “Thank you, Ansley, for your tips and tricks to style a beautiful charcuterie board. It's hard to know where to begin sometimes. Your design steps and recommended meats, cheeses and fillers are so helpful”, I’m pretty darn good at it.
Get ready because I’m going to show you how to whip up a show-stopping easy, simple, and small charcuterie board that's sure to impress your guests! Whether you're making a small charcuterie board for two or a modest gathering, get all the tips and tricks on how to make a perfect board. For everyone from beginner to pro, the step-by-step instructions will guarantee you create an epic easy charcuterie board.
An easy charcuterie board is SUCH a great way to level up your entertaining skills. Whether you're making one for a date-night-in, a Friday afternoon happy hour, or an impromptu gathering with friends, I've got you!
Check out my Steak Salad, Chicken Piccata, Lo Mein, and Baked Falafel recipes too!
Jump to:
- Impress your guests with a simple Small Charcuterie Board
- Simple Charcuterie Board Tips
- How to choose a Small Simple Charcuterie Board
- Small & Simple Charcuterie Board Ingredients
- Small Charcuterie Board Ideas: The Meats and Cheese
- How to Make a Charcuterie Board in 5 Easy Steps
- What to Serve with this Simple Charcuterie Board
- How to store a Small Charcuterie Board
- Mini Charcuterie Board Ideas FAQs
- More Popular Recipes from The Fit Peach
- Recipe
- Reviews
Simple Charcuterie Board Tips
I know creating your own simple charcuterie board can seem daunting. Here are a few tips and tricks to ensure your board is easy to put together and delicious:
- Don't stress too much. One of the best things about this easy charcuterie board is that there are no clear cut rules. It's hard to mess one up! Your charcuterie board doesn't have to look like a boogie styled masterpiece. Use the tips I've listed out above on how to properly lay out your elements so they look nice and let the rest be!
- Be sure to check your fridge and pantry. A charcuterie board is a great way to use up things you already have on hand. I bet you have a half eaten box of crackers in your pantry or a bag of mixed nuts or maybe a carton of strawberries you forgot you had.
- When laying out your items, just remember to start with the largest items first and work your way down to the smallest. Lay those out first and use the smaller items like the crackers and fillings to bulk up your easy charcuterie board.
How to choose a Small Simple Charcuterie Board
You don't need an expensive Pottery Barn marble board (although they are gorgeous) to make a beautifully elegant charcuterie platter. You probably already have something in your kitchen that's perfect for a small charcuterie board! Here are a few easy things to use:
- Salad plate - This is perfect for a small charcuterie board for 2- 3 people.
- Dinner plate - Use a dinner plate as your board when serving 4 - 6 guests.
- Charger - If you have a charger, the thing that goes under a dinner plate, is great for serving a larger party of 6 - 8 people.
- Cookie sheet - Use a cookie sheet with some people parchment paper, like I used in this s'mores charcuterie board, to make a board for a small gathering. This will serve anywhere from 6 - 12 people depending on the size of your cookie sheet.
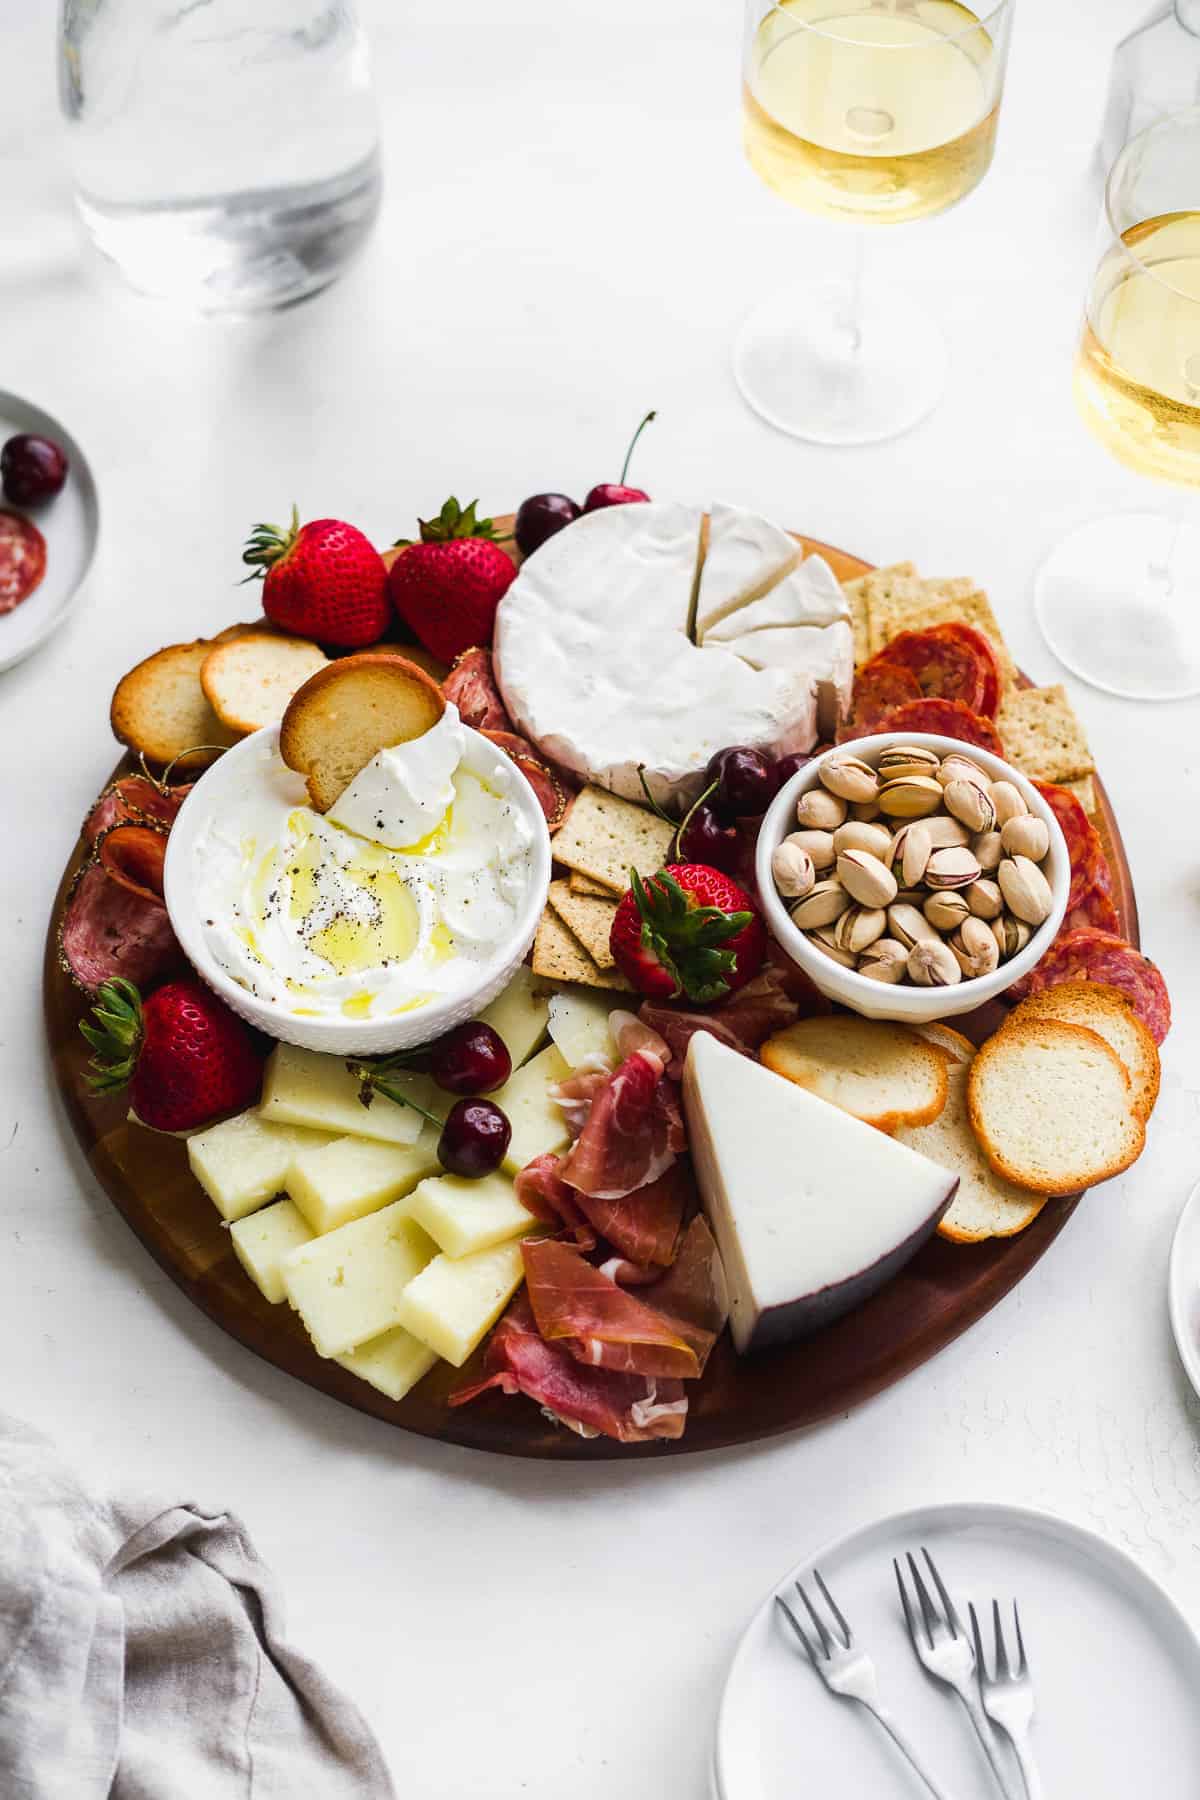
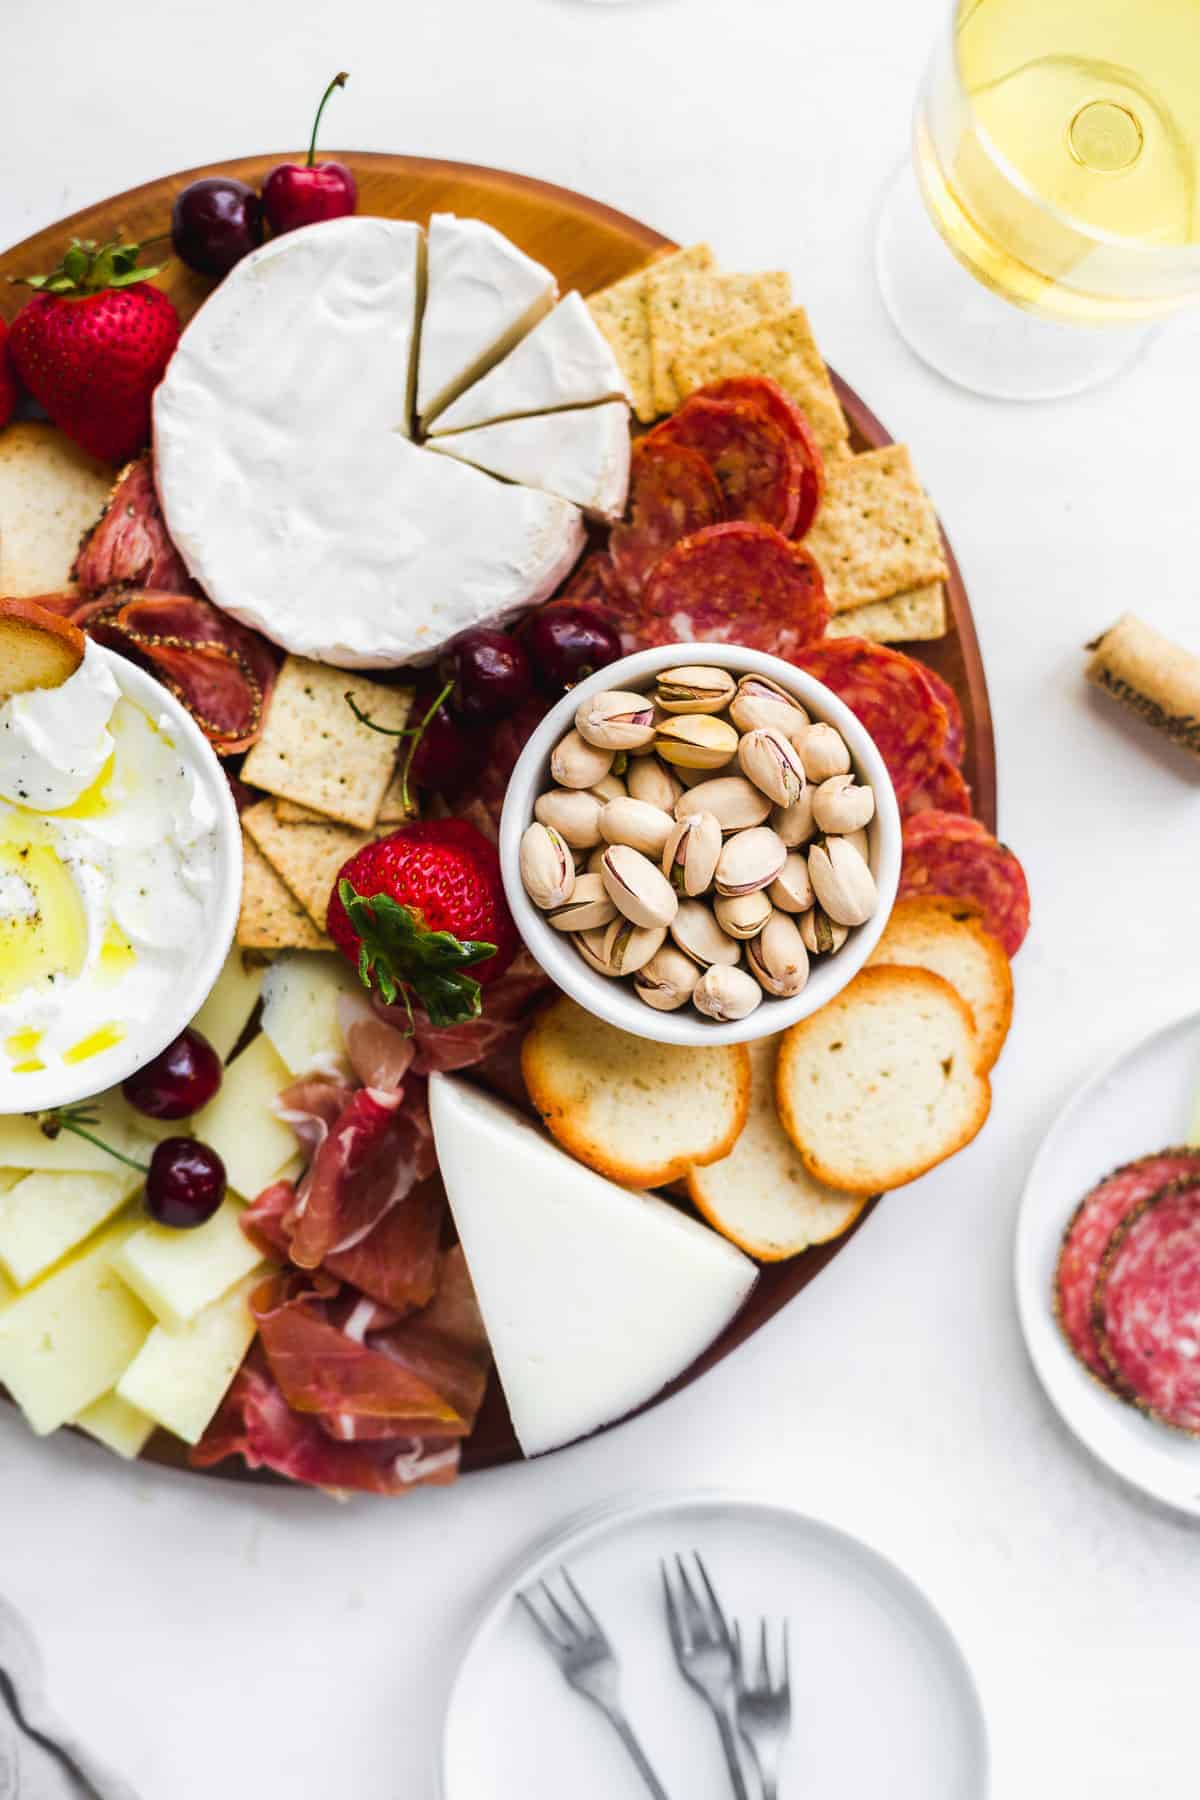
Small & Simple Charcuterie Board Ingredients
If you get overwhelmed just thinking about everything that goes into a simple charcuterie board, try to break it out into these 5 categories:
Cheese
I'm of the opinion that you can't have a charcuterie board without cheeses. Since we're making a small charcuterie board, stick with 2 or 3 varieties of cheeses with different textures. More on how to pick your cheeses below.
Meats
This is my husband's favorite part of any simple charcuterie board. Again, since we're making a smaller board, opt for 2 -3 different cuts of meat. If you're making a board for just 2 people, I recommend selecting just 2. See below section on selecting your meats.
Crackers
I'm willing to bet you have a box of crackers in your pantry. This is an easy way to add bulk to your easy charcuterie board and provide people a salty snack. Don't have crackers? No problem, a baguette works great or you can toast your own bread at home!
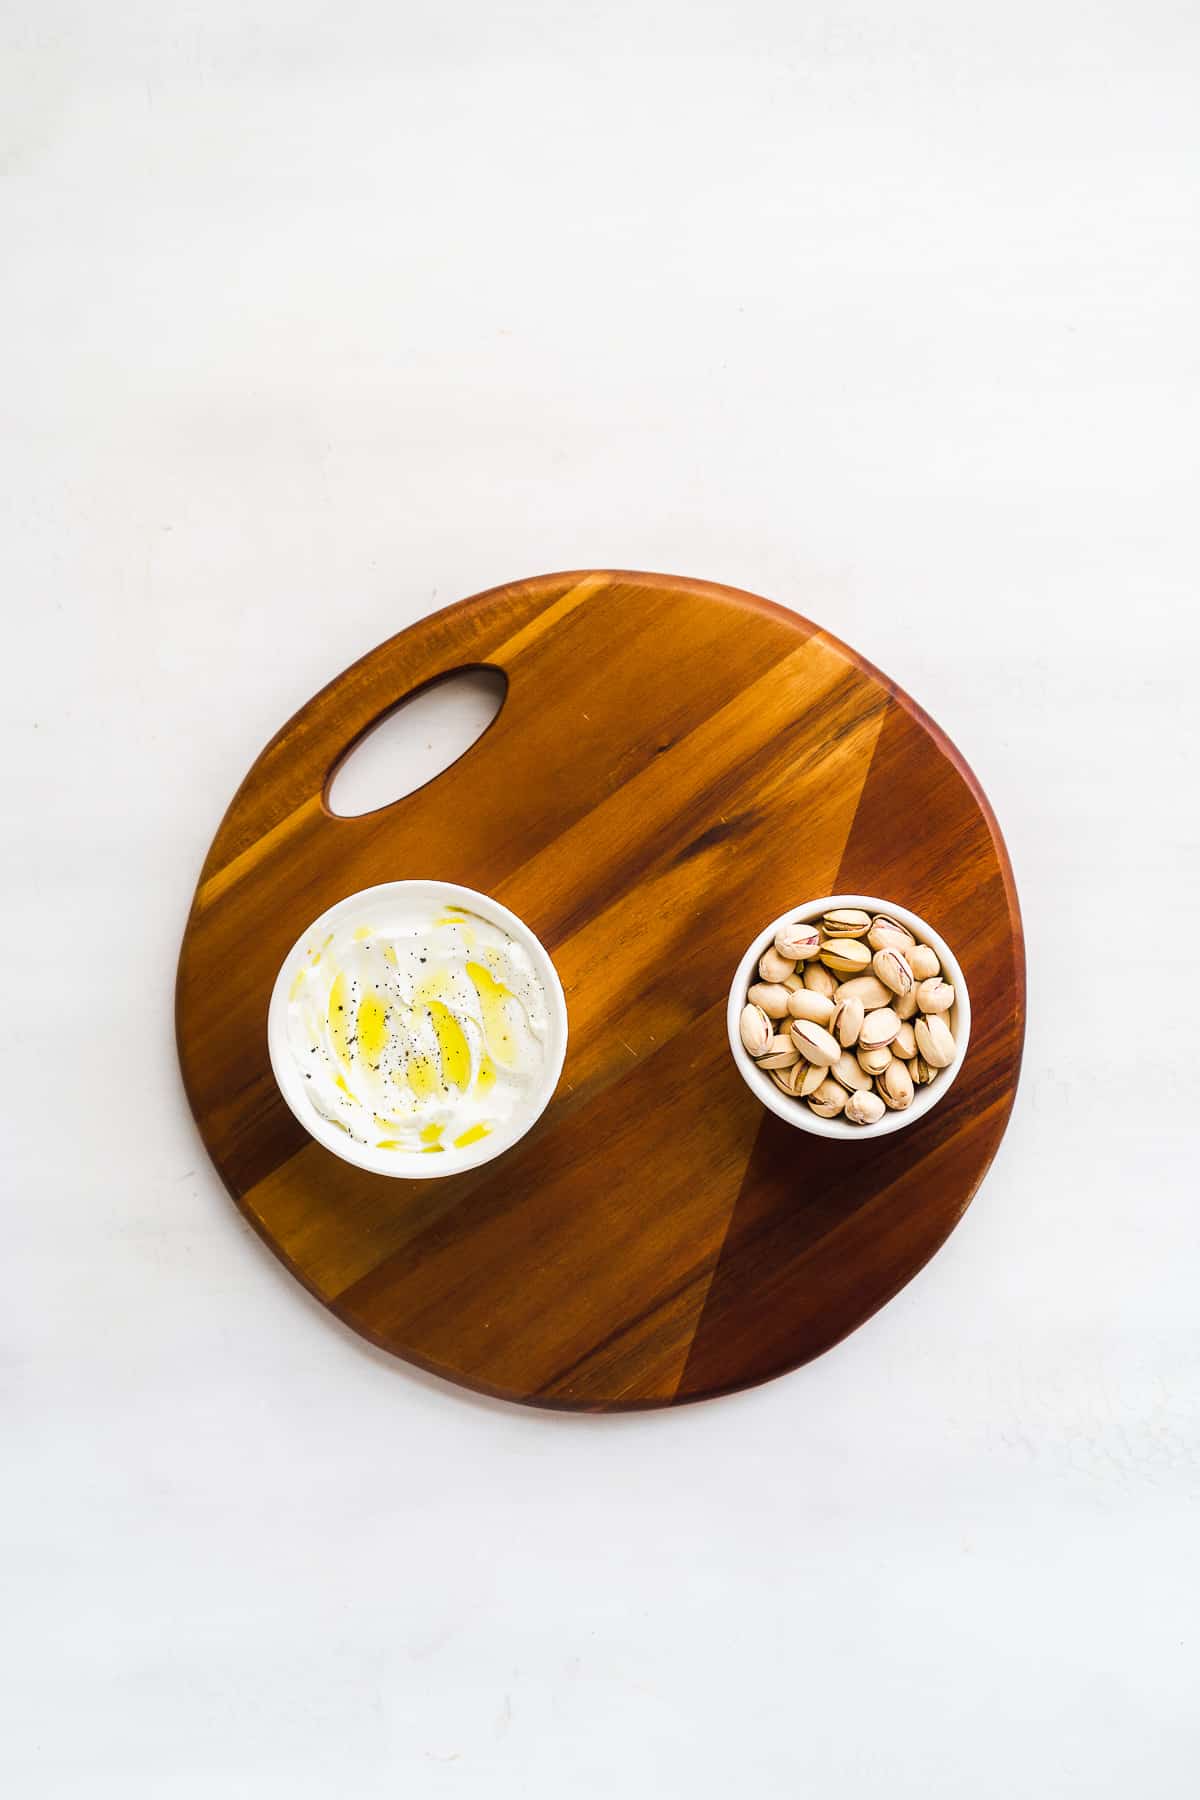
Snacks
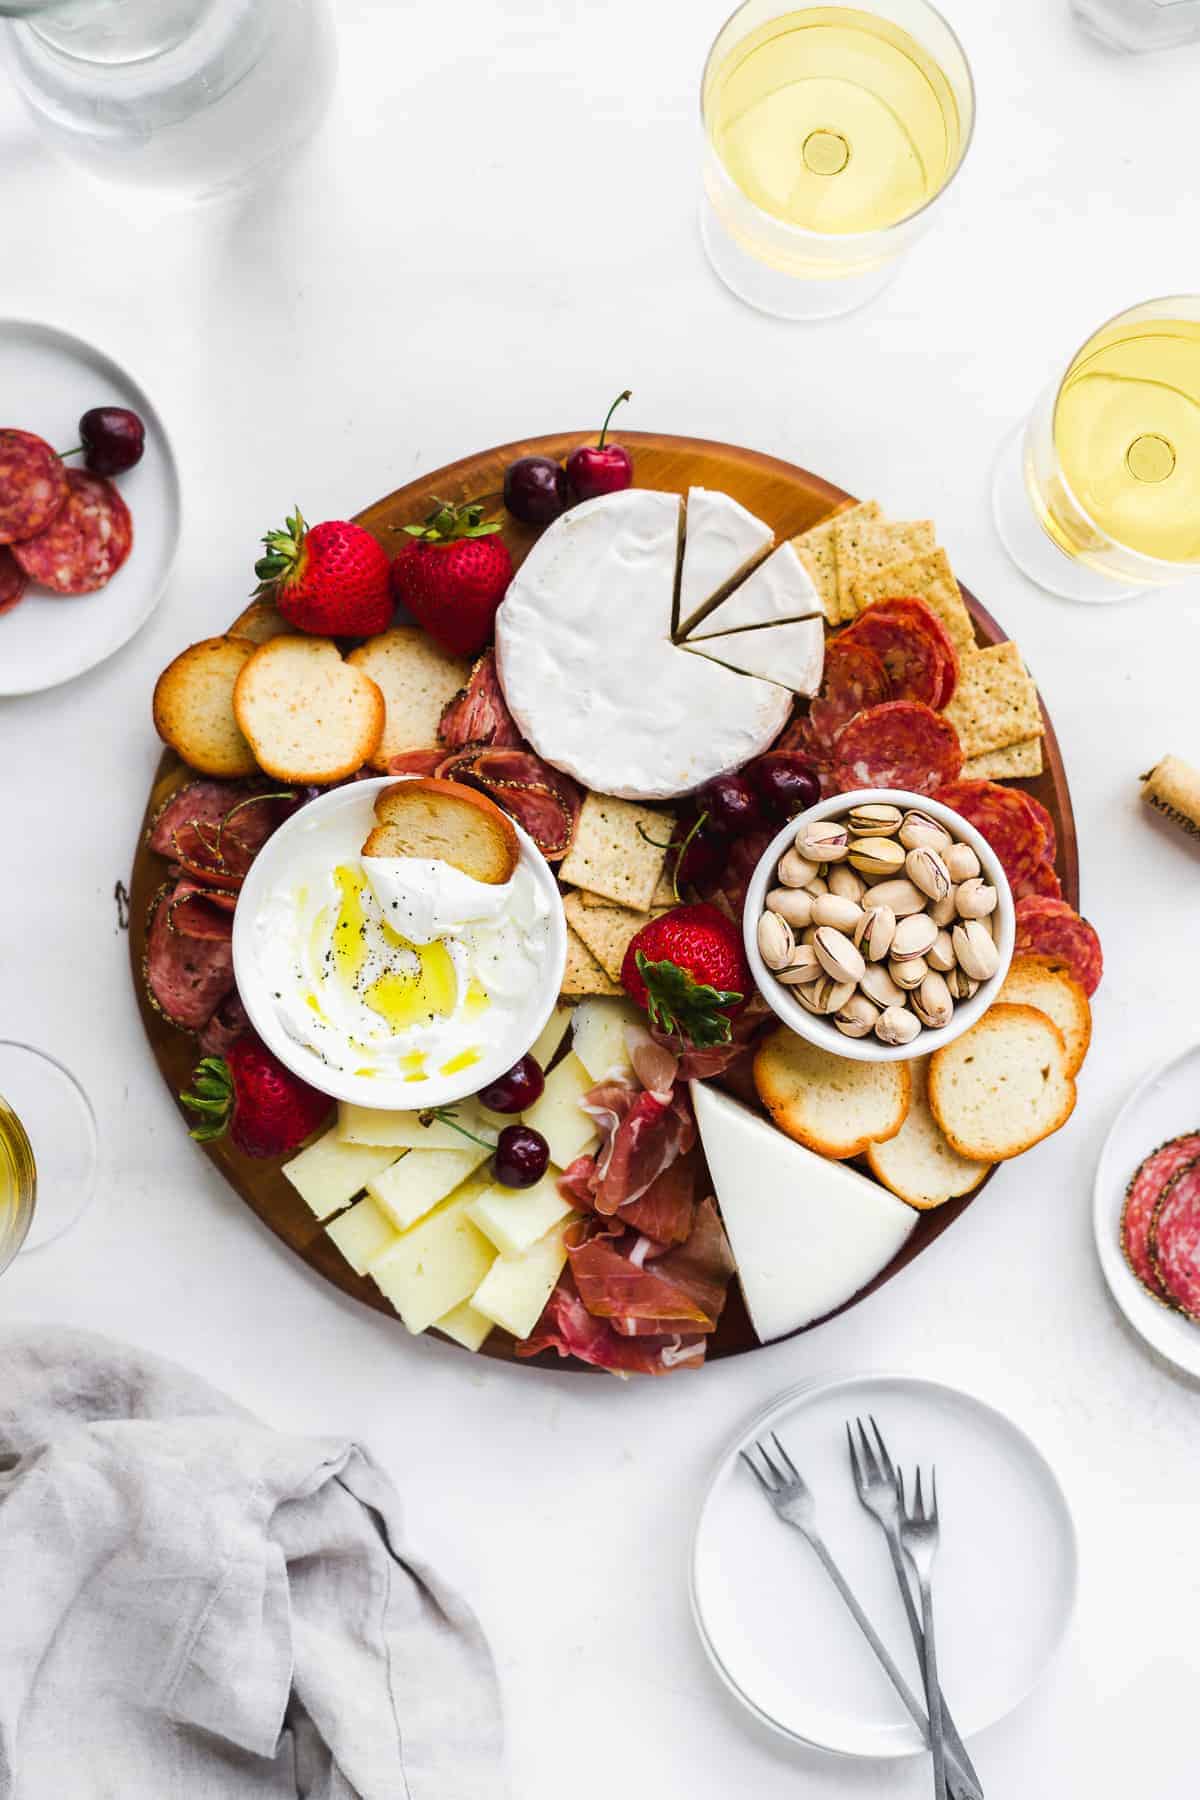
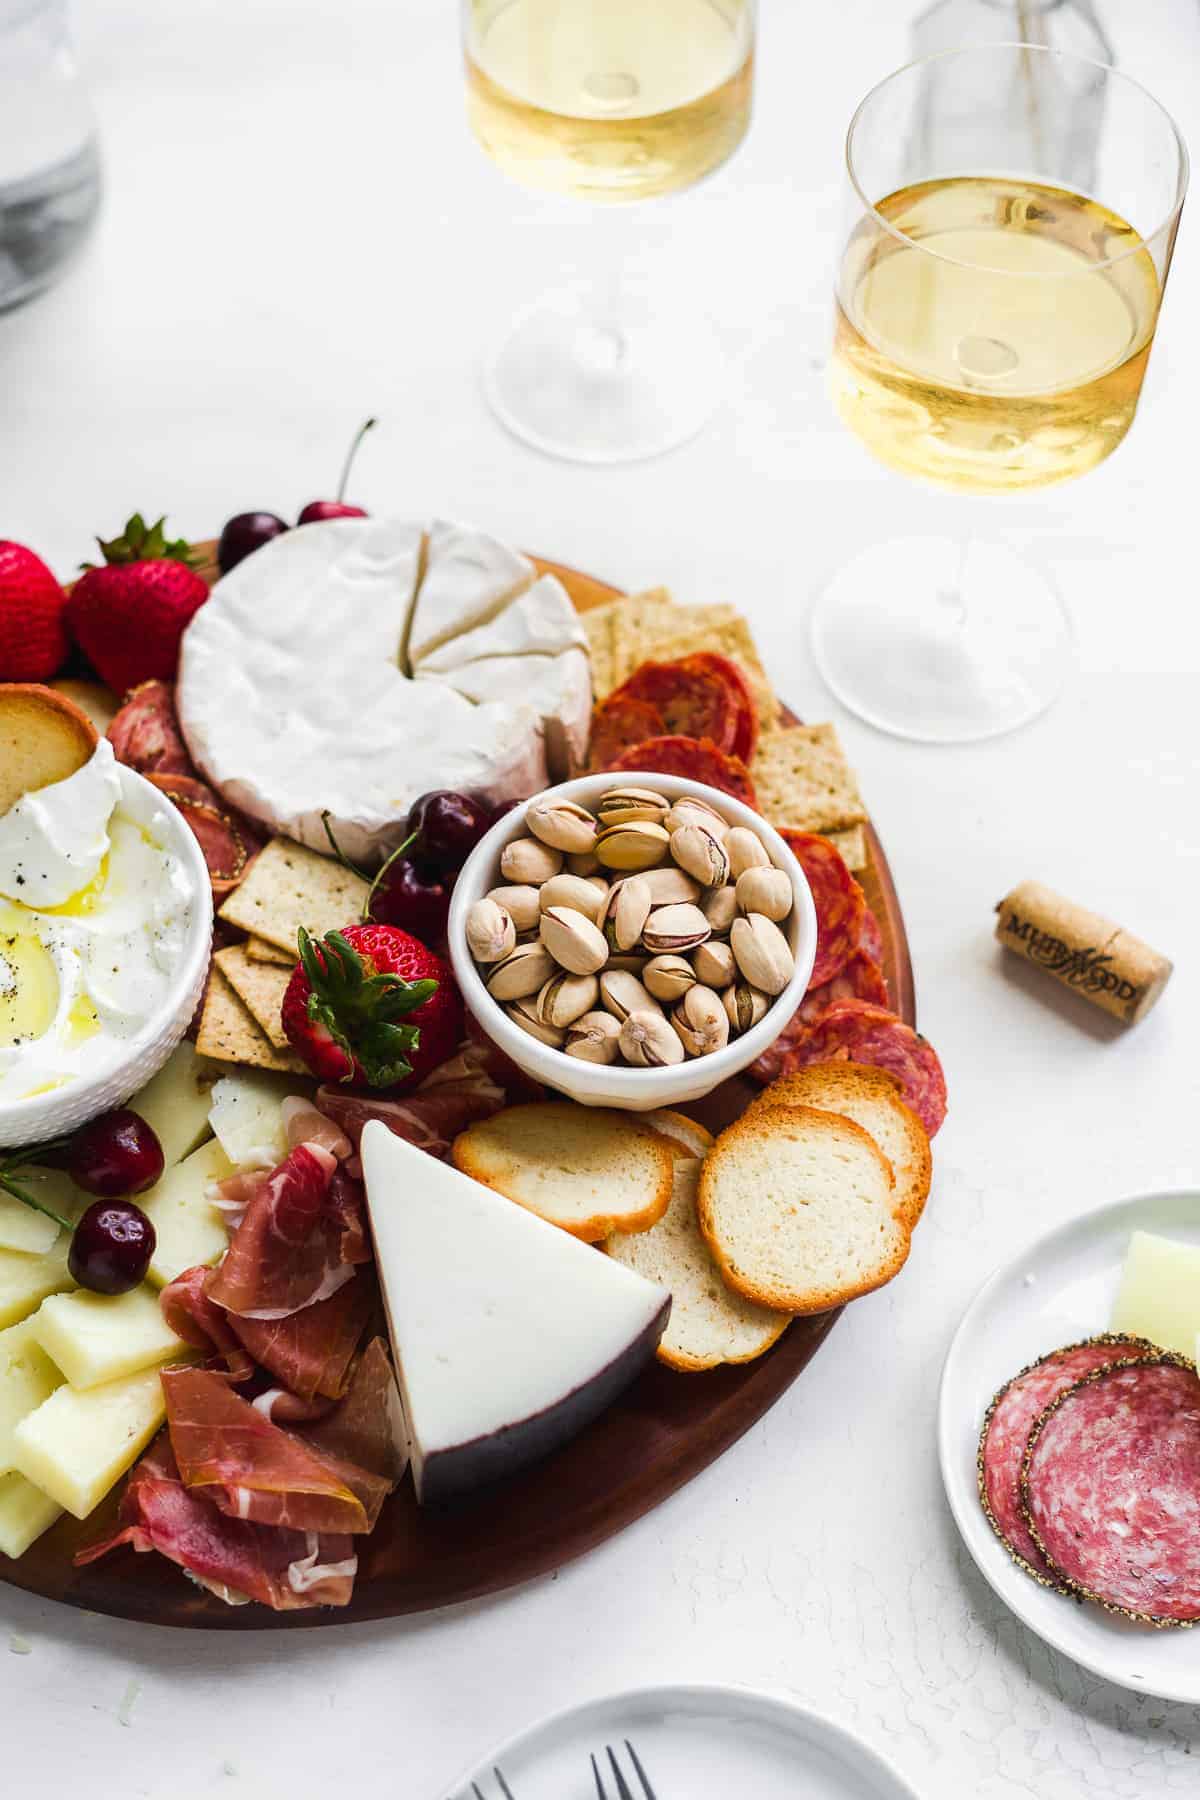
A bowl filled with a "snack" adds some height to the board. Get creative and use whatever you have on hand! A dip like hummus or whipped goat cheese is great for this or a finger snack like olives or almonds. I used unshelled pistachios in my board below.
Fillers
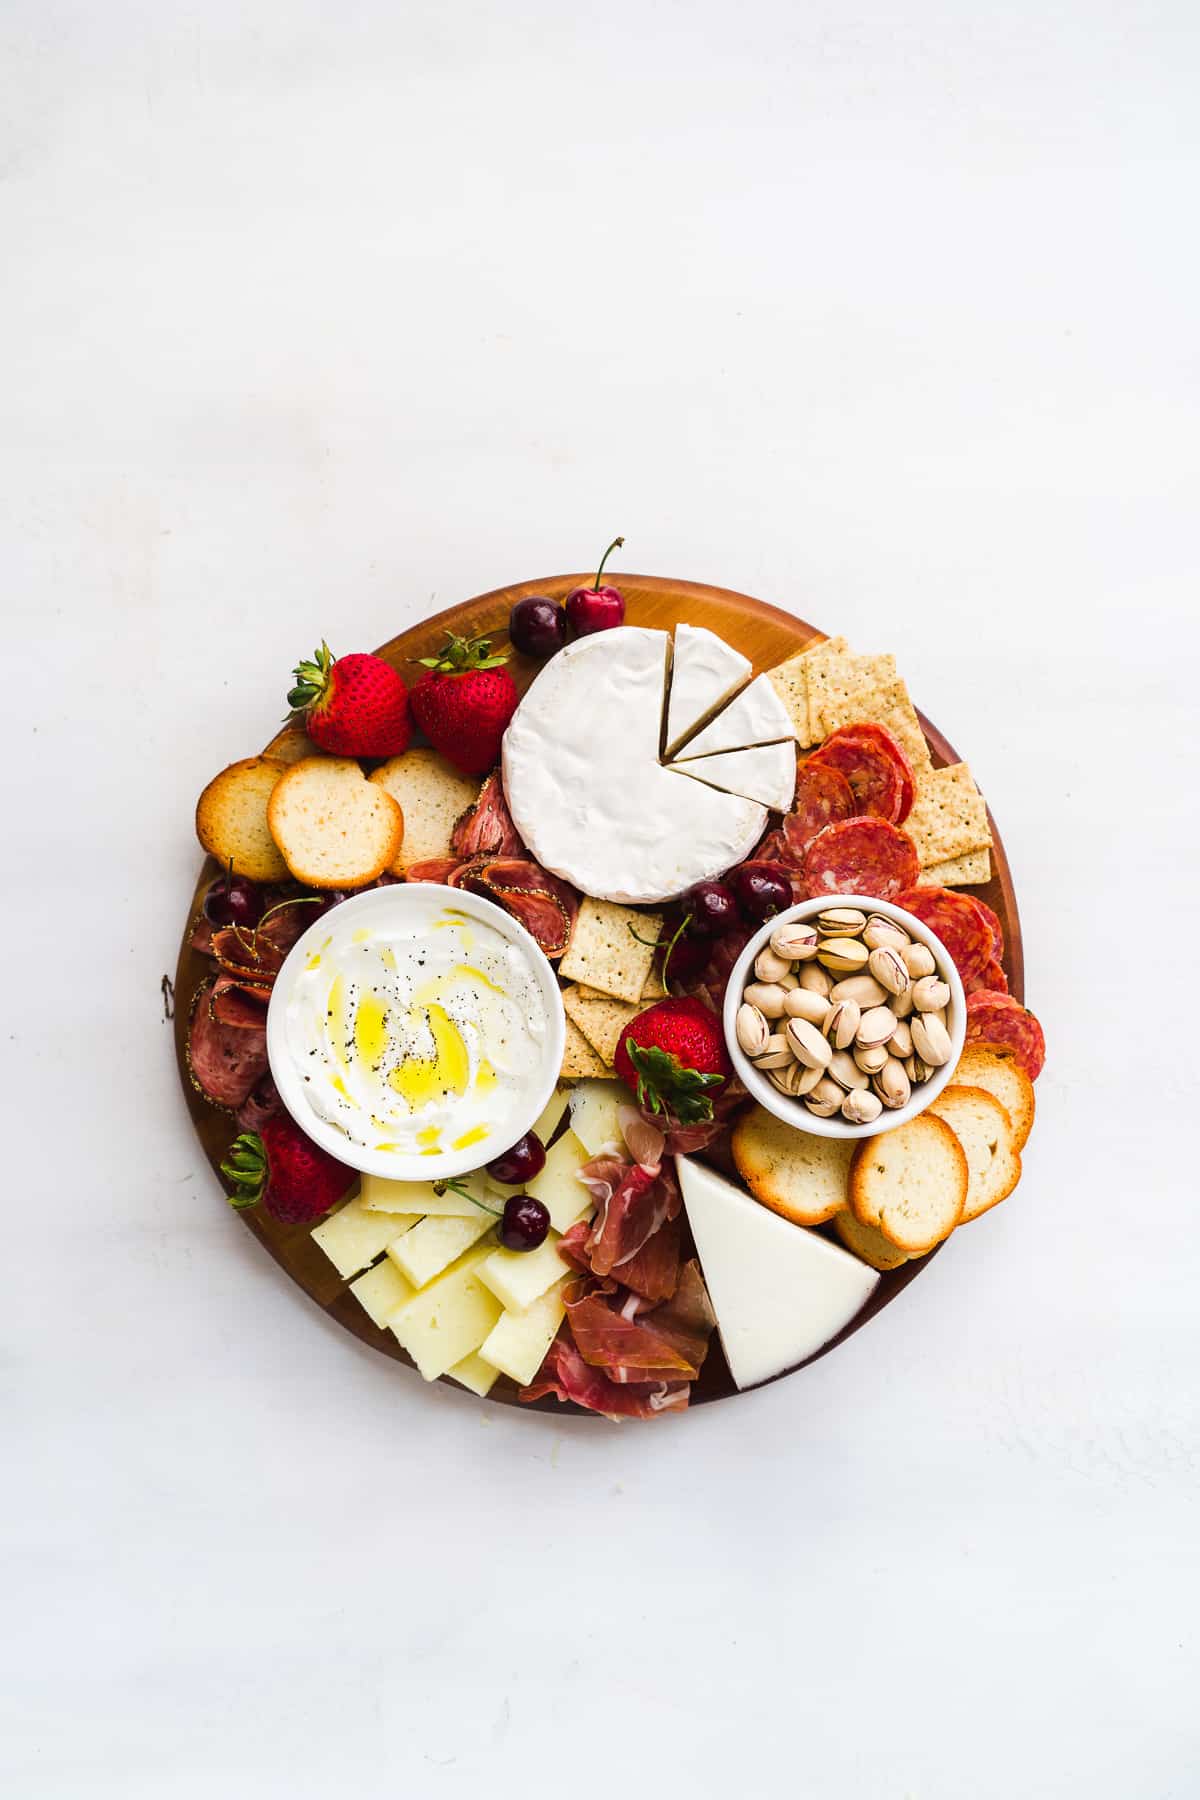
The final touches of your simple charcuterie board should be a few random things you want to use to fill in the empty spaces. Fruit is a great way to do this. I used strawberries and cherries in the board below as they were in season and I already had them on hand. Apple or orange slices are also great as well as any dried fruit like cranberries or apricots. Check your fridge and pantry - I'm sure you have something you want to use up!
Small Charcuterie Board Ideas: The Meats and Cheese
This step is not as complicated as it seems. They key to choosing your cheeses and meats for your easy charcuterie board is variety. Variety in shape, texture, color, flavor, etc. This not only is pleasing to the eye when you place them on your board but it also provides your guests with different styles of cheeses and meats so they have a selection to choose from.
Cheeses
There are soft cheese, hard cheeses, cheese spreads, etc. I recommend selecting at least 1 soft cheese and 1 hard. If you're into it or making a board for a bigger crowd, a spread like labneh or whipped feta is great to throw into the mix.
My favorite cheeses to use are:
- Soft goat cheese - Drunken Goat is always a fan favorite
- Sharp cheddar - Opt for a really nice sharp cheddar like Kerrygolds
- Manchego cheese - This is a firm sheep's milk cheese
- Brie - I've recently discovered goat's milk brie and it's phenomenal
- Smoked cheeses - Theses are great to add a different flavor to the mix
- Whipped cheeses - Light and creamy cheeses always a hit. I used labneh in this board with a quick drizzle of olive oil
Meats
For meats, you also want to stick with the rule of variety. If making an easy charcuterie board for two, I recommend 2 different styles of meat, one that is sliced thicker and one thinner. It's also a plus if they both have different flavors - like one that is spicy and one on the sweeter side.
My favorite meats to use are:
- Salami - This is a thicker cut of meat and can also be spicy
- Speck - Thinner in size and can have a smokey flavoring
- Prosciutto - A popular charcuterie meat as it's thin, silky, and flavorful
- Soppressata - Another fan favorite which can be sweet or spicy depending on the herbs used

How to Make a Charcuterie Board in 5 Easy Steps
Now that you have your board picked out along with your meats and cheeses, let's start assembling your easy charcuterie board!
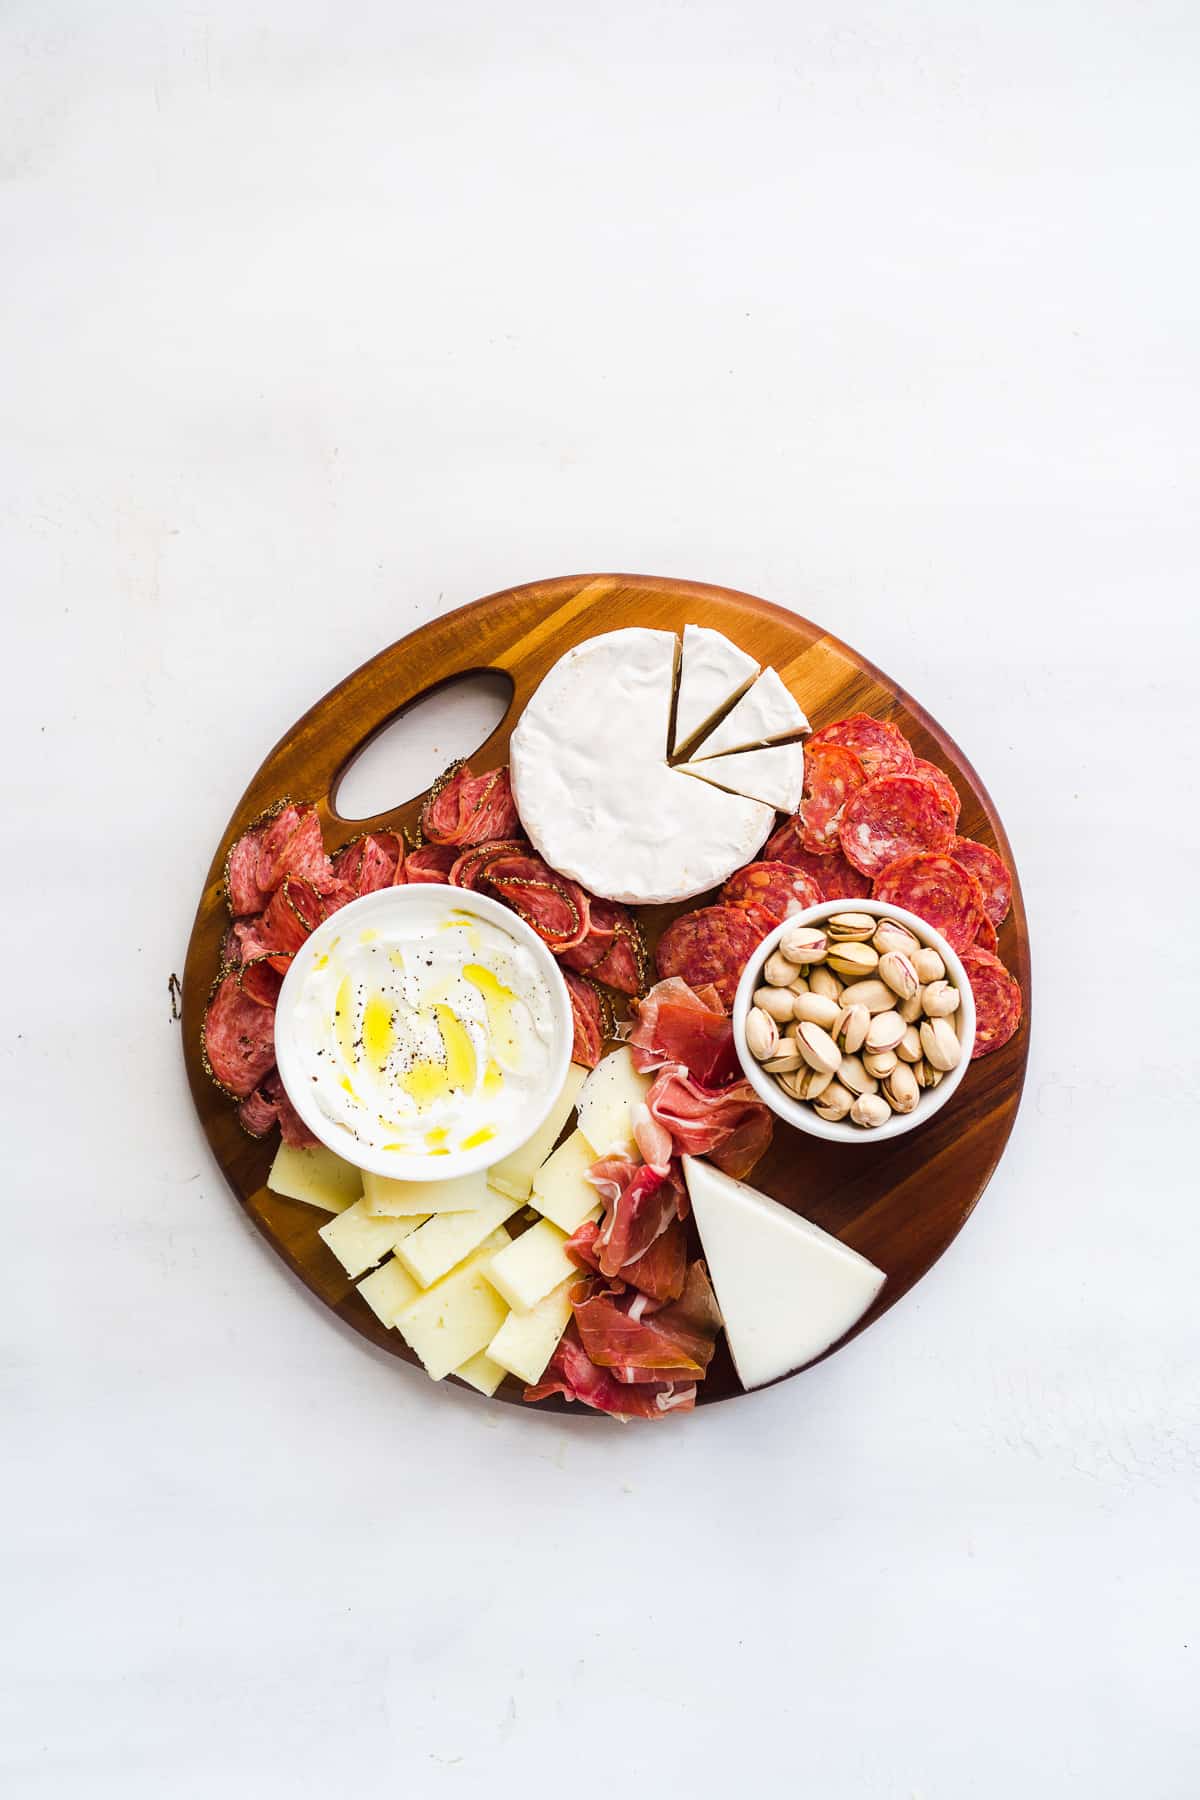
Step 1 : Place your bowls on the board
If using small snack bowls, place them on your board first. This is important to do first as these items are "fixed" in shape. In other words, we can't make them smaller or bigger so it's smart to lay them out first and build around them.
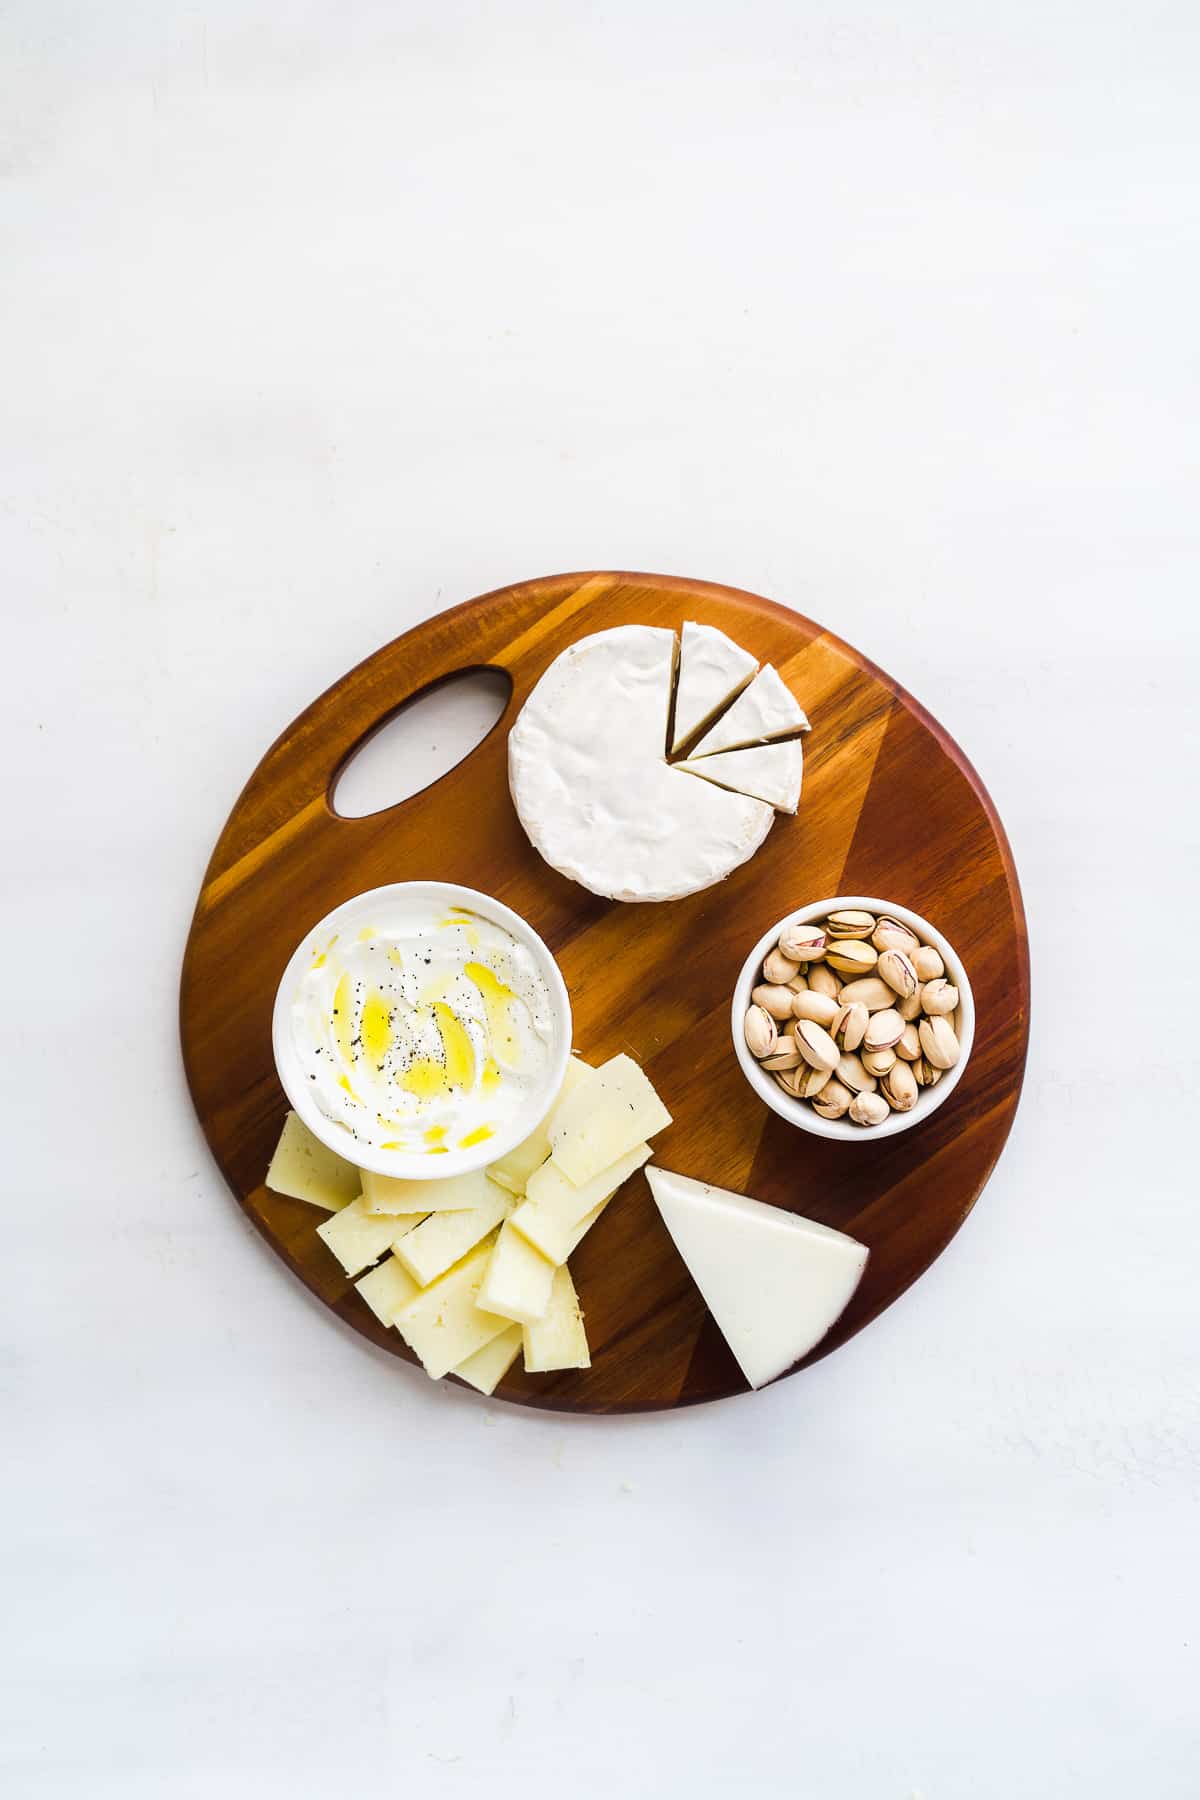
Step 2 : Add your cheeses
Next, lay out your cheeses on the board. We do this step next as the cheeses are typically the next largest item. Because we do have the ability to slice them need be to make them fit, we have a little flexibility when it comes to spacing them out.
Try to place the cheeses at opposite ends of the board and not all right next to each other. You can also get creative with the shape. For example, I went ahead and sliced up my hard cheese into pieces and laid them out in a pile. This also makes it easier for guests to pick up instead of cutting a super hard cheese like it's an old tree stump (we've all been there, it's awkward).
Step 3 : Layer in the meats
Once the cheeses are set, fill in the areas around them with your meats. Again, the key is variety. Lay out your thicker meat in a pile on top of each other and pinch the thinner meat into little folds in a row.
It can be fun to create a "flower-like" fold with one of your circular meats. To do this, fold each one in half, and then again in half so it's now in a triangular shape. Place each of the triangles around a bowl or cheese and tuck the point of each one underneath another.
Step 4 : add the crackers
After the meats are all on the board, it's time to add your crackers or bread. This part isn't rocket science, simply add a handful of crackers into any of the large empty spaces on your board. You can style them in a line or pile them on top of each other.
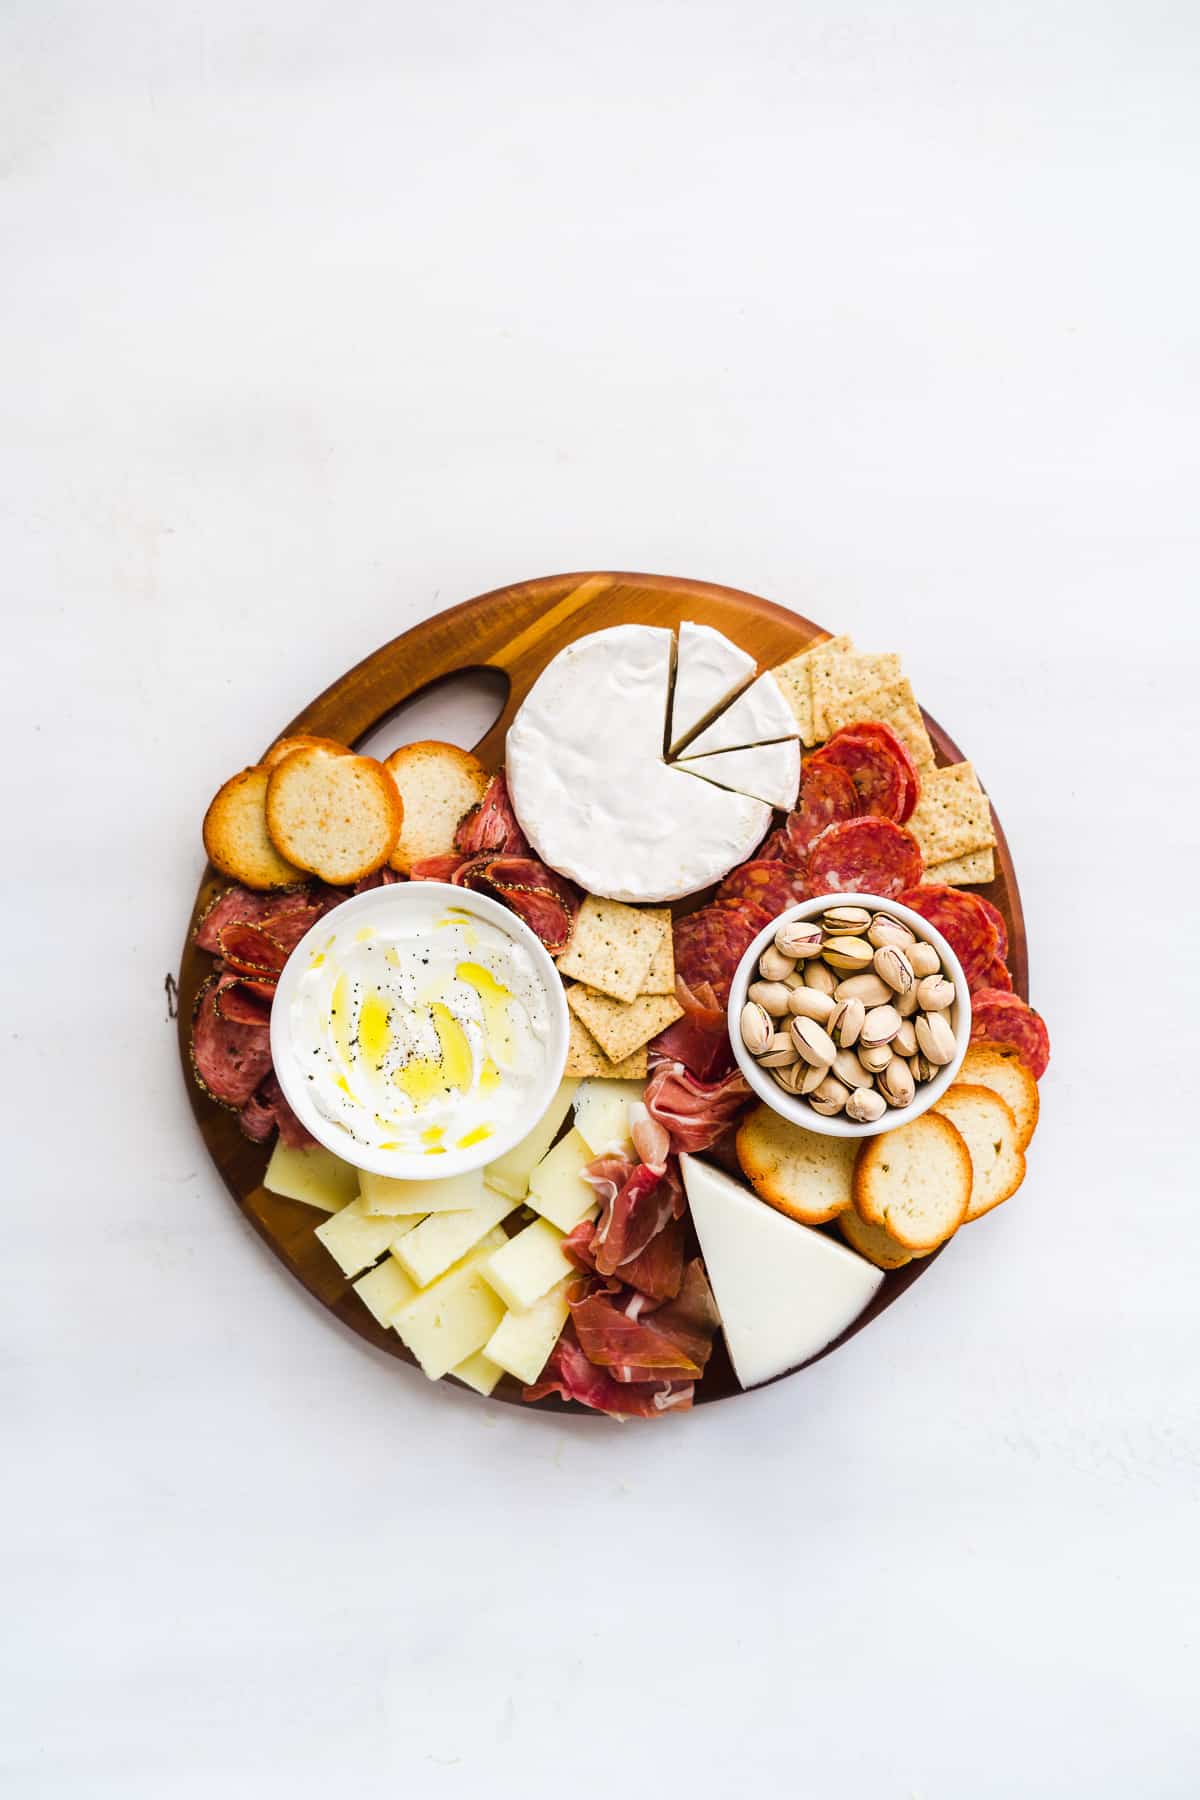
Step 5 : fill in empty spaces
Finally, with any remaining bare spaces, add in your fillings. I used strawberries and cherries for this and simple sprinkled them into the board where there was an empty space or an area that just needed a little more color. Again, this step isn't rocket science and you don't have to use a whole lot.
What to Serve with this Simple Charcuterie Board
To serve your simple charcuterie board, make sure to lay out some plates, napkins, and utensils for your guests to use. Most simple charcuterie boards don't require utensils but it's always a good idea to have them there just in case. If you have a spreadable dip, you will need a knife as well.
And of course, what is an easy charcuterie board without wine?! This part is totally up to you and your guests. I like to offer a few options of wine if I'm hosting so people have a choice.
If it's just my husband and I, we typically go for a smooth full-bodied red. In the summer, a chilled Sauvignon Blanc is always a hit or a light rose'. If you're a red drinker like me, I recommend a nice Malbec or Cabernet.

How to store a Small Charcuterie Board
To store your charcuterie board, first take off any breads or crackers. These can dry out quickly so I recommend storing them separately in an airtight container on the counter.
For the rest of the board, place saran wrap, aluminum foil, or a lid over your board to keep it as air tight as possible. Store it in the fridge to keep the cheese, meats, and fruit chilled where it will stay fresh for 3 days.
When ready to enjoy, simply sprinkle the crackers and/or bread on the board again and dig in!
Mini Charcuterie Board Ideas FAQs
I get it, charcuterie boards can get expensive and FAST. The best way to make a beautiful simple charcuterie board without cleaning out your wallet is to look in your fridge and pantry to see what you already have.
Do you have some crackers you can throw on the board or a handful of fruit? I bet you have an opened bag of nuts somewhere in there too to sprinkle on your board.
When it comes to the meats and cheeses, try to look in the prepackaged deli meat and cheese section for a package with both a meat and cheese. Most grocery stores are carrying something like a package of salami and slices of cheese these days and they are typically much less expensive as a block of cheese or fresh cut meat.
If yo have a Trader Joe's near you, they are the unsung hero of a cheap and simple charcuterie board with very affordable options.
Yes! A salad or dessert plate is perfect as your platter for a personal charcuterie board. I recommend using 1 cheese and 2 meats or 2 cheeses and 1 meat. Then sprinkle in a few pieces of fruit (like apple slices and some grapes) and a handful of crackers and you're ready to dine!
More Popular Recipes from The Fit Peach
For more entertaining recipes, check out my:

PS : If you make this recipe, be sure to leave a star review and comment below! Also be sure to follow along with me on Instagram and Pinterest to stay up to date on all tasty recipes here at The Fit Peach!
Recipe

Small Easy Charcuterie Board Ideas
Ingredients
Snacks
- ½ cup unshelled pistachios
Cheeses
- 4 oz soft goat cheese
- 1 wheel brie cheese
- 4 oz smoked white cheddar cheese
- ½ cup labneh - drizzled with olive oil
Meats
- 2 - 4 oz Peppered Genoa Salami
- 3 - 5 oz Hot Italian Salami
- 4 oz Prosciutto
Crackers
- ½ cup bagel crisps
- ½ cup almond flour crackers
Fillings
- Handful of strawberries
- Handful of pitted cherries
Instructions
- Select your board and lay out any snack bowls you are using first.
- Add the cheeses to the board around the bowls. If you have a hard cheese, go ahead and slice it into pieces and lay them out in a pile.
- Layer your meats on the board alongside the cheeses, making sure to space them out so they aren't all in one area. Fold any thin slices of meat into a triangle to create a "flower-like" style and lay them on top of one another in a row around one of the cheeses.
- Place crackers or bread in large empty spaces on the board.
- Finally, fill in any bare spots with your fillings. You can also use your fillings to add a pop of color in an area of the board that may need it.
- Serve alongside small plates, napkins, utensils, and a bottle of your favorite wine!

Thank you, Ansley, for your tips and tricks to style a beautiful charcuterie board. It's hard to know where to begin sometimes. Your design steps and recommended meats, cheeses and fillers are so helpful.
Hi Mary Ann! Thank you - I'm so glad you found them helpful 🙂
All the pairing suggestions were great - thank you
Happy to hear the tips were helpful! Have a great week!
Ansley this was so helpful thankyou! I've always struggled making my snack board look presentable and you have some great tips. I put one together last night for my girlfriends and it finally looked good ha!!
Hi Noelle! So glad to hear you found the tips helpful! Charcuterie boards are a lot easier to put together than they look 🙂